搜索到
23
篇与
的结果
-
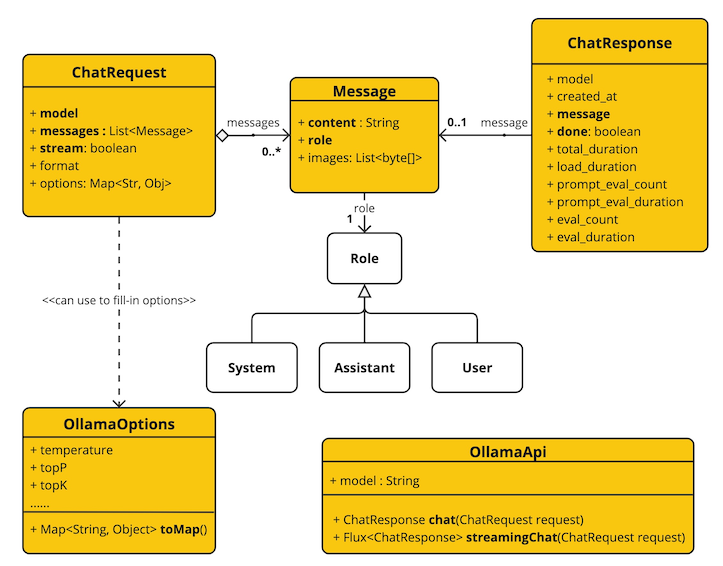
 Spring AI来了 Spring AI来了Spring AI 项目旨在简化包含人工智能功能的应用程序的开发,避免不必要的复杂性。该项目从著名的 Python 项目(例如 LangChain 和 LlamaIndex)中汲取灵感,但 Spring AI 并不是这些项目的直接移植。 该项目的成立相信下一波生成式人工智能应用程序不仅适用于 Python 开发人员,而且将在许多编程语言中普遍存在。Spring AI 的核心提供了抽象,作为开发 AI 应用程序的基础。 这些抽象有多种实现,可以通过最少的代码更改轻松进行组件交换。一、Spring AI 提供以下功能Support for all major Model providers such as OpenAI, Microsoft, Amazon, Google, and Huggingface.(支持所有主要模型提供商,例如 OpenAI、Microsoft、Amazon、Google 和 Huggingface)Supported Model types are Chat and Text to Image with more on the way.(支持的模型类型包括“聊天”和“文本到图像”,还有更多模型类型正在开发中)Portable API across AI providers for Chat and for Embedding models. Both synchronous and stream API options are supported. Dropping down to access model specific features is also supported.(跨 AI 提供商的可移植 API,用于聊天和嵌入模型。 支持同步和流 API 选项。 还支持下拉访问模型特定功能)Mapping of AI Model output to POJOs.(AI 模型输出到 POJO 的映射)Support for all major Vector Database providers such as Azure Vector Search, Chroma, Milvus, Neo4j, PostgreSQL/PGVector, PineCone, Qdrant, Redis, and Weaviate(支持所有主要矢量数据库提供商,例如 Azure 矢量搜索、Chroma、Milvus、Neo4j、PostgreSQL/PGVector、PineCone、Qdrant、Redis 和 Weaviate)Portable API across Vector Store providers, including a novel SQL-like metadata filter API that is also portable.(跨 Vector Store 提供商的可移植 API,包括同样可移植的新颖的类似 SQL 的元数据过滤器 API)Function calling(函数调用)Spring Boot Auto Configuration and Starters for AI Models and Vector Stores.(AI 模型和向量存储的 Spring Boot 自动配置和启动器)ETL framework for Data Engineering(数据工程的 ETL 框架)二、俗语介绍ModelsModels模型是旨在处理和生成信息的算法,通常模仿人类的认知功能。 通过从大型数据集中学习模式和见解,这些模型可以做出预测、文本、图像或其他输出,从而增强跨行业的各种应用程序。有许多不同类型的人工智能模型,每种模型都适合特定的用例。 虽然 ChatGPT 及其生成式人工智能功能通过文本输入和输出吸引了用户,但许多模型和公司提供了多样化的输入和输出。 在 ChatGPT 之前,很多人对 Midjourney 和 Stable Diffusion 等文本到图像生成模型着迷。下表根据输入和输出类型对几种模型进行了分类:InputOutputExamplesLanguage/Code/Images (Multi-Modal)Language/CodeGPT4 - OpenAI, Google GeminiLanguage/CodeLanguage/CodeGPT 3.5 - OpenAI-Azure OpenAI, Google Bard, Meta LlamaLanguageImageDall-E - OpenAI + Azure, Deep AILanguage/ImageImageMidjourney, Stable Diffusion, RunwayMLTextNumbersMany (AKA embeddings)PromptsPrompts是基于语言的输入的基础,指导人工智能模型产生特定的输出。 对于熟悉 ChatGPT 的人来说,提示可能看起来只是发送到 API 的对话框中输入的文本。 然而,它包含的内容远不止于此。 在许多 AI 模型中,提示文本不仅仅是一个简单的字符串。ChatGPT 的 API 在Prompts中具有多个文本输入,每个文本输入都被分配一个角色。 例如,系统角色告诉模型如何行为并设置交互的上下文。 还有用户角色,通常是来自用户的输入。简单来说就是使用LLM等模型时,Prompts是输入,Prompts中输入内容被分配成不同的角色,每个角色控制不同的功能。Prompts的制定就成为重要的输入,可以共享,多人制定。Prompt Templates创建有效的提示涉及建立请求的上下文并用特定于用户输入的值替换部分请求。此过程使用传统的基于文本的模板引擎进行提示创建和管理。 Spring AI 为此使用 OSS 库 StringTemplate。Prompt Templates输入Prompts的模板,在Spring AI中,Prompt Templates可以比作Spring MVC架构中的“视图”。 提供模型对象(通常是 java.util.Map)来填充模板内的占位符。 “‘rendered’”字符串成为提供给 AI 模型的提示内容。EmbeddingsEmbeddings将文本转换为数值数组或向量,使人工智能模型能够处理和解释语言数据。 这种从文本到数字的转换是人工智能如何与人类语言交互并理解人类语言的关键要素。 作为探索人工智能的 Java 开发人员,没有必要理解复杂的数学理论或这些向量表示背后的具体实现。 对它们在人工智能系统中的角色和功能有基本的了解就足够了,特别是当您将人工智能功能集成到应用程序中时。嵌入在实际应用中尤其重要,例如检索增强生成(RAG)模式。 它们能够将数据表示为语义空间中的点,该语义空间类似于欧几里得几何的二维空间,但维度更高。 这意味着就像欧几里得几何中平面上的点根据其坐标可以接近或远离一样,在语义空间中,点的接近反映了含义的相似性。 关于相似主题的句子在这个多维空间中位置更近,就像图表上彼此靠近的点一样。 这种接近性有助于文本分类、语义搜索甚至产品推荐等任务,因为它允许人工智能根据相关概念在扩展语义环境中的“位置”来辨别和分组。您可以将这个语义空间视为一个向量。Output ParsingAI 模型的输出传统上以 java.lang.String 形式到达,即使您要求回复采用 JSON 格式。 它可能是正确的 JSON,但它不是 JSON 数据结构。 它只是一个字符串。 此外,在提示中询问“for JSON”并不是 100% 准确。这种复杂性导致了一个专门领域的出现,涉及创建提示以产生预期的输出,然后将生成的简单字符串解析为可用的数据结构以进行应用程序集成。输出解析采用精心设计的提示,通常需要与模型进行多次交互才能实现所需的格式。这一挑战促使 OpenAI 引入“OpenAI 函数”作为精确指定模型所需输出格式的方法。三、Bringing Your Data to the AI model(将您的数据引入人工智能模型)存在三种技术可用于自定义 AI 模型以合并您的数据:微调:这种传统的机器学习技术涉及定制模型并更改其内部权重。 然而,对于机器学习专家来说,这是一个具有挑战性的过程,而且对于 GPT 等模型来说,由于其规模,资源极其密集。 此外,某些型号可能不提供此选项。提示填充:更实用的替代方案是将数据嵌入到提供给模型的提示中。 考虑到模型的令牌限制,需要技术来在模型的上下文窗口中呈现相关数据。 这种方法通俗地称为“填充提示”。 Spring AI 库可帮助您实现基于“填充提示”技术(也称为检索增强生成 (RAG))的解决方案。函数调用:此技术允许注册自定义用户函数,将大型语言模型连接到外部系统的 API。 Spring AI 极大地简化了支持函数调用所需编写的代码。四、其它说明Retrieval Augmented Generation一种名为检索增强生成 (RAG) 的技术已经出现,旨在解决将相关数据纳入提示中以实现准确的 AI 模型响应的挑战。该方法涉及批处理风格的编程模型,其中作业从文档中读取非结构化数据,对其进行转换,然后将其写入矢量数据库。 从较高层面来看,这是一个 ETL(提取、转换和加载)管道。 RAG技术的检索部分使用向量数据库。作为将非结构化数据加载到矢量数据库的一部分,最重要的转换之一是将原始文档分割成更小的部分。 将原始文档分割成更小的部分的过程有两个重要步骤:将文档拆分为多个部分,同时保留内容的语义边界。 例如,对于包含段落和表格的文档,应避免在段落或表格的中间拆分文档。 对于代码,避免在方法实现的中间拆分代码。将文档的各个部分进一步拆分为大小仅为 AI 模型令牌限制的一小部分的部分。RAG 的下一阶段是处理用户输入。 当人工智能模型要回答用户的问题时,该问题和所有“相似”文档片段都会被放入发送给人工智能模型的提示中。 这就是使用矢量数据库的原因。 它非常擅长查找相似内容。实现 RAG 时使用了几个概念。 这些概念映射到 Spring AI 中的类:DocumentReader:一个 Java 函数接口,负责从数据源加载 List。 常见的数据源有 PDF、Markdown 和 JSON。Document:数据源的基于文本的表示形式,还包含用于描述内容的元数据。DocumentTransformer:负责以各种方式处理数据(例如,将文档分割成更小的部分或向文档添加额外的元数据)。DocumentWriter:允许您将文档保存到数据库中(最常见的是在 AI 堆栈中,矢量数据库)。Embedding:将数据表示为 List,向量数据库使用它来计算用户查询与相关文档的“相似度”。Function Calling大型语言模型(LLM)在训练后被冻结,导致知识过时,并且无法访问或修改外部数据。函数调用机制解决了这些缺点。 它允许您注册自定义用户函数,将大型语言模型连接到外部系统的 API。 这些系统可以为法学硕士提供实时数据并代表他们执行数据处理操作。Spring AI 极大地简化了支持函数调用所需编写的代码。 它为您代理函数调用对话。 您可以将函数作为 @Bean 提供,然后在提示选项中提供该函数的 bean 名称以激活该函数。 您还可以在单个提示中定义和引用多个函数。Evaluating AI responses有效评估人工智能系统响应用户请求的输出对于确保最终应用的准确性和有用性非常重要。 一些新兴技术可以使用预训练模型本身来实现此目的。此评估过程涉及分析生成的响应是否符合用户的意图和查询的上下文。 相关性、连贯性和事实正确性等指标用于衡量人工智能生成的响应的质量。一种方法涉及呈现用户的请求和人工智能模型对模型的响应,查询响应是否与提供的数据一致。此外,利用矢量数据库中存储的信息作为补充数据可以增强评估过程,有助于确定响应相关性。Spring AI 项目当前提供了一些非常基本的示例,说明如何以提示的形式评估响应以包含在 JUnit 测试中。五、功能说明Embeddings ModelsEmbeddings APISpring AI OpenAI EmbeddingsSpring AI Azure OpenAI EmbeddingsSpring AI Ollama EmbeddingsSpring AI Transformers (ONNX) EmbeddingsSpring AI PostgresML EmbeddingsSpring AI Bedrock Cohere EmbeddingsSpring AI Bedrock Titan EmbeddingsSpring AI VertexAI EmbeddingsSpring AI MistralAI EmbeddingsChat ModelsChat Completion APIOpenAI Chat Completion (streaming and function-calling support)Microsoft Azure Open AI Chat Completion (streaming and function-calling support)Ollama Chat CompletionHuggingFace Chat Completion (no streaming support)Google Vertex AI PaLM2 Chat Completion (no streaming support)Google Vertex AI Gemini Chat Completion (streaming, multi-modality & function-calling support)Amazon BedrockCohere Chat CompletionLlama2 Chat CompletionTitan Chat CompletionAnthropic Chat CompletionMistralAI Chat Completion (streaming and function-calling support)Image Generation ModelsImage Generation APIOpenAI Image GenerationStabilityAI Image GenerationVector DatabasesVector Database APIAzure Vector Search - The Azure vector store.ChromaVectorStore - The Chroma vector store.MilvusVectorStore - The Milvus vector store.Neo4jVectorStore - The Neo4j vector store.PgVectorStore - The PostgreSQL/PGVector vector store.PineconeVectorStore - PineCone vector store.QdrantVectorStore - Qdrant vector store.RedisVectorStore - The Redis vector store.WeaviateVectorStore - The Weaviate vector store.SimpleVectorStore - A simple (in-memory) implementation of persistent vector storage, good for educational purposes.六、springboot ai接入Ollama Chat这里以Chat Models为例,创建一个springboot ai项目。说明:由于Openai api key收费,这里以Ollama Chat为LLM演示。本地搭建Ollama Chat下载Ollama https://ollama.com/download/OllamaSetup.exe拉取运行ollama run llama2如果想支持中文拉取这个ollama pull llama2-chinese执行ollama run llama2-chineseollama默认服务地址端口http://localhost:11434/搭建springboot ai项目说明:对JDK有版本要求,最低JDK17.maven:3.8.3JDK:172、引入依赖<?xml version="1.0" encoding="UTF-8"?> <project xmlns="http://maven.apache.org/POM/4.0.0" xmlns:xsi="http://www.w3.org/2001/XMLSchema-instance" xsi:schemaLocation="http://maven.apache.org/POM/4.0.0 https://maven.apache.org/xsd/maven-4.0.0.xsd"> <modelVersion>4.0.0</modelVersion> <parent> <groupId>org.springframework.boot</groupId> <artifactId>spring-boot-starter-parent</artifactId> <version>3.2.4</version> <relativePath/> <!-- lookup parent from repository --> </parent> <groupId>com.example.ai</groupId> <artifactId>ollama-chat</artifactId> <version>0.0.1-SNAPSHOT</version> <name>ollama-chat</name> <description>Ollama Chat project for Spring Boot</description> <properties> <java.version>17</java.version> </properties> <dependencies> <dependency> <groupId>org.springframework.boot</groupId> <artifactId>spring-boot-starter-web</artifactId> </dependency> <dependency> <groupId>org.springframework.boot</groupId> <artifactId>spring-boot-starter-test</artifactId> <scope>test</scope> </dependency> <dependency> <groupId>org.springframework.ai</groupId> <artifactId>spring-ai-ollama-spring-boot-starter</artifactId> </dependency> </dependencies> <build> <plugins> <plugin> <groupId>org.springframework.boot</groupId> <artifactId>spring-boot-maven-plugin</artifactId> </plugin> </plugins> </build> <repositories> <repository> <id>spring-milestones</id> <name>Spring Milestones</name> <url>https://repo.spring.io/milestone</url> <snapshots> <enabled>false</enabled> </snapshots> </repository> <repository> <id>spring-snapshots</id> <name>Spring Snapshots</name> <url>https://repo.spring.io/snapshot</url> <releases> <enabled>false</enabled> </releases> </repository> </repositories> <dependencyManagement> <dependencies> <dependency> <groupId>org.springframework.ai</groupId> <artifactId>spring-ai-bom</artifactId> <version>1.0.0-SNAPSHOT</version> <type>pom</type> <scope>import</scope> </dependency> </dependencies> </dependencyManagement> </project> 编写Controllerpackage com.example.ai.ollamachat.controller; import org.springframework.ai.chat.ChatResponse; import org.springframework.ai.chat.messages.UserMessage; import org.springframework.ai.chat.prompt.Prompt; import org.springframework.ai.ollama.OllamaChatClient; import org.springframework.beans.factory.annotation.Autowired; import org.springframework.web.bind.annotation.GetMapping; import org.springframework.web.bind.annotation.RequestParam; import org.springframework.web.bind.annotation.RestController; import reactor.core.publisher.Flux; import java.util.Map; @RestController public class ChatController { private final OllamaChatClient chatClient; @Autowired public ChatController(OllamaChatClient chatClient) { this.chatClient = chatClient; } @GetMapping("/ai/generate") public Map generate(@RequestParam(value = "message", defaultValue = "Tell me a joke") String message) { return Map.of("generation", chatClient.call(message)); } @GetMapping("/ai/generateStream") public Flux<ChatResponse> generateStream(@RequestParam(value = "message", defaultValue = "Tell me a joke") String message) { Prompt prompt = new Prompt(new UserMessage(message)); return chatClient.stream(prompt); } }application.properties配置spring.application.name=ollama-chat spring.ai.ollama.base-url=http://localhost:11434/ spring.ai.ollama.chat.enabled=true spring.ai.ollama.chat.options.model=llama2 spring.ai.ollama.chat.options.temperature=0.7更多参数配置见文档 https://docs.spring.io/spring-ai/reference/api/clients/ollama-chat.html测试访问http://localhost:8080/ai/generate返回结果{"generation":"\nWhy don't scientists trust atoms? Because they make up everything! \uD83D\uDE02"}说明OllamaApi 聊天接口和构建块图:更多其它LLM接入,后续更新。
 -
Nacos配置管理、Feign远程调用、Gateway网关 SpringCloud实用篇020.学习目标1.Nacos配置管理Nacos除了可以做注册中心,同样可以做配置管理来使用。1.1.统一配置管理当微服务部署的实例越来越多,达到数十、数百时,逐个修改微服务配置就会让人抓狂,而且很容易出错。我们需要一种统一配置管理方案,可以集中管理所有实例的配置。Nacos一方面可以将配置集中管理,另一方可以在配置变更时,及时通知微服务,实现配置的热更新。1.1.1.在nacos中添加配置文件如何在nacos中管理配置呢?然后在弹出的表单中,填写配置信息:注意:项目的核心配置,需要热更新的配置才有放到nacos管理的必要。基本不会变更的一些配置还是保存在微服务本地比较好。1.1.2.从微服务拉取配置微服务要拉取nacos中管理的配置,并且与本地的application.yml配置合并,才能完成项目启动。但如果尚未读取application.yml,又如何得知nacos地址呢?因此spring引入了一种新的配置文件:bootstrap.yaml文件,会在application.yml之前被读取,流程如下:1)引入nacos-config依赖首先,在user-service服务中,引入nacos-config的客户端依赖:<!--nacos配置管理依赖--> <dependency> <groupId>com.alibaba.cloud</groupId> <artifactId>spring-cloud-starter-alibaba-nacos-config</artifactId> </dependency>2)添加bootstrap.yaml然后,在user-service中添加一个bootstrap.yaml文件,内容如下:spring: application: name: userservice # 服务名称 profiles: active: dev #开发环境,这里是dev cloud: nacos: server-addr: localhost:8848 # Nacos地址 config: file-extension: yaml # 文件后缀名这里会根据spring.cloud.nacos.server-addr获取nacos地址,再根据${spring.application.name}-${spring.profiles.active}.${spring.cloud.nacos.config.file-extension}作为文件id,来读取配置。本例中,就是去读取userservice-dev.yaml:3)读取nacos配置在user-service中的UserController中添加业务逻辑,读取pattern.dateformat配置:完整代码:package cn.itcast.user.web; import cn.itcast.user.pojo.User; import cn.itcast.user.service.UserService; import lombok.extern.slf4j.Slf4j; import org.springframework.beans.factory.annotation.Autowired; import org.springframework.beans.factory.annotation.Value; import org.springframework.web.bind.annotation.*; import java.time.LocalDateTime; import java.time.format.DateTimeFormatter; @Slf4j @RestController @RequestMapping("/user") public class UserController { @Autowired private UserService userService; @Value("${pattern.dateformat}") private String dateformat; @GetMapping("now") public String now(){ return LocalDateTime.now().format(DateTimeFormatter.ofPattern(dateformat)); } // ...略 }在页面访问,可以看到效果:1.2.配置热更新我们最终的目的,是修改nacos中的配置后,微服务中无需重启即可让配置生效,也就是配置热更新。要实现配置热更新,可以使用两种方式:1.2.1.方式一在@Value注入的变量所在类上添加注解@RefreshScope:1.2.2.方式二使用@ConfigurationProperties注解代替@Value注解。在user-service服务中,添加一个类,读取patterrn.dateformat属性:package cn.itcast.user.config; import lombok.Data; import org.springframework.boot.context.properties.ConfigurationProperties; import org.springframework.stereotype.Component; @Component @Data @ConfigurationProperties(prefix = "pattern") public class PatternProperties { private String dateformat; }在UserController中使用这个类代替@Value:完整代码:package cn.itcast.user.web; import cn.itcast.user.config.PatternProperties; import cn.itcast.user.pojo.User; import cn.itcast.user.service.UserService; import lombok.extern.slf4j.Slf4j; import org.springframework.beans.factory.annotation.Autowired; import org.springframework.web.bind.annotation.GetMapping; import org.springframework.web.bind.annotation.PathVariable; import org.springframework.web.bind.annotation.RequestMapping; import org.springframework.web.bind.annotation.RestController; import java.time.LocalDateTime; import java.time.format.DateTimeFormatter; @Slf4j @RestController @RequestMapping("/user") public class UserController { @Autowired private UserService userService; @Autowired private PatternProperties patternProperties; @GetMapping("now") public String now(){ return LocalDateTime.now().format(DateTimeFormatter.ofPattern(patternProperties.getDateformat())); } // 略 }1.3.配置共享其实微服务启动时,会去nacos读取多个配置文件,例如:[spring.application.name]-[spring.profiles.active].yaml,例如:userservice-dev.yaml[spring.application.name].yaml,例如:userservice.yaml而[spring.application.name].yaml不包含环境,因此可以被多个环境共享。下面我们通过案例来测试配置共享1)添加一个环境共享配置我们在nacos中添加一个userservice.yaml文件:2)在user-service中读取共享配置在user-service服务中,修改PatternProperties类,读取新添加的属性:在user-service服务中,修改UserController,添加一个方法:3)运行两个UserApplication,使用不同的profile修改UserApplication2这个启动项,改变其profile值:这样,UserApplication(8081)使用的profile是dev,UserApplication2(8082)使用的profile是test。启动UserApplication和UserApplication2访问http://localhost:8081/user/prop,结果:访问http://localhost:8082/user/prop,结果:可以看出来,不管是dev,还是test环境,都读取到了envSharedValue这个属性的值。4)配置共享的优先级当nacos、服务本地同时出现相同属性时,优先级有高低之分:1.4.搭建Nacos集群Nacos生产环境下一定要部署为集群状态,部署方式参考课前资料中的文档:2.Feign远程调用先来看我们以前利用RestTemplate发起远程调用的代码:存在下面的问题:•代码可读性差,编程体验不统一•参数复杂URL难以维护Feign是一个声明式的http客户端,官方地址:https://github.com/OpenFeign/feign其作用就是帮助我们优雅的实现http请求的发送,解决上面提到的问题。2.1.Feign替代RestTemplateFegin的使用步骤如下:1)引入依赖我们在order-service服务的pom文件中引入feign的依赖:<dependency> <groupId>org.springframework.cloud</groupId> <artifactId>spring-cloud-starter-openfeign</artifactId> </dependency>2)添加注解在order-service的启动类添加注解开启Feign的功能:3)编写Feign的客户端在order-service中新建一个接口,内容如下:package cn.itcast.order.client; import cn.itcast.order.pojo.User; import org.springframework.cloud.openfeign.FeignClient; import org.springframework.web.bind.annotation.GetMapping; import org.springframework.web.bind.annotation.PathVariable; @FeignClient("userservice") public interface UserClient { @GetMapping("/user/{id}") User findById(@PathVariable("id") Long id); }这个客户端主要是基于SpringMVC的注解来声明远程调用的信息,比如:服务名称:userservice请求方式:GET请求路径:/user/{id}请求参数:Long id返回值类型:User这样,Feign就可以帮助我们发送http请求,无需自己使用RestTemplate来发送了。4)测试修改order-service中的OrderService类中的queryOrderById方法,使用Feign客户端代替RestTemplate:是不是看起来优雅多了。5)总结使用Feign的步骤:① 引入依赖② 添加@EnableFeignClients注解③ 编写FeignClient接口④ 使用FeignClient中定义的方法代替RestTemplate2.2.自定义配置Feign可以支持很多的自定义配置,如下表所示:类型作用说明feign.Logger.Level修改日志级别包含四种不同的级别:NONE、BASIC、HEADERS、FULLfeign.codec.Decoder响应结果的解析器http远程调用的结果做解析,例如解析json字符串为java对象feign.codec.Encoder请求参数编码将请求参数编码,便于通过http请求发送feign. Contract支持的注解格式默认是SpringMVC的注解feign. Retryer失败重试机制请求失败的重试机制,默认是没有,不过会使用Ribbon的重试一般情况下,默认值就能满足我们使用,如果要自定义时,只需要创建自定义的@Bean覆盖默认Bean即可。下面以日志为例来演示如何自定义配置。2.2.1.配置文件方式基于配置文件修改feign的日志级别可以针对单个服务:feign: client: config: userservice: # 针对某个微服务的配置 loggerLevel: FULL # 日志级别 也可以针对所有服务:feign: client: config: default: # 这里用default就是全局配置,如果是写服务名称,则是针对某个微服务的配置 loggerLevel: FULL # 日志级别 而日志的级别分为四种:NONE:不记录任何日志信息,这是默认值。BASIC:仅记录请求的方法,URL以及响应状态码和执行时间HEADERS:在BASIC的基础上,额外记录了请求和响应的头信息FULL:记录所有请求和响应的明细,包括头信息、请求体、元数据。2.2.2.Java代码方式也可以基于Java代码来修改日志级别,先声明一个类,然后声明一个Logger.Level的对象:public class DefaultFeignConfiguration { @Bean public Logger.Level feignLogLevel(){ return Logger.Level.BASIC; // 日志级别为BASIC } }如果要全局生效,将其放到启动类的@EnableFeignClients这个注解中:@EnableFeignClients(defaultConfiguration = DefaultFeignConfiguration .class) 如果是局部生效,则把它放到对应的@FeignClient这个注解中:@FeignClient(value = "userservice", configuration = DefaultFeignConfiguration .class) 2.3.Feign使用优化Feign底层发起http请求,依赖于其它的框架。其底层客户端实现包括:•URLConnection:默认实现,不支持连接池•Apache HttpClient :支持连接池•OKHttp:支持连接池因此提高Feign的性能主要手段就是使用连接池代替默认的URLConnection。这里我们用Apache的HttpClient来演示。1)引入依赖在order-service的pom文件中引入Apache的HttpClient依赖:<!--httpClient的依赖 --> <dependency> <groupId>io.github.openfeign</groupId> <artifactId>feign-httpclient</artifactId> </dependency>2)配置连接池在order-service的application.yml中添加配置:feign: client: config: default: # default全局的配置 loggerLevel: BASIC # 日志级别,BASIC就是基本的请求和响应信息 httpclient: enabled: true # 开启feign对HttpClient的支持 max-connections: 200 # 最大的连接数 max-connections-per-route: 50 # 每个路径的最大连接数接下来,在FeignClientFactoryBean中的loadBalance方法中打断点:Debug方式启动order-service服务,可以看到这里的client,底层就是Apache HttpClient:总结,Feign的优化:1.日志级别尽量用basic2.使用HttpClient或OKHttp代替URLConnection① 引入feign-httpClient依赖② 配置文件开启httpClient功能,设置连接池参数2.4.最佳实践所谓最近实践,就是使用过程中总结的经验,最好的一种使用方式。自习观察可以发现,Feign的客户端与服务提供者的controller代码非常相似:feign客户端:UserController:有没有一种办法简化这种重复的代码编写呢?2.4.1.继承方式一样的代码可以通过继承来共享:1)定义一个API接口,利用定义方法,并基于SpringMVC注解做声明。2)Feign客户端和Controller都集成改接口优点:简单实现了代码共享缺点:服务提供方、服务消费方紧耦合参数列表中的注解映射并不会继承,因此Controller中必须再次声明方法、参数列表、注解2.4.2.抽取方式将Feign的Client抽取为独立模块,并且把接口有关的POJO、默认的Feign配置都放到这个模块中,提供给所有消费者使用。例如,将UserClient、User、Feign的默认配置都抽取到一个feign-api包中,所有微服务引用该依赖包,即可直接使用。2.4.3.实现基于抽取的最佳实践1)抽取首先创建一个module,命名为feign-api:项目结构:在feign-api中然后引入feign的starter依赖<dependency> <groupId>org.springframework.cloud</groupId> <artifactId>spring-cloud-starter-openfeign</artifactId> </dependency>然后,order-service中编写的UserClient、User、DefaultFeignConfiguration都复制到feign-api项目中2)在order-service中使用feign-api首先,删除order-service中的UserClient、User、DefaultFeignConfiguration等类或接口。在order-service的pom文件中中引入feign-api的依赖:<dependency> <groupId>cn.itcast.demo</groupId> <artifactId>feign-api</artifactId> <version>1.0</version> </dependency>修改order-service中的所有与上述三个组件有关的导包部分,改成导入feign-api中的包3)重启测试重启后,发现服务报错了:这是因为UserClient现在在cn.itcast.feign.clients包下,而order-service的@EnableFeignClients注解是在cn.itcast.order包下,不在同一个包,无法扫描到UserClient。4)解决扫描包问题方式一:指定Feign应该扫描的包:@EnableFeignClients(basePackages = "cn.itcast.feign.clients")方式二:指定需要加载的Client接口:@EnableFeignClients(clients = {UserClient.class})3.Gateway服务网关Spring Cloud Gateway 是 Spring Cloud 的一个全新项目,该项目是基于 Spring 5.0,Spring Boot 2.0 和 Project Reactor 等响应式编程和事件流技术开发的网关,它旨在为微服务架构提供一种简单有效的统一的 API 路由管理方式。3.1.为什么需要网关Gateway网关是我们服务的守门神,所有微服务的统一入口。网关的核心功能特性:请求路由权限控制限流架构图:权限控制:网关作为微服务入口,需要校验用户是是否有请求资格,如果没有则进行拦截。路由和负载均衡:一切请求都必须先经过gateway,但网关不处理业务,而是根据某种规则,把请求转发到某个微服务,这个过程叫做路由。当然路由的目标服务有多个时,还需要做负载均衡。限流:当请求流量过高时,在网关中按照下流的微服务能够接受的速度来放行请求,避免服务压力过大。在SpringCloud中网关的实现包括两种:gatewayzuulZuul是基于Servlet的实现,属于阻塞式编程。而SpringCloudGateway则是基于Spring5中提供的WebFlux,属于响应式编程的实现,具备更好的性能。3.2.gateway快速入门下面,我们就演示下网关的基本路由功能。基本步骤如下:创建SpringBoot工程gateway,引入网关依赖编写启动类编写基础配置和路由规则启动网关服务进行测试1)创建gateway服务,引入依赖创建服务:引入依赖:<!--网关--> <dependency> <groupId>org.springframework.cloud</groupId> <artifactId>spring-cloud-starter-gateway</artifactId> </dependency> <!--nacos服务发现依赖--> <dependency> <groupId>com.alibaba.cloud</groupId> <artifactId>spring-cloud-starter-alibaba-nacos-discovery</artifactId> </dependency>2)编写启动类package cn.itcast.gateway; import org.springframework.boot.SpringApplication; import org.springframework.boot.autoconfigure.SpringBootApplication; @SpringBootApplication public class GatewayApplication { public static void main(String[] args) { SpringApplication.run(GatewayApplication.class, args); } }3)编写基础配置和路由规则创建application.yml文件,内容如下:server: port: 10010 # 网关端口 spring: application: name: gateway # 服务名称 cloud: nacos: server-addr: localhost:8848 # nacos地址 gateway: routes: # 网关路由配置 - id: user-service # 路由id,自定义,只要唯一即可 # uri: http://127.0.0.1:8081 # 路由的目标地址 http就是固定地址 uri: lb://userservice # 路由的目标地址 lb就是负载均衡,后面跟服务名称 predicates: # 路由断言,也就是判断请求是否符合路由规则的条件 - Path=/user/** # 这个是按照路径匹配,只要以/user/开头就符合要求我们将符合Path 规则的一切请求,都代理到 uri参数指定的地址。本例中,我们将 /user/**开头的请求,代理到lb://userservice,lb是负载均衡,根据服务名拉取服务列表,实现负载均衡。4)重启测试重启网关,访问http://localhost:10010/user/1时,符合/user/**规则,请求转发到uri:http://userservice/user/1,得到了结果:5)网关路由的流程图整个访问的流程如下:总结:网关搭建步骤:创建项目,引入nacos服务发现和gateway依赖配置application.yml,包括服务基本信息、nacos地址、路由路由配置包括:路由id:路由的唯一标示路由目标(uri):路由的目标地址,http代表固定地址,lb代表根据服务名负载均衡路由断言(predicates):判断路由的规则,路由过滤器(filters):对请求或响应做处理接下来,就重点来学习路由断言和路由过滤器的详细知识3.3.断言工厂我们在配置文件中写的断言规则只是字符串,这些字符串会被Predicate Factory读取并处理,转变为路由判断的条件例如Path=/user/**是按照路径匹配,这个规则是由org.springframework.cloud.gateway.handler.predicate.PathRoutePredicateFactory类来处理的,像这样的断言工厂在SpringCloudGateway还有十几个:名称说明示例After是某个时间点后的请求- After=2037-01-20T17:42:47.789-07:00[America/Denver]Before是某个时间点之前的请求- Before=2031-04-13T15:14:47.433+08:00[Asia/Shanghai]Between是某两个时间点之前的请求- Between=2037-01-20T17:42:47.789-07:00[America/Denver], 2037-01-21T17:42:47.789-07:00[America/Denver]Cookie请求必须包含某些cookie- Cookie=chocolate, ch.pHeader请求必须包含某些header- Header=X-Request-Id, \d+Host请求必须是访问某个host(域名)- Host=.somehost.org,.anotherhost.orgMethod请求方式必须是指定方式- Method=GET,POSTPath请求路径必须符合指定规则- Path=/red/{segment},/blue/**Query请求参数必须包含指定参数- Query=name, Jack或者- Query=nameRemoteAddr请求者的ip必须是指定范围- RemoteAddr=192.168.1.1/24Weight权重处理 我们只需要掌握Path这种路由工程就可以了。3.4.过滤器工厂GatewayFilter是网关中提供的一种过滤器,可以对进入网关的请求和微服务返回的响应做处理:3.4.1.路由过滤器的种类Spring提供了31种不同的路由过滤器工厂。例如:名称说明AddRequestHeader给当前请求添加一个请求头RemoveRequestHeader移除请求中的一个请求头AddResponseHeader给响应结果中添加一个响应头RemoveResponseHeader从响应结果中移除有一个响应头RequestRateLimiter限制请求的流量3.4.2.请求头过滤器下面我们以AddRequestHeader 为例来讲解。需求:给所有进入userservice的请求添加一个请求头:Truth=itcast is freaking awesome!只需要修改gateway服务的application.yml文件,添加路由过滤即可:spring: cloud: gateway: routes: - id: user-service uri: lb://userservice predicates: - Path=/user/** filters: # 过滤器 - AddRequestHeader=Truth, Itcast is freaking awesome! # 添加请求头当前过滤器写在userservice路由下,因此仅仅对访问userservice的请求有效。3.4.3.默认过滤器如果要对所有的路由都生效,则可以将过滤器工厂写到default下。格式如下:spring: cloud: gateway: routes: - id: user-service uri: lb://userservice predicates: - Path=/user/** default-filters: # 默认过滤项 - AddRequestHeader=Truth, Itcast is freaking awesome! 3.4.4.总结过滤器的作用是什么?① 对路由的请求或响应做加工处理,比如添加请求头② 配置在路由下的过滤器只对当前路由的请求生效defaultFilters的作用是什么?① 对所有路由都生效的过滤器3.5.全局过滤器上一节学习的过滤器,网关提供了31种,但每一种过滤器的作用都是固定的。如果我们希望拦截请求,做自己的业务逻辑则没办法实现。3.5.1.全局过滤器作用全局过滤器的作用也是处理一切进入网关的请求和微服务响应,与GatewayFilter的作用一样。区别在于GatewayFilter通过配置定义,处理逻辑是固定的;而GlobalFilter的逻辑需要自己写代码实现。定义方式是实现GlobalFilter接口。public interface GlobalFilter { /** * 处理当前请求,有必要的话通过{@link GatewayFilterChain}将请求交给下一个过滤器处理 * * @param exchange 请求上下文,里面可以获取Request、Response等信息 * @param chain 用来把请求委托给下一个过滤器 * @return {@code Mono<Void>} 返回标示当前过滤器业务结束 */ Mono<Void> filter(ServerWebExchange exchange, GatewayFilterChain chain); }在filter中编写自定义逻辑,可以实现下列功能:登录状态判断权限校验请求限流等3.5.2.自定义全局过滤器需求:定义全局过滤器,拦截请求,判断请求的参数是否满足下面条件:参数中是否有authorization,authorization参数值是否为admin如果同时满足则放行,否则拦截实现:在gateway中定义一个过滤器:package cn.itcast.gateway.filters; import org.springframework.cloud.gateway.filter.GatewayFilterChain; import org.springframework.cloud.gateway.filter.GlobalFilter; import org.springframework.core.annotation.Order; import org.springframework.http.HttpStatus; import org.springframework.stereotype.Component; import org.springframework.web.server.ServerWebExchange; import reactor.core.publisher.Mono; @Order(-1) @Component public class AuthorizeFilter implements GlobalFilter { @Override public Mono<Void> filter(ServerWebExchange exchange, GatewayFilterChain chain) { // 1.获取请求参数 MultiValueMap<String, String> params = exchange.getRequest().getQueryParams(); // 2.获取authorization参数 String auth = params.getFirst("authorization"); // 3.校验 if ("admin".equals(auth)) { // 放行 return chain.filter(exchange); } // 4.拦截 // 4.1.禁止访问,设置状态码 exchange.getResponse().setStatusCode(HttpStatus.FORBIDDEN); // 4.2.结束处理 return exchange.getResponse().setComplete(); } }3.5.3.过滤器执行顺序请求进入网关会碰到三类过滤器:当前路由的过滤器、DefaultFilter、GlobalFilter请求路由后,会将当前路由过滤器和DefaultFilter、GlobalFilter,合并到一个过滤器链(集合)中,排序后依次执行每个过滤器:排序的规则是什么呢?每一个过滤器都必须指定一个int类型的order值,order值越小,优先级越高,执行顺序越靠前。GlobalFilter通过实现Ordered接口,或者添加@Order注解来指定order值,由我们自己指定路由过滤器和defaultFilter的order由Spring指定,默认是按照声明顺序从1递增。当过滤器的order值一样时,会按照 defaultFilter > 路由过滤器 > GlobalFilter的顺序执行。详细内容,可以查看源码:org.springframework.cloud.gateway.route.RouteDefinitionRouteLocator#getFilters()方法是先加载defaultFilters,然后再加载某个route的filters,然后合并。org.springframework.cloud.gateway.handler.FilteringWebHandler#handle()方法会加载全局过滤器,与前面的过滤器合并后根据order排序,组织过滤器链3.6.跨域问题3.6.1.什么是跨域问题跨域:域名不一致就是跨域,主要包括:域名不同: www.taobao.com 和 www.taobao.org 和 www.jd.com 和 miaosha.jd.com域名相同,端口不同:localhost:8080和localhost8081跨域问题:浏览器禁止请求的发起者与服务端发生跨域ajax请求,请求被浏览器拦截的问题解决方案:CORS,这个以前应该学习过,这里不再赘述了。不知道的小伙伴可以查看https://www.ruanyifeng.com/blog/2016/04/cors.html3.6.2.模拟跨域问题找到课前资料的页面文件:放入tomcat或者nginx这样的web服务器中,启动并访问。可以在浏览器控制台看到下面的错误:从localhost:8090访问localhost:10010,端口不同,显然是跨域的请求。3.6.3.解决跨域问题在gateway服务的application.yml文件中,添加下面的配置:spring: cloud: gateway: # 。。。 globalcors: # 全局的跨域处理 add-to-simple-url-handler-mapping: true # 解决options请求被拦截问题 corsConfigurations: '[/**]': allowedOrigins: # 允许哪些网站的跨域请求 - "http://localhost:8090" allowedMethods: # 允许的跨域ajax的请求方式 - "GET" - "POST" - "DELETE" - "PUT" - "OPTIONS" allowedHeaders: "*" # 允许在请求中携带的头信息 allowCredentials: true # 是否允许携带cookie maxAge: 360000 # 这次跨域检测的有效期
-
Nacos与Eureka SpringCloud011.认识微服务随着互联网行业的发展,对服务的要求也越来越高,服务架构也从单体架构逐渐演变为现在流行的微服务架构。这些架构之间有怎样的差别呢?1.0.学习目标了解微服务架构的优缺点1.1.单体架构单体架构:将业务的所有功能集中在一个项目中开发,打成一个包部署。单体架构的优缺点如下:优点:架构简单部署成本低缺点:耦合度高(维护困难、升级困难)1.2.分布式架构分布式架构:根据业务功能对系统做拆分,每个业务功能模块作为独立项目开发,称为一个服务。分布式架构的优缺点:优点:降低服务耦合有利于服务升级和拓展缺点:服务调用关系错综复杂分布式架构虽然降低了服务耦合,但是服务拆分时也有很多问题需要思考:服务拆分的粒度如何界定?服务之间如何调用?服务的调用关系如何管理?人们需要制定一套行之有效的标准来约束分布式架构。1.3.微服务微服务的架构特征:单一职责:微服务拆分粒度更小,每一个服务都对应唯一的业务能力,做到单一职责自治:团队独立、技术独立、数据独立,独立部署和交付面向服务:服务提供统一标准的接口,与语言和技术无关隔离性强:服务调用做好隔离、容错、降级,避免出现级联问题微服务的上述特性其实是在给分布式架构制定一个标准,进一步降低服务之间的耦合度,提供服务的独立性和灵活性。做到高内聚,低耦合。因此,可以认为微服务是一种经过良好架构设计的分布式架构方案 。但方案该怎么落地?选用什么样的技术栈?全球的互联网公司都在积极尝试自己的微服务落地方案。其中在Java领域最引人注目的就是SpringCloud提供的方案了。1.4.SpringCloudSpringCloud是目前国内使用最广泛的微服务框架。官网地址:https://spring.io/projects/spring-cloud。SpringCloud集成了各种微服务功能组件,并基于SpringBoot实现了这些组件的自动装配,从而提供了良好的开箱即用体验。其中常见的组件包括:另外,SpringCloud底层是依赖于SpringBoot的,并且有版本的兼容关系,如下:我们课堂学习的版本是 Hoxton.SR10,因此对应的SpringBoot版本是2.3.x版本。1.5.总结单体架构:简单方便,高度耦合,扩展性差,适合小型项目。例如:学生管理系统分布式架构:松耦合,扩展性好,但架构复杂,难度大。适合大型互联网项目,例如:京东、淘宝微服务:一种良好的分布式架构方案①优点:拆分粒度更小、服务更独立、耦合度更低②缺点:架构非常复杂,运维、监控、部署难度提高SpringCloud是微服务架构的一站式解决方案,集成了各种优秀微服务功能组件2.服务拆分和远程调用任何分布式架构都离不开服务的拆分,微服务也是一样。2.1.服务拆分原则这里我总结了微服务拆分时的几个原则:不同微服务,不要重复开发相同业务微服务数据独立,不要访问其它微服务的数据库微服务可以将自己的业务暴露为接口,供其它微服务调用2.2.服务拆分示例以课前资料中的微服务cloud-demo为例,其结构如下:cloud-demo:父工程,管理依赖order-service:订单微服务,负责订单相关业务user-service:用户微服务,负责用户相关业务要求:订单微服务和用户微服务都必须有各自的数据库,相互独立订单服务和用户服务都对外暴露Restful的接口订单服务如果需要查询用户信息,只能调用用户服务的Restful接口,不能查询用户数据库2.2.1.导入Sql语句首先,将课前资料提供的cloud-order.sql和cloud-user.sql导入到mysql中:cloud-user表中初始数据如下:cloud-order表中初始数据如下:cloud-order表中持有cloud-user表中的id字段。2.2.2.导入demo工程用IDEA导入课前资料提供的Demo:项目结构如下:导入后,会在IDEA右下角出现弹窗:点击弹窗,然后按下图选择:会出现这样的菜单:配置下项目使用的JDK:2.3.实现远程调用案例在order-service服务中,有一个根据id查询订单的接口:根据id查询订单,返回值是Order对象,如图:其中的user为null在user-service中有一个根据id查询用户的接口:查询的结果如图:2.3.1.案例需求:修改order-service中的根据id查询订单业务,要求在查询订单的同时,根据订单中包含的userId查询出用户信息,一起返回。因此,我们需要在order-service中 向user-service发起一个http的请求,调用http://localhost:8081/user/{userId}这个接口。大概的步骤是这样的:注册一个RestTemplate的实例到Spring容器修改order-service服务中的OrderService类中的queryOrderById方法,根据Order对象中的userId查询User将查询的User填充到Order对象,一起返回2.3.2.注册RestTemplate首先,我们在order-service服务中的OrderApplication启动类中,注册RestTemplate实例:package cn.itcast.order; import org.mybatis.spring.annotation.MapperScan; import org.springframework.boot.SpringApplication; import org.springframework.boot.autoconfigure.SpringBootApplication; import org.springframework.context.annotation.Bean; import org.springframework.web.client.RestTemplate; @MapperScan("cn.itcast.order.mapper") @SpringBootApplication public class OrderApplication { public static void main(String[] args) { SpringApplication.run(OrderApplication.class, args); } @Bean public RestTemplate restTemplate() { return new RestTemplate(); } }2.3.3.实现远程调用修改order-service服务中的cn.itcast.order.service包下的OrderService类中的queryOrderById方法:2.4.提供者与消费者在服务调用关系中,会有两个不同的角色:服务提供者:一次业务中,被其它微服务调用的服务。(提供接口给其它微服务)服务消费者:一次业务中,调用其它微服务的服务。(调用其它微服务提供的接口)但是,服务提供者与服务消费者的角色并不是绝对的,而是相对于业务而言。如果服务A调用了服务B,而服务B又调用了服务C,服务B的角色是什么?对于A调用B的业务而言:A是服务消费者,B是服务提供者对于B调用C的业务而言:B是服务消费者,C是服务提供者因此,服务B既可以是服务提供者,也可以是服务消费者。3.Eureka注册中心假如我们的服务提供者user-service部署了多个实例,如图:大家思考几个问题:order-service在发起远程调用的时候,该如何得知user-service实例的ip地址和端口?有多个user-service实例地址,order-service调用时该如何选择?order-service如何得知某个user-service实例是否依然健康,是不是已经宕机?3.1.Eureka的结构和作用这些问题都需要利用SpringCloud中的注册中心来解决,其中最广为人知的注册中心就是Eureka,其结构如下:回答之前的各个问题。问题1:order-service如何得知user-service实例地址?获取地址信息的流程如下:user-service服务实例启动后,将自己的信息注册到eureka-server(Eureka服务端)。这个叫服务注册eureka-server保存服务名称到服务实例地址列表的映射关系order-service根据服务名称,拉取实例地址列表。这个叫服务发现或服务拉取问题2:order-service如何从多个user-service实例中选择具体的实例?order-service从实例列表中利用负载均衡算法选中一个实例地址向该实例地址发起远程调用问题3:order-service如何得知某个user-service实例是否依然健康,是不是已经宕机?user-service会每隔一段时间(默认30秒)向eureka-server发起请求,报告自己状态,称为心跳当超过一定时间没有发送心跳时,eureka-server会认为微服务实例故障,将该实例从服务列表中剔除order-service拉取服务时,就能将故障实例排除了注意:一个微服务,既可以是服务提供者,又可以是服务消费者,因此eureka将服务注册、服务发现等功能统一封装到了eureka-client端因此,接下来我们动手实践的步骤包括:3.2.搭建eureka-server首先大家注册中心服务端:eureka-server,这必须是一个独立的微服务3.2.1.创建eureka-server服务在cloud-demo父工程下,创建一个子模块:填写模块信息:然后填写服务信息:3.2.2.引入eureka依赖引入SpringCloud为eureka提供的starter依赖:<dependency> <groupId>org.springframework.cloud</groupId> <artifactId>spring-cloud-starter-netflix-eureka-server</artifactId> </dependency>3.2.3.编写启动类给eureka-server服务编写一个启动类,一定要添加一个@EnableEurekaServer注解,开启eureka的注册中心功能:package cn.itcast.eureka; import org.springframework.boot.SpringApplication; import org.springframework.boot.autoconfigure.SpringBootApplication; import org.springframework.cloud.netflix.eureka.server.EnableEurekaServer; @SpringBootApplication @EnableEurekaServer public class EurekaApplication { public static void main(String[] args) { SpringApplication.run(EurekaApplication.class, args); } }3.2.4.编写配置文件编写一个application.yml文件,内容如下:server: port: 10086 spring: application: name: eureka-server eureka: client: service-url: defaultZone: http://127.0.0.1:10086/eureka3.2.5.启动服务启动微服务,然后在浏览器访问:http://127.0.0.1:10086看到下面结果应该是成功了:3.3.服务注册下面,我们将user-service注册到eureka-server中去。1)引入依赖在user-service的pom文件中,引入下面的eureka-client依赖:<dependency> <groupId>org.springframework.cloud</groupId> <artifactId>spring-cloud-starter-netflix-eureka-client</artifactId> </dependency>2)配置文件在user-service中,修改application.yml文件,添加服务名称、eureka地址:spring: application: name: userservice eureka: client: service-url: defaultZone: http://127.0.0.1:10086/eureka3)启动多个user-service实例为了演示一个服务有多个实例的场景,我们添加一个SpringBoot的启动配置,再启动一个user-service。首先,复制原来的user-service启动配置:然后,在弹出的窗口中,填写信息:现在,SpringBoot窗口会出现两个user-service启动配置:不过,第一个是8081端口,第二个是8082端口。启动两个user-service实例:查看eureka-server管理页面:3.4.服务发现下面,我们将order-service的逻辑修改:向eureka-server拉取user-service的信息,实现服务发现。1)引入依赖之前说过,服务发现、服务注册统一都封装在eureka-client依赖,因此这一步与服务注册时一致。在order-service的pom文件中,引入下面的eureka-client依赖:<dependency> <groupId>org.springframework.cloud</groupId> <artifactId>spring-cloud-starter-netflix-eureka-client</artifactId> </dependency>2)配置文件服务发现也需要知道eureka地址,因此第二步与服务注册一致,都是配置eureka信息:在order-service中,修改application.yml文件,添加服务名称、eureka地址:spring: application: name: orderservice eureka: client: service-url: defaultZone: http://127.0.0.1:10086/eureka3)服务拉取和负载均衡最后,我们要去eureka-server中拉取user-service服务的实例列表,并且实现负载均衡。不过这些动作不用我们去做,只需要添加一些注解即可。在order-service的OrderApplication中,给RestTemplate这个Bean添加一个@LoadBalanced注解:修改order-service服务中的cn.itcast.order.service包下的OrderService类中的queryOrderById方法。修改访问的url路径,用服务名代替ip、端口:spring会自动帮助我们从eureka-server端,根据userservice这个服务名称,获取实例列表,而后完成负载均衡。4.Ribbon负载均衡上一节中,我们添加了@LoadBalanced注解,即可实现负载均衡功能,这是什么原理呢?4.1.负载均衡原理SpringCloud底层其实是利用了一个名为Ribbon的组件,来实现负载均衡功能的。那么我们发出的请求明明是http://userservice/user/1,怎么变成了http://localhost:8081的呢?4.2.源码跟踪为什么我们只输入了service名称就可以访问了呢?之前还要获取ip和端口。显然有人帮我们根据service名称,获取到了服务实例的ip和端口。它就是LoadBalancerInterceptor,这个类会在对RestTemplate的请求进行拦截,然后从Eureka根据服务id获取服务列表,随后利用负载均衡算法得到真实的服务地址信息,替换服务id。我们进行源码跟踪:1)LoadBalancerIntercepor可以看到这里的intercept方法,拦截了用户的HttpRequest请求,然后做了几件事:request.getURI():获取请求uri,本例中就是 http://user-service/user/8originalUri.getHost():获取uri路径的主机名,其实就是服务id,user-servicethis.loadBalancer.execute():处理服务id,和用户请求。这里的this.loadBalancer是LoadBalancerClient类型,我们继续跟入。2)LoadBalancerClient继续跟入execute方法:代码是这样的:getLoadBalancer(serviceId):根据服务id获取ILoadBalancer,而ILoadBalancer会拿着服务id去eureka中获取服务列表并保存起来。getServer(loadBalancer):利用内置的负载均衡算法,从服务列表中选择一个。本例中,可以看到获取了8082端口的服务放行后,再次访问并跟踪,发现获取的是8081:果然实现了负载均衡。3)负载均衡策略IRule在刚才的代码中,可以看到获取服务使通过一个getServer方法来做负载均衡:我们继续跟入:继续跟踪源码chooseServer方法,发现这么一段代码:我们看看这个rule是谁:这里的rule默认值是一个RoundRobinRule,看类的介绍:这不就是轮询的意思嘛。到这里,整个负载均衡的流程我们就清楚了。4)总结SpringCloudRibbon的底层采用了一个拦截器,拦截了RestTemplate发出的请求,对地址做了修改。用一幅图来总结一下:基本流程如下:拦截我们的RestTemplate请求http://userservice/user/1RibbonLoadBalancerClient会从请求url中获取服务名称,也就是user-serviceDynamicServerListLoadBalancer根据user-service到eureka拉取服务列表eureka返回列表,localhost:8081、localhost:8082IRule利用内置负载均衡规则,从列表中选择一个,例如localhost:8081RibbonLoadBalancerClient修改请求地址,用localhost:8081替代userservice,得到http://localhost:8081/user/1,发起真实请求4.3.负载均衡策略4.3.1.负载均衡策略负载均衡的规则都定义在IRule接口中,而IRule有很多不同的实现类:不同规则的含义如下:内置负载均衡规则类规则描述RoundRobinRule简单轮询服务列表来选择服务器。它是Ribbon默认的负载均衡规则。AvailabilityFilteringRule对以下两种服务器进行忽略: (1)在默认情况下,这台服务器如果3次连接失败,这台服务器就会被设置为“短路”状态。短路状态将持续30秒,如果再次连接失败,短路的持续时间就会几何级地增加。 (2)并发数过高的服务器。如果一个服务器的并发连接数过高,配置了AvailabilityFilteringRule规则的客户端也会将其忽略。并发连接数的上限,可以由客户端的..ActiveConnectionsLimit属性进行配置。WeightedResponseTimeRule为每一个服务器赋予一个权重值。服务器响应时间越长,这个服务器的权重就越小。这个规则会随机选择服务器,这个权重值会影响服务器的选择。ZoneAvoidanceRule以区域可用的服务器为基础进行服务器的选择。使用Zone对服务器进行分类,这个Zone可以理解为一个机房、一个机架等。而后再对Zone内的多个服务做轮询。BestAvailableRule忽略那些短路的服务器,并选择并发数较低的服务器。RandomRule随机选择一个可用的服务器。RetryRule重试机制的选择逻辑默认的实现就是ZoneAvoidanceRule,是一种轮询方案4.3.2.自定义负载均衡策略通过定义IRule实现可以修改负载均衡规则,有两种方式:代码方式:在order-service中的OrderApplication类中,定义一个新的IRule:@Bean public IRule randomRule(){ return new RandomRule(); }配置文件方式:在order-service的application.yml文件中,添加新的配置也可以修改规则:userservice: # 给某个微服务配置负载均衡规则,这里是userservice服务 ribbon: NFLoadBalancerRuleClassName: com.netflix.loadbalancer.RandomRule # 负载均衡规则 注意,一般用默认的负载均衡规则,不做修改。4.4.饥饿加载Ribbon默认是采用懒加载,即第一次访问时才会去创建LoadBalanceClient,请求时间会很长。而饥饿加载则会在项目启动时创建,降低第一次访问的耗时,通过下面配置开启饥饿加载:ribbon: eager-load: enabled: true clients: userservice5.Nacos注册中心国内公司一般都推崇阿里巴巴的技术,比如注册中心,SpringCloudAlibaba也推出了一个名为Nacos的注册中心。5.1.认识和安装NacosNacos是阿里巴巴的产品,现在是SpringCloud中的一个组件。相比Eureka功能更加丰富,在国内受欢迎程度较高。安装方式可以参考课前资料《Nacos安装指南.md》5.2.服务注册到nacosNacos是SpringCloudAlibaba的组件,而SpringCloudAlibaba也遵循SpringCloud中定义的服务注册、服务发现规范。因此使用Nacos和使用Eureka对于微服务来说,并没有太大区别。主要差异在于:依赖不同服务地址不同1)引入依赖在cloud-demo父工程的pom文件中的<dependencyManagement>中引入SpringCloudAlibaba的依赖:<dependency> <groupId>com.alibaba.cloud</groupId> <artifactId>spring-cloud-alibaba-dependencies</artifactId> <version>2.2.6.RELEASE</version> <type>pom</type> <scope>import</scope> </dependency>然后在user-service和order-service中的pom文件中引入nacos-discovery依赖:<dependency> <groupId>com.alibaba.cloud</groupId> <artifactId>spring-cloud-starter-alibaba-nacos-discovery</artifactId> </dependency>注意:不要忘了注释掉eureka的依赖。2)配置nacos地址在user-service和order-service的application.yml中添加nacos地址:spring: cloud: nacos: server-addr: localhost:8848注意:不要忘了注释掉eureka的地址3)重启重启微服务后,登录nacos管理页面,可以看到微服务信息:5.3.服务分级存储模型一个服务可以有多个实例,例如我们的user-service,可以有:127.0.0.1:8081127.0.0.1:8082127.0.0.1:8083假如这些实例分布于全国各地的不同机房,例如:127.0.0.1:8081,在上海机房127.0.0.1:8082,在上海机房127.0.0.1:8083,在杭州机房Nacos就将同一机房内的实例 划分为一个集群。也就是说,user-service是服务,一个服务可以包含多个集群,如杭州、上海,每个集群下可以有多个实例,形成分级模型,如图:微服务互相访问时,应该尽可能访问同集群实例,因为本地访问速度更快。当本集群内不可用时,才访问其它集群。例如:杭州机房内的order-service应该优先访问同机房的user-service。5.3.1.给user-service配置集群修改user-service的application.yml文件,添加集群配置:spring: cloud: nacos: server-addr: localhost:8848 discovery: cluster-name: HZ # 集群名称重启两个user-service实例后,我们可以在nacos控制台看到下面结果:我们再次复制一个user-service启动配置,添加属性:-Dserver.port=8083 -Dspring.cloud.nacos.discovery.cluster-name=SH配置如图所示:启动UserApplication3后再次查看nacos控制台:5.3.2.同集群优先的负载均衡默认的ZoneAvoidanceRule并不能实现根据同集群优先来实现负载均衡。因此Nacos中提供了一个NacosRule的实现,可以优先从同集群中挑选实例。1)给order-service配置集群信息修改order-service的application.yml文件,添加集群配置:spring: cloud: nacos: server-addr: localhost:8848 discovery: cluster-name: HZ # 集群名称2)修改负载均衡规则修改order-service的application.yml文件,修改负载均衡规则:userservice: ribbon: NFLoadBalancerRuleClassName: com.alibaba.cloud.nacos.ribbon.NacosRule # 负载均衡规则 5.4.权重配置实际部署中会出现这样的场景:服务器设备性能有差异,部分实例所在机器性能较好,另一些较差,我们希望性能好的机器承担更多的用户请求。但默认情况下NacosRule是同集群内随机挑选,不会考虑机器的性能问题。因此,Nacos提供了权重配置来控制访问频率,权重越大则访问频率越高。在nacos控制台,找到user-service的实例列表,点击编辑,即可修改权重:在弹出的编辑窗口,修改权重:注意:如果权重修改为0,则该实例永远不会被访问5.5.环境隔离Nacos提供了namespace来实现环境隔离功能。nacos中可以有多个namespacenamespace下可以有group、service等不同namespace之间相互隔离,例如不同namespace的服务互相不可见5.5.1.创建namespace默认情况下,所有service、data、group都在同一个namespace,名为public:我们可以点击页面新增按钮,添加一个namespace:然后,填写表单:就能在页面看到一个新的namespace:5.5.2.给微服务配置namespace给微服务配置namespace只能通过修改配置来实现。例如,修改order-service的application.yml文件:spring: cloud: nacos: server-addr: localhost:8848 discovery: cluster-name: HZ namespace: 492a7d5d-237b-46a1-a99a-fa8e98e4b0f9 # 命名空间,填ID重启order-service后,访问控制台,可以看到下面的结果:此时访问order-service,因为namespace不同,会导致找不到userservice,控制台会报错:5.6.Nacos与Eureka的区别Nacos的服务实例分为两种l类型:临时实例:如果实例宕机超过一定时间,会从服务列表剔除,默认的类型。非临时实例:如果实例宕机,不会从服务列表剔除,也可以叫永久实例。配置一个服务实例为永久实例:spring: cloud: nacos: discovery: ephemeral: false # 设置为非临时实例Nacos和Eureka整体结构类似,服务注册、服务拉取、心跳等待,但是也存在一些差异:Nacos与eureka的共同点都支持服务注册和服务拉取都支持服务提供者心跳方式做健康检测Nacos与Eureka的区别Nacos支持服务端主动检测提供者状态:临时实例采用心跳模式,非临时实例采用主动检测模式临时实例心跳不正常会被剔除,非临时实例则不会被剔除Nacos支持服务列表变更的消息推送模式,服务列表更新更及时Nacos集群默认采用AP方式,当集群中存在非临时实例时,采用CP模式;Eureka采用AP方式
-
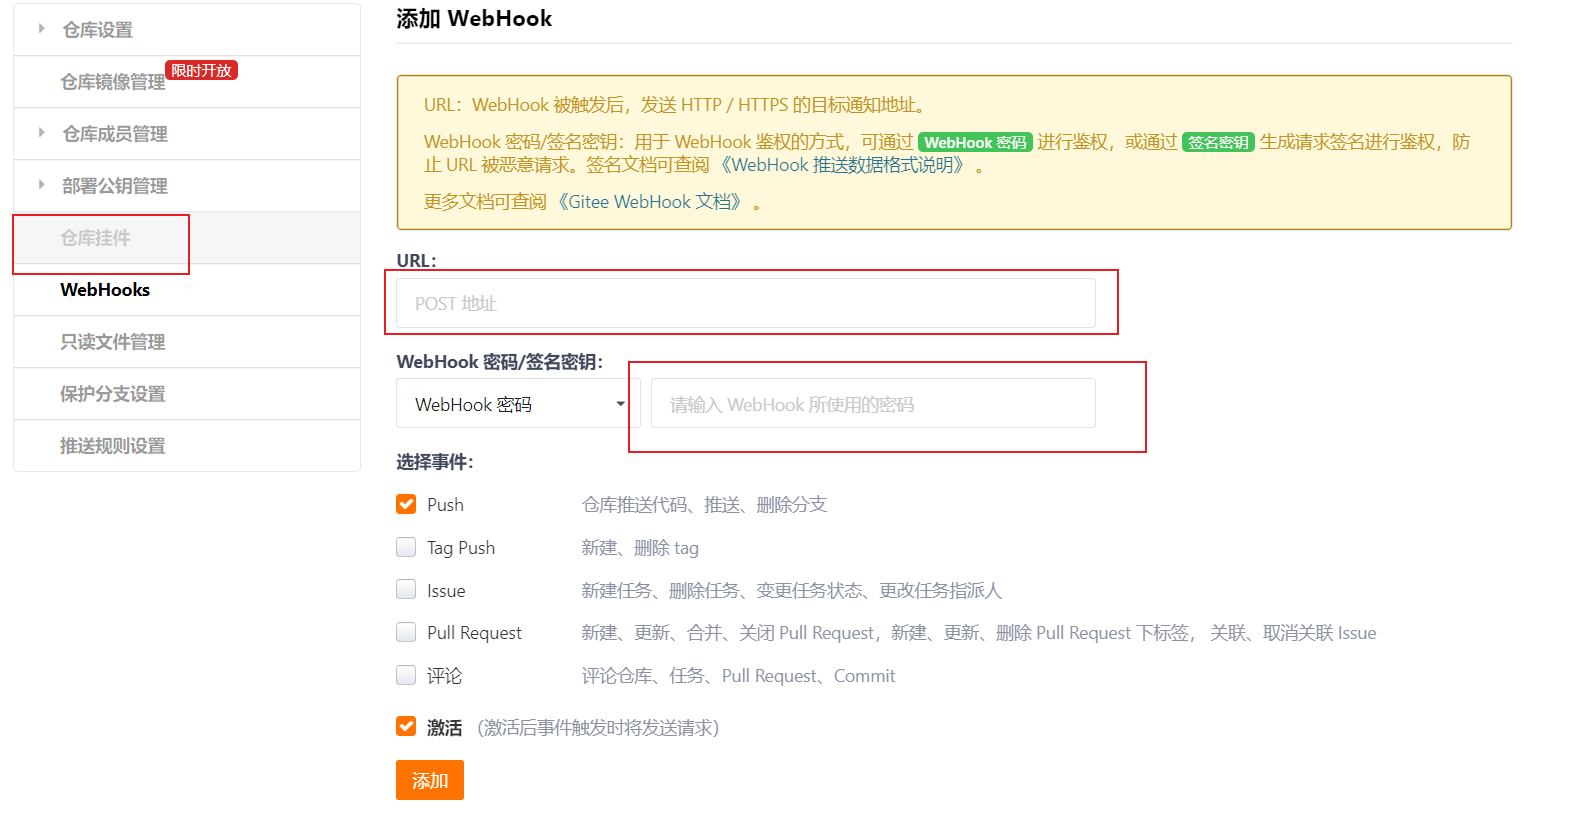
Docker安装Jenkins自动部署SpringBoot项目 Docker安装Jenkins自动部署SpringBoot项目根据之前文章《使用Docker安装好Jenkins》为前提搭建好Jenkins,不明白请看https://www.yanxizhu.com/index.php/archives/138/。环境说明:jenkins为docker部署,Docker+Jenkins+Gitee+JDK11+Maven3.8.5。以后每次改动代码,push提交到giee码云后会自动部署,不用手动点击部署。一、全局工具配置【首页】-【系统管理】-【全局工具配置】我之前启动jenkins容器映射参数如下,根据自己映射路径自行修改。docker run -p 10240:8080 -p 10241:50000 --name jenkins \ -u root \ -v /mydata/jenkins_home:/var/jenkins_home \ -v /mydata/maven/apache-maven-3.8.5:/maven/apache-maven-3.8.5 \ -v /mydata/jdk/jdk-11.0.10/:/jdk/jdk-11.0.10 \ -v /mydata/maven/repo:/mydata/maven/repo \ -v /usr/bin/docker:/usr/bin/docker \ -v /var/run/docker.sock:/var/run/docker.sock \ -d jenkins/jenkins:lts上面很重要,注意。jdk配置jdk11路径/jdk/jdk-11.0.10maven配置maven3.8.5路径/maven/apache-maven-3.8.5git配置Default路径/usr/bin/gitdocker配置docker路径/usr/bin注意点:1、jenkins容器里面自带git,可通过命令查看路径。2、注意自己jdk、mavn、docker安装路径。查看jenkins自带git路径命令:which git二、插件安装【首页】-【系统管理】-【插件管理】插件1:Publish Over SSH插件2:Gitee Plugin如果插件安装慢,可以修改源,请参考修改方案,https://www.yanxizhu.com/index.php/archives/138/注意:如果在【全局工具配置】没有对应的选项,就是缺少相应插件。三、系统配置1、SSH remote hosts配置新增加配置ssh登陆凭证,此步骤的主要作用是jenkins 打包镜像后,能够远程去登陆和执行脚本文件。Hostname:xxx.xxx.xxx.x..(需要登陆的服务器ip)Port:22(ssh登陆端口)Credentials:登陆账号和密码(此处点击[添加]按钮增加一个)如果是本机可以不用配置2、Gitee 配置链接名:giteeGitee 域名 URL:https://gitee.com添加凭证Gitee API V5 的私人令牌(获取地址 https://gitee.com/profile/personal_access_tokens)通过上面连接创建一个令牌,然后添加到这里。四、准备项目1、本地新建一个SpringBoot项目,新建HellocerConller控制层package com.yanxizhu.jenkins.demo.controller; import org.springframework.web.bind.annotation.GetMapping; import org.springframework.web.bind.annotation.RestController; /** * @description: Jenkins自动部署测试 * @author: <a href="mailto:batis@foxmail.com">清风</a> * @date: 2022/5/8 17:30 * @version: 1.0 */ @RestController public class HelloController { @GetMapping("/hello") public String hello(){ return "Hello World!"; } }本地启动项目确保通过127.0.0.1:8080/hello能够访问。2、编写Dockerfile# 指定是基于哪个基础镜像 FROM openjdk:11 # 作者信息 MAINTAINER batis # 挂载点声明 VOLUME /tmp # 将本地的一个文件或目录,拷贝到容器的文件或目录里 ADD /target/jenkins-demo-0.0.1-SNAPSHOT.jar springboot.jar #shell脚本 RUN bash -c 'touch /springboot.jar' # 将容器的8000端口暴露,给外部访问。 EXPOSE 8000 # 当容器运行起来时执行使用运行jar的指令 ENTRYPOINT ["java", "-jar", "springboot.jar"]注意:修改jdk版本、打包后名称、端口信息五、代码上传登录码云新建仓库,名字随意将代码关联并提交到码云。新建仓库、代码push自行google。六、WebHooks 管理配置1、打开仓库 -> 管理 -> 右侧的webhooksURL:填入服务器公网IP地址WebHook密码通过以下生成。七、部署SpringBoot项目1、新建部署任务任务名字随意、构建一个自由风格的软件项目。2、General描述随意填写,丢弃旧的构建策略,保持构建的天数1,保持构建的最大个数3,根据自己需要自行修改。3、源码管理选择gitRepository URL为自己gitee码云仓库地址。Credentials点击“添加”,Credentials凭证,选择通过用户名密码添加,id、备注可以为空。4、构建触发器其它默认:找到Gitee WebHook 密码,点击“生成按钮”生成,然后将该密码填入上面 “六、WebHooks 管理配置”中。轮询 SCM策略:* * * * *注意:*中间有空格,当您输入 "* * * * *" 时,意思为"每分钟"?也许您希望 "H * * * *" 每小时轮询。5、构建选择执行shell脚本#!/bin/bash -lex docker rm -f app_docker sleep 1 docker rmi -f app_docker:1.0 sleep 1 mvn clean install -Dmaven.test.skip=true sleep 1 docker build -t app_docker:1.0 -f ./src/main/Dockerfile . sleep 1 docker run -d -p 8000:8000 --name app_docker app_docker:1.0 注意自己端口名称。6、访问测试通过自己xxx.xxx.xx.xx:8000/hello即可自己写的helloword了。以后每次改动代码,push提交到giee码云后会自动部署,不用手动点击部署。7、问题记录及解决方案比如:1、查不到mvn、docker、jdk命令,可能是jenkins容器中环境配置问题,可以参考《Jenkins容器docker部署springboot项目-问题记录》2、如果开启了防火墙注意开发相应端口或关闭防火墙3、部署遇到问题,查看部署日志,以及google、baidu相关参考:Docker开启Remote API访问docker启动Jenkins报错Docker安装JenkinsNginx配置Jenkins二级域名,以及443 SSL证书访问Jenkins容器docker部署springboot项目-问题记录
-
Jenkins容器docker部署springboot项目-问题记录 Jenkins容器docker部署springboot项目-问题记录一、docker容器内不能使用vim解决方案:以root进入容器内docker exec -it -user root jenkins /bin/bash更新软件包apt-get update升级过程可能非常慢,因为是从海外站点拉取镜像,所以我们可以配置一个国内的镜像源,加速镜像拉取更新。备份原文件mv /etc/apt/sources.list /etc/apt/sources.list.bak查看容器中Debian版本cat /etc/issue修改配置sources.list文件根据自己版本修改成对应内容,修改内容参考阿里镜像https://developer.aliyun.com/mirror/debian我容器Debian为11.x版本,修改内容为:cat >/etc/apt/sources.list <<EOF deb http://mirrors.aliyun.com/debian/ bullseye main non-free contrib deb-src http://mirrors.aliyun.com/debian/ bullseye main non-free contrib deb http://mirrors.aliyun.com/debian-security/ bullseye-security main deb-src http://mirrors.aliyun.com/debian-security/ bullseye-security main deb http://mirrors.aliyun.com/debian/ bullseye-updates main non-free contrib deb-src http://mirrors.aliyun.com/debian/ bullseye-updates main non-free contrib deb http://mirrors.aliyun.com/debian/ bullseye-backports main non-free contrib deb-src http://mirrors.aliyun.com/debian/ bullseye-backports main non-free contrib EOF重新执行apt-get update安装vimapt-get install -y vim安装rpmapt-get install rpm -y二、docker容器内vim不能粘贴内容vim右键进入visual模式无法粘贴解决方案vim /usr/share/vim/vim80/defaults.vim修改内容:第70行,在mouse=a的=前面加个-,修改后如下:if has('mouse') set mouse-=a endif三、docker容器内环境配置修改环境变量配置vi /etc/profile新增jdk、mavn环境变量配置# java环境变量 export JAVA_HOME=/jdk/jdk-11.0.10 export JRE_HOME=$JAVA_HOME/jre export PATH=$JAVA_HOME/bin:$PATH export CLASSPATH=./:JAVA_HOME/lib:$JRE_HOME/lib # maven环境变量 export M2_HOME=/maven/apache-maven-3.8.5 export PATH=$PATH:$JAVA_HOME/bin:$M2_HOME/bin重新加载环境变量source /etc/profile检验是否配置成功java -version mvn -v
-
SpringBoot源码解析(四):监听器 springboot源码解析(四):监听器 在看springboot的源码过程中,发现内部使用了大量的监听器,下面来看下监听器的作用。在springboot的监听器有如下两类:# Run Listeners #事件发布运行监听器,是springboot中配置的唯一一个应用运行监听器,作用是通过一个多路广播器,将springboot运行状态的变化,构建成事件,并广播给各个监听器 org.springframework.boot.SpringApplicationRunListener=\ org.springframework.boot.context.event.EventPublishingRunListener # Application Listeners org.springframework.context.ApplicationListener=\ org.springframework.boot.ClearCachesApplicationListener(),\ org.springframework.boot.builder.ParentContextCloserApplicationListener,\ org.springframework.boot.cloud.CloudFoundryVcapEnvironmentPostProcessor,\ org.springframework.boot.context.FileEncodingApplicationListener,\ org.springframework.boot.context.config.AnsiOutputApplicationListener,\ org.springframework.boot.context.config.ConfigFileApplicationListener,\ org.springframework.boot.context.config.DelegatingApplicationListener,\ org.springframework.boot.context.logging.ClasspathLoggingApplicationListener,\ org.springframework.boot.context.logging.LoggingApplicationListener,\ org.springframework.boot.liquibase.LiquibaseServiceLocatorApplicationListener # Application Listeners org.springframework.context.ApplicationListener=\ org.springframework.boot.autoconfigure.BackgroundPreinitializer 当程序开始运行的时候,可以看到启动了一个运行时监听器,并且创建了一个SpringApplicationRunListeners对象,该对象是一个封装工具类,封装了所有的启动监听器:代码如下class SpringApplicationRunListeners { private final Log log; //启动类监听器 private final List<SpringApplicationRunListener> listeners; SpringApplicationRunListeners(Log log, Collection<? extends SpringApplicationRunListener> listeners) { this.log = log; this.listeners = new ArrayList<>(listeners); } //启动上下文事件监听 void starting() { for (SpringApplicationRunListener listener : this.listeners) { listener.starting(); } } //environment准备完毕事件监听 void environmentPrepared(ConfigurableEnvironment environment) { for (SpringApplicationRunListener listener : this.listeners) { listener.environmentPrepared(environment); } } //spring上下文准备完毕事件监听 void contextPrepared(ConfigurableApplicationContext context) { for (SpringApplicationRunListener listener : this.listeners) { listener.contextPrepared(context); } } //上下文配置类加载事件监听 void contextLoaded(ConfigurableApplicationContext context) { for (SpringApplicationRunListener listener : this.listeners) { listener.contextLoaded(context); } } //上下文刷新调用事件 void started(ConfigurableApplicationContext context) { for (SpringApplicationRunListener listener : this.listeners) { listener.started(context); } } //上下文刷新完成,在run方法执行完之前调用该事件 void running(ConfigurableApplicationContext context) { for (SpringApplicationRunListener listener : this.listeners) { listener.running(context); } } //在运行过程中失败调起的事件 void failed(ConfigurableApplicationContext context, Throwable exception) { for (SpringApplicationRunListener listener : this.listeners) { callFailedListener(listener, context, exception); } } private void callFailedListener(SpringApplicationRunListener listener, ConfigurableApplicationContext context, Throwable exception) { try { listener.failed(context, exception); } catch (Throwable ex) { if (exception == null) { ReflectionUtils.rethrowRuntimeException(ex); } if (this.log.isDebugEnabled()) { this.log.error("Error handling failed", ex); } else { String message = ex.getMessage(); message = (message != null) ? message : "no error message"; this.log.warn("Error handling failed (" + message + ")"); } } } } 在启动源码的流程中,我们知道不同的方法会在不同的时间点触发执行,然后广播出不同的事件,进入到EventPublishingRunListener类中public EventPublishingRunListener(SpringApplication application, String[] args) { this.application = application; this.args = args; this.initialMulticaster = new SimpleApplicationEventMulticaster(); for (ApplicationListener<?> listener : application.getListeners()) { this.initialMulticaster.addApplicationListener(listener); } } 在当前类的构造方法中默认创建了SimpleApplicationEventMulticaster类,用来完成创建全局的事件发布功能@Override public void starting() { this.initialMulticaster.multicastEvent(new ApplicationStartingEvent(this.application, this.args)); } @Override public void environmentPrepared(ConfigurableEnvironment environment) { this.initialMulticaster .multicastEvent(new ApplicationEnvironmentPreparedEvent(this.application, this.args, environment)); } @Override public void contextPrepared(ConfigurableApplicationContext context) { this.initialMulticaster .multicastEvent(new ApplicationContextInitializedEvent(this.application, this.args, context)); } @Override public void contextLoaded(ConfigurableApplicationContext context) { for (ApplicationListener<?> listener : this.application.getListeners()) { if (listener instanceof ApplicationContextAware) { ((ApplicationContextAware) listener).setApplicationContext(context); } context.addApplicationListener(listener); } this.initialMulticaster.multicastEvent(new ApplicationPreparedEvent(this.application, this.args, context)); } @Override public void started(ConfigurableApplicationContext context) { context.publishEvent(new ApplicationStartedEvent(this.application, this.args, context)); } @Override public void running(ConfigurableApplicationContext context) { context.publishEvent(new ApplicationReadyEvent(this.application, this.args, context)); } @Override public void failed(ConfigurableApplicationContext context, Throwable exception) { ApplicationFailedEvent event = new ApplicationFailedEvent(this.application, this.args, context, exception); if (context != null && context.isActive()) { // Listeners have been registered to the application context so we should // use it at this point if we can context.publishEvent(event); } else { // An inactive context may not have a multicaster so we use our multicaster to // call all of the context's listeners instead if (context instanceof AbstractApplicationContext) { for (ApplicationListener<?> listener : ((AbstractApplicationContext) context) .getApplicationListeners()) { this.initialMulticaster.addApplicationListener(listener); } } this.initialMulticaster.setErrorHandler(new LoggingErrorHandler()); this.initialMulticaster.multicastEvent(event); } } 在进行事件广播的时候,会进入如下方法:@Override public void multicastEvent(final ApplicationEvent event, @Nullable ResolvableType eventType) { ResolvableType type = (eventType != null ? eventType : resolveDefaultEventType(event)); //获取线程池 Executor executor = getTaskExecutor(); //根据事件类型选取需要通知的监听器 for (ApplicationListener<?> listener : getApplicationListeners(event, type)) { //如果不为空,则异步执行 if (executor != null) { executor.execute(() -> invokeListener(listener, event)); } else { //如果为空,则同步执行 invokeListener(listener, event); } } } 在进行事件广播之前,需要将监听器进行过滤,符合类型的留下,不符合类型的过滤掉protected Collection<ApplicationListener<?>> getApplicationListeners( ApplicationEvent event, ResolvableType eventType) { Object source = event.getSource(); Class<?> sourceType = (source != null ? source.getClass() : null); ListenerCacheKey cacheKey = new ListenerCacheKey(eventType, sourceType); // Quick check for existing entry on ConcurrentHashMap... ListenerRetriever retriever = this.retrieverCache.get(cacheKey); if (retriever != null) { return retriever.getApplicationListeners(); } if (this.beanClassLoader == null || (ClassUtils.isCacheSafe(event.getClass(), this.beanClassLoader) && (sourceType == null || ClassUtils.isCacheSafe(sourceType, this.beanClassLoader)))) { // Fully synchronized building and caching of a ListenerRetriever synchronized (this.retrievalMutex) { retriever = this.retrieverCache.get(cacheKey); if (retriever != null) { return retriever.getApplicationListeners(); } retriever = new ListenerRetriever(true); Collection<ApplicationListener<?>> listeners = retrieveApplicationListeners(eventType, sourceType, retriever); this.retrieverCache.put(cacheKey, retriever); return listeners; } } else { // No ListenerRetriever caching -> no synchronization necessary return retrieveApplicationListeners(eventType, sourceType, null); } } 实际处理判断逻辑的类:private Collection<ApplicationListener<?>> retrieveApplicationListeners( ResolvableType eventType, @Nullable Class<?> sourceType, @Nullable ListenerRetriever retriever) { List<ApplicationListener<?>> allListeners = new ArrayList<>(); Set<ApplicationListener<?>> listeners; Set<String> listenerBeans; synchronized (this.retrievalMutex) { listeners = new LinkedHashSet<>(this.defaultRetriever.applicationListeners); listenerBeans = new LinkedHashSet<>(this.defaultRetriever.applicationListenerBeans); } // Add programmatically registered listeners, including ones coming // from ApplicationListenerDetector (singleton beans and inner beans). for (ApplicationListener<?> listener : listeners) { if (supportsEvent(listener, eventType, sourceType)) { if (retriever != null) { retriever.applicationListeners.add(listener); } allListeners.add(listener); } } // Add listeners by bean name, potentially overlapping with programmatically // registered listeners above - but here potentially with additional metadata. if (!listenerBeans.isEmpty()) { ConfigurableBeanFactory beanFactory = getBeanFactory(); for (String listenerBeanName : listenerBeans) { try { if (supportsEvent(beanFactory, listenerBeanName, eventType)) { ApplicationListener<?> listener = beanFactory.getBean(listenerBeanName, ApplicationListener.class); if (!allListeners.contains(listener) && supportsEvent(listener, eventType, sourceType)) { if (retriever != null) { if (beanFactory.isSingleton(listenerBeanName)) { retriever.applicationListeners.add(listener); } else { retriever.applicationListenerBeans.add(listenerBeanName); } } allListeners.add(listener); } } else { // Remove non-matching listeners that originally came from // ApplicationListenerDetector, possibly ruled out by additional // BeanDefinition metadata (e.g. factory method generics) above. Object listener = beanFactory.getSingleton(listenerBeanName); if (retriever != null) { retriever.applicationListeners.remove(listener); } allListeners.remove(listener); } } catch (NoSuchBeanDefinitionException ex) { // Singleton listener instance (without backing bean definition) disappeared - // probably in the middle of the destruction phase } } } AnnotationAwareOrderComparator.sort(allListeners); if (retriever != null && retriever.applicationListenerBeans.isEmpty()) { retriever.applicationListeners.clear(); retriever.applicationListeners.addAll(allListeners); } return allListeners; }在监听器实例化之前,检查是否符合固定的类型 protected boolean supportsEvent( ApplicationListener<?> listener, ResolvableType eventType, @Nullable Class<?> sourceType) { //判断监听器是否是GenericApplicationListener子类,如不是返回一个GenericApplicationListenerAdapter GenericApplicationListener smartListener = (listener instanceof GenericApplicationListener ? (GenericApplicationListener) listener : new GenericApplicationListenerAdapter(listener)); return (smartListener.supportsEventType(eventType) && smartListener.supportsSourceType(sourceType)); }public interface GenericApplicationListener extends ApplicationListener<ApplicationEvent>, Ordered { boolean supportsEventType(ResolvableType eventType); default boolean supportsSourceType(@Nullable Class<?> sourceType) { return true; } @Override default int getOrder() { return LOWEST_PRECEDENCE; } }此时可以看到GenericApplicationListener类,该类是spring提供的用于重写匹配监听器事件的接口,如果需要判断的监听器是GenericApplicationListener的子类,说明类型匹配方法已被重现,就调用子类的匹配方法,如果不是,提供一个默认的适配器来匹配GenericApplicationListenerAdapter public boolean supportsEventType(ResolvableType eventType) { if (this.delegate instanceof SmartApplicationListener) { Class<? extends ApplicationEvent> eventClass = (Class<? extends ApplicationEvent>) eventType.resolve(); return (eventClass != null && ((SmartApplicationListener) this.delegate).supportsEventType(eventClass)); } else { return (this.declaredEventType == null || this.declaredEventType.isAssignableFrom(eventType)); } }可以看到该类最终调用的是declaredEventType.isAssignableFrom(eventType)方法,也就是说,如果我们没有重写监听器匹配方法,那么发布的事件 event 会被监听 event以及监听event的父类的监听器监听到。
-
SpringBoot源码解析(三):SpringBoot内嵌Tomcat springboot源码解析(三):springboot内嵌tomcat 在使用springboot搭建一个web应用程序的时候,我们发现不需要自己搭建一个tomcat服务器,只需要引入spring-boot-starter-web,在应用启动时会自动启动嵌入式的tomcat作为服务器,下面来分析下源码的分析流程: 之前我们已经讲过了自动装配的原理,其实tomcat的实现机制也是从自动装配开始的。1、ServletWebServerFactoryAutoConfiguration类@Configuration(proxyBeanMethods = false) @AutoConfigureOrder(Ordered.HIGHEST_PRECEDENCE) @ConditionalOnClass(ServletRequest.class) @ConditionalOnWebApplication(type = Type.SERVLET) @EnableConfigurationProperties(ServerProperties.class) @Import({ ServletWebServerFactoryAutoConfiguration.BeanPostProcessorsRegistrar.class, ServletWebServerFactoryConfiguration.EmbeddedTomcat.class, ServletWebServerFactoryConfiguration.EmbeddedJetty.class, ServletWebServerFactoryConfiguration.EmbeddedUndertow.class }) public class ServletWebServerFactoryAutoConfiguration { @Bean public ServletWebServerFactoryCustomizer servletWebServerFactoryCustomizer(ServerProperties serverProperties) { return new ServletWebServerFactoryCustomizer(serverProperties); } @Bean @ConditionalOnClass(name = "org.apache.catalina.startup.Tomcat") public TomcatServletWebServerFactoryCustomizer tomcatServletWebServerFactoryCustomizer( ServerProperties serverProperties) { return new TomcatServletWebServerFactoryCustomizer(serverProperties); } @Bean @ConditionalOnMissingFilterBean(ForwardedHeaderFilter.class) @ConditionalOnProperty(value = "server.forward-headers-strategy", havingValue = "framework") public FilterRegistrationBean<ForwardedHeaderFilter> forwardedHeaderFilter() { ForwardedHeaderFilter filter = new ForwardedHeaderFilter(); FilterRegistrationBean<ForwardedHeaderFilter> registration = new FilterRegistrationBean<>(filter); registration.setDispatcherTypes(DispatcherType.REQUEST, DispatcherType.ASYNC, DispatcherType.ERROR); registration.setOrder(Ordered.HIGHEST_PRECEDENCE); return registration; } /** * Registers a {@link WebServerFactoryCustomizerBeanPostProcessor}. Registered via * {@link ImportBeanDefinitionRegistrar} for early registration. */ public static class BeanPostProcessorsRegistrar implements ImportBeanDefinitionRegistrar, BeanFactoryAware { private ConfigurableListableBeanFactory beanFactory; @Override public void setBeanFactory(BeanFactory beanFactory) throws BeansException { if (beanFactory instanceof ConfigurableListableBeanFactory) { this.beanFactory = (ConfigurableListableBeanFactory) beanFactory; } } @Override public void registerBeanDefinitions(AnnotationMetadata importingClassMetadata, BeanDefinitionRegistry registry) { if (this.beanFactory == null) { return; } registerSyntheticBeanIfMissing(registry, "webServerFactoryCustomizerBeanPostProcessor", WebServerFactoryCustomizerBeanPostProcessor.class); registerSyntheticBeanIfMissing(registry, "errorPageRegistrarBeanPostProcessor", ErrorPageRegistrarBeanPostProcessor.class); } private void registerSyntheticBeanIfMissing(BeanDefinitionRegistry registry, String name, Class<?> beanClass) { if (ObjectUtils.isEmpty(this.beanFactory.getBeanNamesForType(beanClass, true, false))) { RootBeanDefinition beanDefinition = new RootBeanDefinition(beanClass); beanDefinition.setSynthetic(true); registry.registerBeanDefinition(name, beanDefinition); } } } } 从这个类上可以看到,当前配置类主要导入了BeanPostProcessorRegister,该类实现了ImportBeanDefinitionRegister接口,可以用来注册额外的BeanDefinition,同时,该类还导入了EmbeddedTomcat,EmbeddedJetty,EmbeddedUndertow三个类,可以根据用户的需求去选择使用哪一个web服务器,默认情况下使用的是tomcat2、当自动装配功能完成之后会接着执行onRefresh的方法(ServletWebServerApplicationContext)@Override protected void onRefresh() { //创建主题对象,不用在意 super.onRefresh(); try { //开始创建web服务 createWebServer(); } catch (Throwable ex) { throw new ApplicationContextException("Unable to start web server", ex); } }3、创建web服务,默认获取的是tomcat的web容器(ServletWebServerApplicationContext)private void createWebServer() { WebServer webServer = this.webServer; ServletContext servletContext = getServletContext(); if (webServer == null && servletContext == null) { //获取servletWebServerFactory,从上下文注册bean中可以找到 ServletWebServerFactory factory = getWebServerFactory(); //获取servletContextInitializer,获取webServer this.webServer = factory.getWebServer(getSelfInitializer()); } else if (servletContext != null) { try { getSelfInitializer().onStartup(servletContext); } catch (ServletException ex) { throw new ApplicationContextException("Cannot initialize servlet context", ex); } } //替换servlet相关的属性资源 initPropertySources(); }如何获取tomcat的bean的实例对象呢?从如下代码中可以看出ServletWebServerApplicationContextprotected ServletWebServerFactory getWebServerFactory() { // Use bean names so that we don't consider the hierarchy String[] beanNames = getBeanFactory().getBeanNamesForType(ServletWebServerFactory.class); if (beanNames.length == 0) { throw new ApplicationContextException("Unable to start ServletWebServerApplicationContext due to missing " + "ServletWebServerFactory bean."); } if (beanNames.length > 1) { throw new ApplicationContextException("Unable to start ServletWebServerApplicationContext due to multiple " + "ServletWebServerFactory beans : " + StringUtils.arrayToCommaDelimitedString(beanNames)); } return getBeanFactory().getBean(beanNames[0], ServletWebServerFactory.class); }protected ServletWebServerFactory getWebServerFactory() { // Use bean names so that we don't consider the hierarchy String[] beanNames = getBeanFactory().getBeanNamesForType(ServletWebServerFactory.class); if (beanNames.length == 0) { throw new ApplicationContextException("Unable to start ServletWebServerApplicationContext due to missing " + "ServletWebServerFactory bean."); } if (beanNames.length > 1) { throw new ApplicationContextException("Unable to start ServletWebServerApplicationContext due to multiple " + "ServletWebServerFactory beans : " + StringUtils.arrayToCommaDelimitedString(beanNames)); } return getBeanFactory().getBean(beanNames[0], ServletWebServerFactory.class); }DefaultListableBeanFactoryf/* 第一个参数type表示要查找的类型 第二个参数表示是否考虑非单例bean 第三个参数表示是否允许提早初始化 */ @Override public String[] getBeanNamesForType(@Nullable Class<?> type, boolean includeNonSingletons, boolean allowEagerInit) { //配置还未被冻结或者类型为null或者不允许早期初始化 if (!isConfigurationFrozen() || type == null || !allowEagerInit) { return doGetBeanNamesForType(ResolvableType.forRawClass(type), includeNonSingletons, allowEagerInit); } //此处注意isConfigurationFrozen为false的时候表示beanDefinition可能还会发生更改和添加,所以不能进行缓存,如果允许非单例bean,那么从保存所有bean的集合中获取,否则从单例bean中获取 Map<Class<?>, String[]> cache = (includeNonSingletons ? this.allBeanNamesByType : this.singletonBeanNamesByType); String[] resolvedBeanNames = cache.get(type); if (resolvedBeanNames != null) { return resolvedBeanNames; } //如果缓存中没有获取到,那么只能重新获取,获取到之后就存入缓存 resolvedBeanNames = doGetBeanNamesForType(ResolvableType.forRawClass(type), includeNonSingletons, true); if (ClassUtils.isCacheSafe(type, getBeanClassLoader())) { cache.put(type, resolvedBeanNames); } return resolvedBeanNames; } private String[] doGetBeanNamesForType(ResolvableType type, boolean includeNonSingletons, boolean allowEagerInit) { List<String> result = new ArrayList<>(); // Check all bean definitions. for (String beanName : this.beanDefinitionNames) { // Only consider bean as eligible if the bean name // is not defined as alias for some other bean. //如果时别名则跳过(当前集合会保存所有的主beanname,并且不会保存别名,别名由beanfactory中别名map维护) if (!isAlias(beanName)) { try { //获取合并的beandefinition,合并的beandefinition是指spring整合了父beandefinition的属性,将其beandefinition编程了rootBeanDefinition RootBeanDefinition mbd = getMergedLocalBeanDefinition(beanName); // Only check bean definition if it is complete. //抽象的beandefinition是不做考虑,抽象的就是拿来继承的,如果允许早期初始化,那么直接短路,进入方法体,如果不允许早期初始化,那么需要进一步判断,如果是不允许早期初始化的,并且beanClass已经被加载或者它是可以早期初始化的,那么如果当前bean是工厂bean,并且指定的bean又是工厂那么这个bean就必须被早期初始化,也就是说就不符合我们制定的allowEagerInit为false的情况,直接跳过 if (!mbd.isAbstract() && (allowEagerInit || (mbd.hasBeanClass() || !mbd.isLazyInit() || isAllowEagerClassLoading()) && !requiresEagerInitForType(mbd.getFactoryBeanName()))) { //如果当前bean是工厂bean boolean isFactoryBean = isFactoryBean(beanName, mbd); //如果允许早期初始化,那么基本上会调用最后的isTypeMatch方法,这个方法会导致工厂的实例化,但是当前不允许进行早期实例化在不允许早期实例化的情况下,如果当前bean是工厂bean,那么它只能在已经被创建的情况下调用isTypeMatch进行匹配判断否则只能宣告匹配失败,返回false BeanDefinitionHolder dbd = mbd.getDecoratedDefinition(); boolean matchFound = false; boolean allowFactoryBeanInit = allowEagerInit || containsSingleton(beanName); boolean isNonLazyDecorated = dbd != null && !mbd.isLazyInit(); if (!isFactoryBean) { if (includeNonSingletons || isSingleton(beanName, mbd, dbd)) { matchFound = isTypeMatch(beanName, type, allowFactoryBeanInit); } } else { //如果没有匹配到并且他是个工厂bean,那么加上&前缀,表示要获取factorybean类型的bean if (includeNonSingletons || isNonLazyDecorated || (allowFactoryBeanInit && isSingleton(beanName, mbd, dbd))) { matchFound = isTypeMatch(beanName, type, allowFactoryBeanInit); } if (!matchFound) { // In case of FactoryBean, try to match FactoryBean instance itself next. beanName = FACTORY_BEAN_PREFIX + beanName; matchFound = isTypeMatch(beanName, type, allowFactoryBeanInit); } } //找到便记录到result集合中,等待返回 if (matchFound) { result.add(beanName); } } } catch (CannotLoadBeanClassException | BeanDefinitionStoreException ex) { if (allowEagerInit) { throw ex; } // Probably a placeholder: let's ignore it for type matching purposes. LogMessage message = (ex instanceof CannotLoadBeanClassException) ? LogMessage.format("Ignoring bean class loading failure for bean '%s'", beanName) : LogMessage.format("Ignoring unresolvable metadata in bean definition '%s'", beanName); logger.trace(message, ex); onSuppressedException(ex); } } } // Check manually registered singletons too. //从单例注册集合中获取,这个单例集合石保存spring内部注入的单例对象,他们的特点就是没有beanDefinition for (String beanName : this.manualSingletonNames) { try { // In case of FactoryBean, match object created by FactoryBean. //如果是工厂bean,那么调用其getObjectType去匹配是否符合指定类型 if (isFactoryBean(beanName)) { if ((includeNonSingletons || isSingleton(beanName)) && isTypeMatch(beanName, type)) { result.add(beanName); // Match found for this bean: do not match FactoryBean itself anymore. continue; } // In case of FactoryBean, try to match FactoryBean itself next. beanName = FACTORY_BEAN_PREFIX + beanName; } // Match raw bean instance (might be raw FactoryBean). //如果没有匹配成功,那么匹配工厂类 if (isTypeMatch(beanName, type)) { result.add(beanName); } } catch (NoSuchBeanDefinitionException ex) { // Shouldn't happen - probably a result of circular reference resolution... logger.trace(LogMessage.format("Failed to check manually registered singleton with name '%s'", beanName), ex); } } return StringUtils.toStringArray(result); }4、tomcat对象的初始化(ServletWebServerApplicationContext)private org.springframework.boot.web.servlet.ServletContextInitializer getSelfInitializer() { return this::selfInitialize; } private void selfInitialize(ServletContext servletContext) throws ServletException { //使用给定的完全加载的servletContext准备WebApplicationContext prepareWebApplicationContext(servletContext); registerApplicationScope(servletContext); //使用给定的BeanFactory注册特定于web的作用域bean(contextParameters,contextAttributes) WebApplicationContextUtils.registerEnvironmentBeans(getBeanFactory(), servletContext); for (ServletContextInitializer beans : getServletContextInitializerBeans()) { beans.onStartup(servletContext); } }5、完成内嵌tomcat的api调用(TomcatServletWebServerFactory)@Override public WebServer getWebServer(ServletContextInitializer... initializers) { if (this.disableMBeanRegistry) { Registry.disableRegistry(); } //完成tomcat的api调用 Tomcat tomcat = new Tomcat(); File baseDir = (this.baseDirectory != null) ? this.baseDirectory : createTempDir("tomcat"); tomcat.setBaseDir(baseDir.getAbsolutePath()); Connector connector = new Connector(this.protocol); connector.setThrowOnFailure(true); tomcat.getService().addConnector(connector); customizeConnector(connector); tomcat.setConnector(connector); tomcat.getHost().setAutoDeploy(false); configureEngine(tomcat.getEngine()); for (Connector additionalConnector : this.additionalTomcatConnectors) { tomcat.getService().addConnector(additionalConnector); } //准备tomcatEmbeddedContext并设置到tomcat中 prepareContext(tomcat.getHost(), initializers); //构建tomcatWebServer return getTomcatWebServer(tomcat); }6、获取tomcat服务(TomcatServletWebServerFactory)protected TomcatWebServer getTomcatWebServer(Tomcat tomcat) { return new TomcatWebServer(tomcat, getPort() >= 0); } public TomcatWebServer(Tomcat tomcat, boolean autoStart) { Assert.notNull(tomcat, "Tomcat Server must not be null"); this.tomcat = tomcat; this.autoStart = autoStart; //初始化 initialize(); }7、完成tomcat的初始化private void initialize() throws WebServerException { logger.info("Tomcat initialized with port(s): " + getPortsDescription(false)); synchronized (this.monitor) { try { //engineName拼接instanceId addInstanceIdToEngineName(); Context context = findContext(); context.addLifecycleListener((event) -> { if (context.equals(event.getSource()) && Lifecycle.START_EVENT.equals(event.getType())) { // Remove service connectors so that protocol binding doesn't // happen when the service is started. //删除Connectors,以便再启动服务时不发生协议绑定 removeServiceConnectors(); } }); // Start the server to trigger initialization listeners //启动服务触发初始化监听器 this.tomcat.start(); // We can re-throw failure exception directly in the main thread //在主线程中重新抛出失败异常 rethrowDeferredStartupExceptions(); try { ContextBindings.bindClassLoader(context, context.getNamingToken(), getClass().getClassLoader()); } catch (NamingException ex) { // Naming is not enabled. Continue } // Unlike Jetty, all Tomcat threads are daemon threads. We create a // blocking non-daemon to stop immediate shutdown //所有的tomcat线程都是守护线程,我们创建一个阻塞非守护线程来避免立即关闭 startDaemonAwaitThread(); } catch (Exception ex) { //异常停止tomcat stopSilently(); destroySilently(); throw new WebServerException("Unable to start embedded Tomcat", ex); } } } ----------------------- private void removeServiceConnectors() { for (Service service : this.tomcat.getServer().findServices()) { Connector[] connectors = service.findConnectors().clone(); //将将要移除的conntector放到缓存中暂存 this.serviceConnectors.put(service, connectors); for (Connector connector : connectors) { //移除connector service.removeConnector(connector); } } }8、除了refresh方法之外,在finishRefresh()方法中也对tomcat做了相关的处理(ServletWebServerApplicationContext) protected void finishRefresh() { //调用父类的finishRefresh方法 super.finishRefresh(); //启动webServer WebServer webServer = startWebServer(); if (webServer != null) { //发布webServer初始化完成事件 publishEvent(new ServletWebServerInitializedEvent(webServer, this)); } }ServletWebServerApplicationContext private WebServer startWebServer() { WebServer webServer = this.webServer; if (webServer != null) { //启动webserver webServer.start(); } return webServer; }TomcatWebServer public void start() throws WebServerException { synchronized (this.monitor) { if (this.started) { return; } try { //添加之前移除的connector addPreviouslyRemovedConnectors(); Connector connector = this.tomcat.getConnector(); if (connector != null && this.autoStart) { //延迟加载启动 performDeferredLoadOnStartup(); } //检查connector启动状态是否为失败,失败抛出异常 checkThatConnectorsHaveStarted(); this.started = true; logger.info("Tomcat started on port(s): " + getPortsDescription(true) + " with context path '" + getContextPath() + "'"); } catch (ConnectorStartFailedException ex) { //异常停止tomcat stopSilently(); throw ex; } catch (Exception ex) { if (findBindException(ex) != null) { throw new PortInUseException(this.tomcat.getConnector().getPort()); } throw new WebServerException("Unable to start embedded Tomcat server", ex); } finally { Context context = findContext(); //context解绑classload ContextBindings.unbindClassLoader(context, context.getNamingToken(), getClass().getClassLoader()); } } }private void addPreviouslyRemovedConnectors() { Service[] services = this.tomcat.getServer().findServices(); for (Service service : services) { //从上面移除connector添加的缓存中取出connector Connector[] connectors = this.serviceConnectors.get(service); if (connectors != null) { for (Connector connector : connectors) { //添加到tomcat service中 service.addConnector(connector); if (!this.autoStart) { //如果不是自动启动,则暂停connector stopProtocolHandler(connector); } } //添加完成后移除 this.serviceConnectors.remove(service); } } }private void performDeferredLoadOnStartup() { try { for (Container child : this.tomcat.getHost().findChildren()) { if (child instanceof TomcatEmbeddedContext) { //延迟加载启动 ((TomcatEmbeddedContext) child).deferredLoadOnStartup(); } } } catch (Exception ex) { if (ex instanceof WebServerException) { throw (WebServerException) ex; } throw new WebServerException("Unable to start embedded Tomcat connectors", ex); } } void deferredLoadOnStartup() throws LifecycleException { doWithThreadContextClassLoader(getLoader().getClassLoader(), () -> getLoadOnStartupWrappers(findChildren()).forEach(this::load)); }9、应用上下文关闭时会调用tomcat的关闭在refreshContext中注册一个关闭的钩子函数,而钩子函数可以完成关闭的功能ServletWebServerApplicationContext @Override protected void onClose() { super.onClose(); stopAndReleaseWebServer(); } private void stopAndReleaseWebServer() { WebServer webServer = this.webServer; if (webServer != null) { try { webServer.stop(); this.webServer = null; } catch (Exception ex) { throw new IllegalStateException(ex); } } }TomcatWebServer@Override public void stop() throws WebServerException { synchronized (this.monitor) { boolean wasStarted = this.started; try { this.started = false; try { stopTomcat(); this.tomcat.destroy(); } catch (LifecycleException ex) { // swallow and continue } } catch (Exception ex) { throw new WebServerException("Unable to stop embedded Tomcat", ex); } finally { if (wasStarted) { containerCounter.decrementAndGet(); } } } }
-
Spring的自动配置原理 spring的自动配置原理springboot配置文件的装配过程1、springboot在启动的时候会加载主配置类,开启了@EnableAutoConfiguration。2、@EnableAutoConfiguration的作用:利用AutoConfigurationImportSelector给容器导入一些组件。查看selectImports方法的内容,返回一个AutoConfigurationEntryAutoConfigurationEntry autoConfigurationEntry = getAutoConfigurationEntry(autoConfigurationMetadata, annotationMetadata); ------ List<String> configurations = getCandidateConfigurations(annotationMetadata, attributes); ------ protected List<String> getCandidateConfigurations(AnnotationMetadata metadata, AnnotationAttributes attributes) { List<String> configurations = SpringFactoriesLoader.loadFactoryNames(getSpringFactoriesLoaderFactoryClass(), getBeanClassLoader()); Assert.notEmpty(configurations, "No auto configuration classes found in META-INF/spring.factories. If you " + "are using a custom packaging, make sure that file is correct."); return configurations; }可以看到SpringFactoriesLoader.loadFactoryNames,继续看又调用了loadSpringFactories方法,获取META-INF/spring.factories资源文件public static List<String> loadFactoryNames(Class<?> factoryType, @Nullable ClassLoader classLoader) { String factoryTypeName = factoryType.getName(); return loadSpringFactories(classLoader).getOrDefault(factoryTypeName, Collections.emptyList()); } private static Map<String, List<String>> loadSpringFactories(@Nullable ClassLoader classLoader) { MultiValueMap<String, String> result = cache.get(classLoader); if (result != null) { return result; } try { Enumeration<URL> urls = (classLoader != null ? classLoader.getResources(FACTORIES_RESOURCE_LOCATION) : ClassLoader.getSystemResources(FACTORIES_RESOURCE_LOCATION)); result = new LinkedMultiValueMap<>(); while (urls.hasMoreElements()) { URL url = urls.nextElement(); UrlResource resource = new UrlResource(url); Properties properties = PropertiesLoaderUtils.loadProperties(resource); for (Map.Entry<?, ?> entry : properties.entrySet()) { String factoryTypeName = ((String) entry.getKey()).trim(); for (String factoryImplementationName : StringUtils.commaDelimitedListToStringArray((String) entry.getValue())) { result.add(factoryTypeName, factoryImplementationName.trim()); } } } cache.put(classLoader, result); return result; } catch (IOException ex) { throw new IllegalArgumentException("Unable to load factories from location [" + FACTORIES_RESOURCE_LOCATION + "]", ex); } }总结:将类路径下 META-INF/spring.factories 里面配置的所有EnableAutoConfiguration的值加入到了容器中;每一个xxxAutoConfiguration类都是容器中的一个组件,最后都加入到容器中,用来做自动配置,每一个自动配置类都可以进行自动配置功能使用HttpEncodingAutoConfiguration来解释自动装配原理/* 表名这是一个配置类, */ @Configuration(proxyBeanMethods = false) /* 启动指定类的ConfigurationProperties功能,进入HttpProperties查看,将配置文件中对应的值和HttpProperties绑定起来,并把HttpProperties加入到ioc容器中 */ @EnableConfigurationProperties(HttpProperties.class) /* spring底层@Confitional注解,根据不同的条件判断,如果满足指定的条件,整个配置类里面的配置就会生效 此时表示判断当前应用是否是web应用,如果是,那么配置类生效 */ @ConditionalOnWebApplication(type = ConditionalOnWebApplication.Type.SERVLET) /* 判断当前项目由没有这个类CharacterEncodingFilter,springmvc中进行乱码解决的过滤器 */ @ConditionalOnClass(CharacterEncodingFilter.class) /* 判断配置文件中是否存在某个配置:spring.http.encoding.enabled 如果不存在,判断也是成立的, 即使我们配置文件中不配置spring.http.encoding.enabled=true,也是默认生效的 */ @ConditionalOnProperty(prefix = "spring.http.encoding", value = "enabled", matchIfMissing = true) public class HttpEncodingAutoConfiguration { //和springboot的配置文件映射 private final HttpProperties.Encoding properties; //只有一个有参构造器的情况下,参数的值就会从容器中拿 public HttpEncodingAutoConfiguration(HttpProperties properties) { this.properties = properties.getEncoding(); } //给容器中添加一个组件,这个组件的某些值需要从properties中获取 @Bean @ConditionalOnMissingBean//判断容器中是否有此组件 public CharacterEncodingFilter characterEncodingFilter() { CharacterEncodingFilter filter = new OrderedCharacterEncodingFilter(); filter.setEncoding(this.properties.getCharset().name()); filter.setForceRequestEncoding(this.properties.shouldForce(Type.REQUEST)); filter.setForceResponseEncoding(this.properties.shouldForce(Type.RESPONSE)); return filter; } @Bean public LocaleCharsetMappingsCustomizer localeCharsetMappingsCustomizer() { return new LocaleCharsetMappingsCustomizer(this.properties); } private static class LocaleCharsetMappingsCustomizer implements WebServerFactoryCustomizer<ConfigurableServletWebServerFactory>, Ordered { private final HttpProperties.Encoding properties; LocaleCharsetMappingsCustomizer(HttpProperties.Encoding properties) { this.properties = properties; } @Override public void customize(ConfigurableServletWebServerFactory factory) { if (this.properties.getMapping() != null) { factory.setLocaleCharsetMappings(this.properties.getMapping()); } } @Override public int getOrder() { return 0; } } } 根据当前不同的条件判断,决定这个配置类是否生效!总结: 1、springboot启动会加载大量的自动配置类 2、查看需要的功能有没有在springboot默认写好的自动配置类中华 3、查看这个自动配置类到底配置了哪些组件 4、给容器中自动配置类添加组件的时候,会从properties类中获取属性@Conditional:自动配置类在一定条件下才能生效@Conditional扩展注解作用@ConditionalOnJava系统的java版本是否符合要求@ConditionalOnBean容器中存在指定Bean@ConditionalOnMissingBean容器中不存在指定Bean@ConditionalOnExpression满足SpEL表达式@ConditionalOnClass系统中有指定的类@ConditionalOnMissingClass系统中没有指定的类@ConditionalOnSingleCandidate容器中只有一个指定的Bean,或者是首选Bean@ConditionalOnProperty系统中指定的属性是否有指定的值@ConditionalOnResource类路径下是否存在指定资源文件@ConditionOnWebApplication当前是web环境@ConditionalOnNotWebApplication当前不是web环境@ConditionalOnJndiJNDI存在指定项
-
SpringBoot运行原理 springboot运行原理1、启动器<dependency> <groupId>org.springframework.boot</groupId> <artifactId>spring-boot-starter-web</artifactId> </dependency> springboot-boot-starter:就是springboot的场景启动器。springboot将所有的功能场景都抽取出来,做成一个个的starter,只需要在项目中引入这些starter即可,所有相关的依赖都会导入进来,根据公司业务需求决定导入什么启动器即可。2、主程序package com.mashibing; import org.springframework.boot.SpringApplication; import org.springframework.boot.autoconfigure.SpringBootApplication; //SpringBootApplication注解用来标注一个主程序类,说明是一个springboot应用 @SpringBootApplication public class StudyApplication { public static void main(String[] args) { SpringApplication.run(StudyApplication.class, args); } }查看@SpringBootApplication/* @ComponentScan:自动扫描并加载符合条件的组件或者bean,将这个bean定义加载到IOC容器中 @SpringBootConfiguration:标注在某个类上,表示这是一个springboot的配置类。 @EnableAutoConfiguration:开启自动配置功能,之前在使用springboot的时候,springboot可以自动帮我们完成配置功能,@EnableAutoConfiguration告诉springboot开启自动配置功能,这样自动配置才能生效 */ @Target(ElementType.TYPE) @Retention(RetentionPolicy.RUNTIME) @Documented @Inherited @SpringBootConfiguration @EnableAutoConfiguration @ComponentScan(excludeFilters = { @Filter(type = FilterType.CUSTOM, classes = TypeExcludeFilter.class), @Filter(type = FilterType.CUSTOM, classes = AutoConfigurationExcludeFilter.class) }) public @interface SpringBootApplication {}/* 可以看到SpringBootConfiguration使用了Configuration注解来标注 */ @Target(ElementType.TYPE) @Retention(RetentionPolicy.RUNTIME) @Documented @Configuration public @interface SpringBootConfiguration {}/* 可以看到Configuration也是容器中的一个组件 */ @Target(ElementType.TYPE) @Retention(RetentionPolicy.RUNTIME) @Documented @Component public @interface Configuration {}/* @AutoConfigurationPackage:自动配置包 @Import(AutoConfigurationImportSelector.class):导入哪些组件的选择器,它将所有需要导入的组件以全类名的方式返回,这些组件就会被添加到容器中,它会给容器中导入非常多的自动配置类,就是给容器中导入这个场景需要的所有组件,并配置好这些组件 */ @Target(ElementType.TYPE) @Retention(RetentionPolicy.RUNTIME) @Documented @Inherited @AutoConfigurationPackage @Import(AutoConfigurationImportSelector.class) public @interface EnableAutoConfiguration {}/* 给容器导入一个组件,导入的组件由AutoConfigurationPackages.Registrar.class将主配置类(@SpringBootApplication标注的类)的所在包及包下面所有子包里面的所有组件扫描到spring容器 */ @Target(ElementType.TYPE) @Retention(RetentionPolicy.RUNTIME) @Documented @Inherited @Import(AutoConfigurationPackages.Registrar.class) public @interface AutoConfigurationPackage {}/* 在AutoConfigurationImportSelector类中有如下方法,可以看到 */ protected List<String> getCandidateConfigurations(AnnotationMetadata metadata, AnnotationAttributes attributes) { List<String> configurations = SpringFactoriesLoader.loadFactoryNames(getSpringFactoriesLoaderFactoryClass(), getBeanClassLoader()); Assert.notEmpty(configurations, "No auto configuration classes found in META-INF/spring.factories. If you " + "are using a custom packaging, make sure that file is correct."); return configurations; } /* 此时返回的就是启动自动导入配置文件的注解类 */ protected Class<?> getSpringFactoriesLoaderFactoryClass() { return EnableAutoConfiguration.class; } //进入SpringFactoriesLoader类中 /* 看到会读取对应的配置文件,位置在META-INF/spring.factories中 */ public final class SpringFactoriesLoader { /** * The location to look for factories. * <p>Can be present in multiple JAR files. */ public static final String FACTORIES_RESOURCE_LOCATION = "META-INF/spring.factories";} //进入loadFactoryNames方法中 public static List<String> loadFactoryNames(Class<?> factoryType, @Nullable ClassLoader classLoader) { String factoryTypeName = factoryType.getName(); return loadSpringFactories(classLoader).getOrDefault(factoryTypeName, Collections.emptyList()); } private static Map<String, List<String>> loadSpringFactories(@Nullable ClassLoader classLoader) { MultiValueMap<String, String> result = cache.get(classLoader); if (result != null) { return result; } try { Enumeration<URL> urls = (classLoader != null ? classLoader.getResources(FACTORIES_RESOURCE_LOCATION) : ClassLoader.getSystemResources(FACTORIES_RESOURCE_LOCATION)); result = new LinkedMultiValueMap<>(); while (urls.hasMoreElements()) { URL url = urls.nextElement(); UrlResource resource = new UrlResource(url); Properties properties = PropertiesLoaderUtils.loadProperties(resource); for (Map.Entry<?, ?> entry : properties.entrySet()) { String factoryTypeName = ((String) entry.getKey()).trim(); for (String factoryImplementationName : StringUtils.commaDelimitedListToStringArray((String) entry.getValue())) { result.add(factoryTypeName, factoryImplementationName.trim()); } } } cache.put(classLoader, result); return result; } catch (IOException ex) { throw new IllegalArgumentException("Unable to load factories from location [" + FACTORIES_RESOURCE_LOCATION + "]", ex); } }springboot在启动的时候从类路径下的META-INF/spring.factories中获取EnableAutoConfiguration指定的值,将这些值作为自动配置类导入容器,自动配置类就生效,帮我们进行自动配置的工作:spring.factories文件位于springboot-autoconfigure.jar包中。所以真正实现是从classpath中搜寻所有的META-INF/spring.factories配置文件,并将其中对应org.springframework.boot.autoconfigure.包下的配置项通过反射实例化为对应标注了@Configuration的JavaConfig形式的IOC容器配置类,然后将这些都汇总称为一个实例并加载到IOC容器中。