搜索到
189
篇与
的结果
-
 ReentrantLock显示锁 package com.yanxizhu; import java.util.concurrent.locks.Lock; import java.util.concurrent.locks.ReentrantLock; /** * @description: ReentrantLock * @author: <a href="mailto:batis@foxmail.com">清风</a> * @date: 2022/3/19 12:37 * @version: 1.0 */ public class LockDemo { public static void main(String[] args) { titck titck = new titck(); new Thread(titck,"线程1").start(); new Thread(titck,"线程2").start(); new Thread(titck,"线程3").start(); } public static class titck implements Runnable{ Lock lock = new ReentrantLock(); private int titck = 100; @Override public void run() { while(true){ lock.lock(); try{ if(titck>0){ try { Thread.sleep(200); } catch (InterruptedException e) { e.printStackTrace(); } System.out.println("剩余票数:"+--titck); } }finally { lock.unlock(); } } } } } synchronized:隐式锁1、同步代码块2、同步方法jdk1.5之后:显示锁3、同步锁Lock注意:是一个显示锁,需要通过lock()方法上锁,必须通过unlock()方法进行释放锁。
 -
FutureTask用于闭锁 package com.yanxizhu; import java.util.concurrent.Callable; import java.util.concurrent.ExecutionException; import java.util.concurrent.FutureTask; /** * @description: FutureTask可用于闭锁 * @date: 2022/3/19 11:48 * @version: 1.0 */ public class FutureTaskDemo { public static void main(String[] args) throws ExecutionException, InterruptedException { myFutureTask myFutureTask = new myFutureTask(); FutureTask<Integer> futureTask = new FutureTask<>(myFutureTask); new Thread(futureTask).start(); //必须等线程执行完,才执行下面的代码,因此FutureTask可用于闭锁 Integer integer = futureTask.get(); System.out.println("integer="+integer); System.out.println("======================="); } public static class myFutureTask implements Callable<Integer>{ @Override public Integer call() throws Exception { int i=1; for(;i<1000000;i++){ i++; } return i; } } }
-
CopyOnWriteArrayList遍历集合 package com.yanxizhu; import java.util.*; /** * @description: synchronizedList遍历错误 * @date: 2022/3/19 11:30 * @version: 1.0 */ public class ConCurrentHashMapTest { public static void main(String[] args) { conCurrentDemo conCurrentDemo = new conCurrentDemo(); for(int i=0;i<5;i++){ new Thread(conCurrentDemo).start(); } } public static class conCurrentDemo implements Runnable{ //并发线程安全,修改报错 private static List<String> list = Collections.synchronizedList(new ArrayList<>()); static { list.add("apple"); list.add("xiaomi"); list.add("huawei"); } @Override public void run() { Iterator<String> iterator = list.iterator(); while(iterator.hasNext()){ System.out.println(iterator.next()); list.add("iphone"); } } } }线程安全报错:Exception in thread "Thread-0" Exception in thread "Thread-3" Exception in thread "Thread-4" Exception in thread "Thread-2" Exception in thread "Thread-1" java.util.ConcurrentModificationException at java.base/java.util.ArrayList$Itr.checkForComodification(ArrayList.java:1043) at java.base/java.util.ArrayList$Itr.next(ArrayList.java:997) at com.yanxizhu.ConCurrentHashMapTest$conCurrentDemo.run(ConCurrentHashMapTest.java:35) at java.base/java.lang.Thread.run(Thread.java:834) java.util.ConcurrentModificationException at java.base/java.util.ArrayList$Itr.checkForComodification(ArrayList.java:1043) at java.base/java.util.ArrayList$Itr.next(ArrayList.java:997) at com.yanxizhu.ConCurrentHashMapTest$conCurrentDemo.run(ConCurrentHashMapTest.java:35) at java.base/java.lang.Thread.run(Thread.java:834)通过用CopyOnWriteArrayList修改:package com.yanxizhu; import java.util.*; import java.util.concurrent.CopyOnWriteArrayList; /** * @description: CopyOnWriteArrayList遍历集合 * @date: 2022/3/19 11:30 * @version: 1.0 */ public class ConCurrentHashMapTest { public static void main(String[] args) { conCurrentDemo conCurrentDemo = new conCurrentDemo(); for(int i=0;i<5;i++){ new Thread(conCurrentDemo).start(); } } public static class conCurrentDemo implements Runnable{ //并发线程安全,修改报错 // private static List<String> list = Collections.synchronizedList(new ArrayList<>()); private static CopyOnWriteArrayList<String> list = new CopyOnWriteArrayList<>(); static { list.add("apple"); list.add("xiaomi"); list.add("huawei"); } @Override public void run() { Iterator<String> iterator = list.iterator(); while(iterator.hasNext()){ System.out.println(iterator.next()); //CopyOnWriteArrayList,每次会重新复制一个新的,添加。 list.add("iphone"); } } } }
-
Atomic原子类的使用 import java.util.concurrent.atomic.AtomicInteger; /** * @description: Atomic使用 * @date: 2022/3/19 10:14 * @version: 1.0 */ public class AtomicDemo { public static void main(String[] args) { ////通过synchronized、volatile实现 // demo demo = new demo(); // for(int i=0;i<10;i++){ // new Thread(demo).start(); // } //使用AtomicInteger实现 demo2 demo = new demo2(); for(int i=0;i<10;i++){ new Thread(demo).start(); } } //通过synchronized、volatile实现 public static class demo implements Runnable{ private volatile int num=0; @Override public void run() { try { Thread.sleep(2000); } catch (InterruptedException e) { e.printStackTrace(); } System.out.println("num="+getNums()); } public synchronized int getNums(){ return num ++; } } //使用AtomicInteger实现 public static class demo2 implements Runnable{ AtomicInteger num = new AtomicInteger(); @Override public void run() { try { Thread.sleep(2000); } catch (InterruptedException e) { e.printStackTrace(); } System.out.println("num="+getNums()); } public int getNums(){ return num.getAndIncrement(); } } }
-
CountDownLatch闭锁使用 import java.util.concurrent.CountDownLatch; /** * @date: 2022/3/19 11:09 * @version: 1.0 */ public class CountDownLatchTest { public static void main(String[] args) throws InterruptedException { CountDownLatch countDownLatch = new CountDownLatch(5); myCountDownlatch myCountDownlatch = new myCountDownlatch(countDownLatch); long start = System.currentTimeMillis(); for(int i=0;i<5;i++){ new Thread(myCountDownlatch).start(); } countDownLatch.await(); long end = System.currentTimeMillis(); System.out.println("耗时:"+(end-start)); } public static class myCountDownlatch implements Runnable{ private CountDownLatch countDownLatch; public myCountDownlatch(CountDownLatch countDownLatch){ this.countDownLatch = countDownLatch; } @Override public void run() { synchronized (this){ try{ for(int i =0;i<500;i++){ if(i % 2==0){ System.out.println(i); } } }finally { countDownLatch.countDown(); } } } } }
-
-
SpringBoot整合定时任务和异步任务 SpringBoot整合定时任务和异步任务一、定时任务SpringBoot整合quartz-scheduler,执行定时任务。1、开启定时任务@EnableScheduling2、开启一个定时任务@Scheduled3、编写cron表达式cron表达式格式请参考官方文档4、实例package com.yanxizhu.ifamily.booking.controller.scheduler; import lombok.extern.slf4j.Slf4j; import org.springframework.scheduling.annotation.EnableScheduling; import org.springframework.scheduling.annotation.Scheduled; import org.springframework.stereotype.Component; /** * SpringBoot整合Scheduling定时任务 * @author: <a href="mailto:vip@foxmail.com">清风</a> * @date: 2022/3/15 20:26 * @version: 1.0 */ @Slf4j @Component @EnableScheduling public class MyScheduler { /** * cron表达式 */ @Scheduled(cron = "1/3 1/1 * * * ? ") public void sayHell(){ log.info("Hello"); } }5、定时任务总结1、@EnableScheduling 开启一个定时任务2、@Scheduled 开启一个定时任务3、编写定时规则,也就是cron表达式。6、注意事项spring中6位组成,不允许第7位的年。在周几的位置,1-7代表周一到周日,MON-SUN定时任务不应该阻塞,默认时阻塞的,应该以异步任务执行。7、解决方案解决定时任务阻塞问题:使用异步+定时任务二、异步任务执行几种方式1、异步方式提交线程池可以让业务运行以异步的方式,自己提交到线程池(CompletableFuture异步编排)。@Slf4j @Component @EnableScheduling public class MyScheduler { public static ExecutorService executorService = Executors.newFixedThreadPool(10); /** * cron表达式 */ @Scheduled(cron = "1/3 1/1 * * * ? ") public void sayHell(){ CompletableFuture.runAsync(()->{ //调用server业务方法 }, executorService); } }2、定时任务线程池支持定时任务线程池(定时任务线程池)。Scheduling自动配置类,默认只有1个线程。// // Source code recreated from a .class file by IntelliJ IDEA // (powered by FernFlower decompiler) // package org.springframework.boot.autoconfigure.task; import java.util.concurrent.ScheduledExecutorService; import org.springframework.beans.factory.ObjectProvider; import org.springframework.boot.LazyInitializationExcludeFilter; import org.springframework.boot.autoconfigure.AutoConfigureAfter; import org.springframework.boot.autoconfigure.condition.ConditionalOnBean; import org.springframework.boot.autoconfigure.condition.ConditionalOnClass; import org.springframework.boot.autoconfigure.condition.ConditionalOnMissingBean; import org.springframework.boot.autoconfigure.task.TaskSchedulingProperties.Shutdown; import org.springframework.boot.context.properties.EnableConfigurationProperties; import org.springframework.boot.task.TaskSchedulerBuilder; import org.springframework.boot.task.TaskSchedulerCustomizer; import org.springframework.context.annotation.Bean; import org.springframework.context.annotation.Configuration; import org.springframework.scheduling.TaskScheduler; import org.springframework.scheduling.annotation.SchedulingConfigurer; import org.springframework.scheduling.concurrent.ThreadPoolTaskScheduler; @ConditionalOnClass({ThreadPoolTaskScheduler.class}) @Configuration( proxyBeanMethods = false ) @EnableConfigurationProperties({TaskSchedulingProperties.class}) @AutoConfigureAfter({TaskExecutionAutoConfiguration.class}) public class TaskSchedulingAutoConfiguration { public TaskSchedulingAutoConfiguration() { } @Bean @ConditionalOnBean( name = {"org.springframework.context.annotation.internalScheduledAnnotationProcessor"} ) @ConditionalOnMissingBean({SchedulingConfigurer.class, TaskScheduler.class, ScheduledExecutorService.class}) public ThreadPoolTaskScheduler taskScheduler(TaskSchedulerBuilder builder) { return builder.build(); } @Bean public static LazyInitializationExcludeFilter scheduledBeanLazyInitializationExcludeFilter() { return new ScheduledBeanLazyInitializationExcludeFilter(); } @Bean @ConditionalOnMissingBean public TaskSchedulerBuilder taskSchedulerBuilder(TaskSchedulingProperties properties, ObjectProvider<TaskSchedulerCustomizer> taskSchedulerCustomizers) { TaskSchedulerBuilder builder = new TaskSchedulerBuilder(); builder = builder.poolSize(properties.getPool().getSize()); Shutdown shutdown = properties.getShutdown(); builder = builder.awaitTermination(shutdown.isAwaitTermination()); builder = builder.awaitTerminationPeriod(shutdown.getAwaitTerminationPeriod()); builder = builder.threadNamePrefix(properties.getThreadNamePrefix()); builder = builder.customizers(taskSchedulerCustomizers); return builder; } }默认只有一个线程package org.springframework.boot.autoconfigure.task; import java.time.Duration; import org.springframework.boot.context.properties.ConfigurationProperties; @ConfigurationProperties("spring.task.scheduling") public class TaskSchedulingProperties { private final TaskSchedulingProperties.Pool pool = new TaskSchedulingProperties.Pool(); private final TaskSchedulingProperties.Shutdown shutdown = new TaskSchedulingProperties.Shutdown(); private String threadNamePrefix = "scheduling-"; public TaskSchedulingProperties() { } public TaskSchedulingProperties.Pool getPool() { return this.pool; } public TaskSchedulingProperties.Shutdown getShutdown() { return this.shutdown; } public String getThreadNamePrefix() { return this.threadNamePrefix; } public void setThreadNamePrefix(String threadNamePrefix) { this.threadNamePrefix = threadNamePrefix; } public static class Shutdown { private boolean awaitTermination; private Duration awaitTerminationPeriod; public Shutdown() { } public boolean isAwaitTermination() { return this.awaitTermination; } public void setAwaitTermination(boolean awaitTermination) { this.awaitTermination = awaitTermination; } public Duration getAwaitTerminationPeriod() { return this.awaitTerminationPeriod; } public void setAwaitTerminationPeriod(Duration awaitTerminationPeriod) { this.awaitTerminationPeriod = awaitTerminationPeriod; } } public static class Pool { private int size = 1; public Pool() { } public int getSize() { return this.size; } public void setSize(int size) { this.size = size; } } }配置线程池数量spring.task.scheduling.pool.size=5这样定时任务就有5个线程可以执行了,如果1个线程,定时任务就会阻塞。3、让定时任务执行@EnableAsync 开启异步任务功能@Async 在希望异步执行的方法开启异步执行注解,普通方法也可以使用。默认线程数8异步任务自动配置类源码:// // Source code recreated from a .class file by IntelliJ IDEA // (powered by FernFlower decompiler) // package org.springframework.boot.autoconfigure.task; import java.util.concurrent.Executor; import java.util.stream.Stream; import org.springframework.beans.factory.ObjectProvider; import org.springframework.boot.autoconfigure.condition.ConditionalOnClass; import org.springframework.boot.autoconfigure.condition.ConditionalOnMissingBean; import org.springframework.boot.autoconfigure.task.TaskExecutionProperties.Pool; import org.springframework.boot.autoconfigure.task.TaskExecutionProperties.Shutdown; import org.springframework.boot.context.properties.EnableConfigurationProperties; import org.springframework.boot.task.TaskExecutorBuilder; import org.springframework.boot.task.TaskExecutorCustomizer; import org.springframework.context.annotation.Bean; import org.springframework.context.annotation.Configuration; import org.springframework.context.annotation.Lazy; import org.springframework.core.task.TaskDecorator; import org.springframework.scheduling.concurrent.ThreadPoolTaskExecutor; @ConditionalOnClass({ThreadPoolTaskExecutor.class}) @Configuration( proxyBeanMethods = false ) @EnableConfigurationProperties({TaskExecutionProperties.class}) public class TaskExecutionAutoConfiguration { public static final String APPLICATION_TASK_EXECUTOR_BEAN_NAME = "applicationTaskExecutor"; public TaskExecutionAutoConfiguration() { } @Bean @ConditionalOnMissingBean public TaskExecutorBuilder taskExecutorBuilder(TaskExecutionProperties properties, ObjectProvider<TaskExecutorCustomizer> taskExecutorCustomizers, ObjectProvider<TaskDecorator> taskDecorator) { Pool pool = properties.getPool(); TaskExecutorBuilder builder = new TaskExecutorBuilder(); builder = builder.queueCapacity(pool.getQueueCapacity()); builder = builder.corePoolSize(pool.getCoreSize()); builder = builder.maxPoolSize(pool.getMaxSize()); builder = builder.allowCoreThreadTimeOut(pool.isAllowCoreThreadTimeout()); builder = builder.keepAlive(pool.getKeepAlive()); Shutdown shutdown = properties.getShutdown(); builder = builder.awaitTermination(shutdown.isAwaitTermination()); builder = builder.awaitTerminationPeriod(shutdown.getAwaitTerminationPeriod()); builder = builder.threadNamePrefix(properties.getThreadNamePrefix()); Stream var10001 = taskExecutorCustomizers.orderedStream(); var10001.getClass(); builder = builder.customizers(var10001::iterator); builder = builder.taskDecorator((TaskDecorator)taskDecorator.getIfUnique()); return builder; } @Lazy @Bean( name = {"applicationTaskExecutor", "taskExecutor"} ) @ConditionalOnMissingBean({Executor.class}) public ThreadPoolTaskExecutor applicationTaskExecutor(TaskExecutorBuilder builder) { return builder.build(); } }默认线程8package org.springframework.boot.autoconfigure.task; import java.time.Duration; import org.springframework.boot.context.properties.ConfigurationProperties; @ConfigurationProperties("spring.task.execution") public class TaskExecutionProperties { private final TaskExecutionProperties.Pool pool = new TaskExecutionProperties.Pool(); private final TaskExecutionProperties.Shutdown shutdown = new TaskExecutionProperties.Shutdown(); private String threadNamePrefix = "task-"; public TaskExecutionProperties() { } public TaskExecutionProperties.Pool getPool() { return this.pool; } public TaskExecutionProperties.Shutdown getShutdown() { return this.shutdown; } public String getThreadNamePrefix() { return this.threadNamePrefix; } public void setThreadNamePrefix(String threadNamePrefix) { this.threadNamePrefix = threadNamePrefix; } public static class Shutdown { private boolean awaitTermination; private Duration awaitTerminationPeriod; public Shutdown() { } public boolean isAwaitTermination() { return this.awaitTermination; } public void setAwaitTermination(boolean awaitTermination) { this.awaitTermination = awaitTermination; } public Duration getAwaitTerminationPeriod() { return this.awaitTerminationPeriod; } public void setAwaitTerminationPeriod(Duration awaitTerminationPeriod) { this.awaitTerminationPeriod = awaitTerminationPeriod; } } public static class Pool { private int queueCapacity = 2147483647; private int coreSize = 8; private int maxSize = 2147483647; private boolean allowCoreThreadTimeout = true; private Duration keepAlive = Duration.ofSeconds(60L); public Pool() { } public int getQueueCapacity() { return this.queueCapacity; } public void setQueueCapacity(int queueCapacity) { this.queueCapacity = queueCapacity; } public int getCoreSize() { return this.coreSize; } public void setCoreSize(int coreSize) { this.coreSize = coreSize; } public int getMaxSize() { return this.maxSize; } public void setMaxSize(int maxSize) { this.maxSize = maxSize; } public boolean isAllowCoreThreadTimeout() { return this.allowCoreThreadTimeout; } public void setAllowCoreThreadTimeout(boolean allowCoreThreadTimeout) { this.allowCoreThreadTimeout = allowCoreThreadTimeout; } public Duration getKeepAlive() { return this.keepAlive; } public void setKeepAlive(Duration keepAlive) { this.keepAlive = keepAlive; } } }通过配置线程池线程数spring.task.execution.pool.core-size=5 spring.task.execution.pool.max-size=50实列import lombok.extern.slf4j.Slf4j; import org.springframework.scheduling.annotation.Async; import org.springframework.scheduling.annotation.EnableAsync; import org.springframework.scheduling.annotation.EnableScheduling; import org.springframework.scheduling.annotation.Scheduled; import org.springframework.stereotype.Component; import java.util.concurrent.ExecutorService; import java.util.concurrent.Executors; @Slf4j @Component @EnableAsync @EnableScheduling public class MyScheduler { public static ExecutorService executorService = Executors.newFixedThreadPool(10); /** * cron表达式 */ @Async @Scheduled(cron = "1/3 1/1 * * * ? ") public void sayHell(){ System.out.println("Hello ...."); } }要用线程池的时候,自己注入即可用了。
-
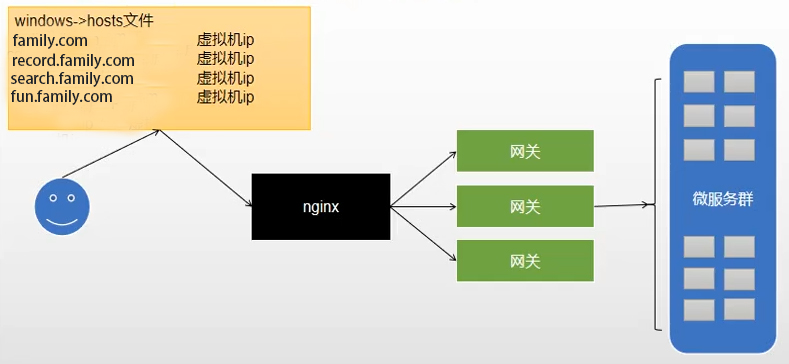
Nginx反向代理微服务配置 Nginx反向代理微服务配置一、本地域名服务访问过程二、正向代理和反向代理三、Nginx+Windows搭建域名访问环境1、修改C:\Windows\System32\drivers\etc下hosts文件,映射本地域名和192.168.56.10ip关系。每次通过记事本修改很麻烦,可以通过SwitchHosts软件修改。192.168.56.10 family.com2、现在就可以通过family.com域名访问了。想要访问部署在服务器上的其它端口应用也可以通过域名访问,比如:搭建的kibana是5601端口,通过域名http://family.com:5601/即可访问了(kibana时部署在56.10服务器上的)四、nginx.conf user nginx; worker_processes 1; error_log /var/log/nginx/error.log warn; pid /var/run/nginx.pid; events { worker_connections 1024; } http { include /etc/nginx/mime.types; default_type application/octet-stream; log_format main '$remote_addr - $remote_user [$time_local] "$request" ' '$status $body_bytes_sent "$http_referer" ' '"$http_user_agent" "$http_x_forwarded_for"'; access_log /var/log/nginx/access.log main; sendfile on; #tcp_nopush on; keepalive_timeout 65; #gzip on; include /etc/nginx/conf.d/*.conf; }Nginx配置文件说明:1、全局块:配置影响nginx全局的指令。如:用户组、nginx进程pid存放路径,日志存放路径,配置文件引入,允许生成wordker process数等。2、events块:配置影响nginx服务器或用户的网络链接。如:每个进程的最大连接数,选取那种事件驱动模型处理链接请求,是否允许同时接收多个网络链接,开启多个网络链接序列化等。3、http块:可以嵌套多个server,配置代理,缓存,日志定义等绝大多数功能和第三方模块的配置。如文件引入,mime-type定义,是否使用sendfile传输文件,链接超时事件,单链接请求数等。 http块里面又包含: 3.1、http全局块:如upstream,错误页面,连接超时等。 3.2、server块: 配置虚拟注解的相关参数,一个http中可以有多个wever。 server块里面又包含: 3.2.1、location:配置请求的路由,以及各种页面的处理情况。 注意: server块里面可以包含多个location。4、include /etc/nginx/conf.d/*.conf;注意:会包含所有include /etc/nginx/conf.d/这个目录下的所有配置文件。比如/etc/nginx/conf.d/默认有个default.conf配置文件,里面就只包含了server块。server { listen 80; -----------nginx监听的端口 server_name localhost; ------------nginx监听的端口 #charset koi8-r; #access_log /var/log/nginx/log/host.access.log main; ----访问日志 location / { ---------------- /表示上面监听域名下所有的请求,都可以在root目录下找,包括首页index root /usr/share/nginx/html index index.html index.htm; } #error_page 404 /404.html; ----------404错误页面路径配置 # redirect server error pages to the static page /50x.html # error_page 500 502 503 504 /50x.html; ---------500页面路径配置 location = /50x.html { root /usr/share/nginx/html; }五、反向代理配置配置实例:因为上面修改了host文件映射了域名到192.168.56.10服务器,所有通过服务上nginx访问本地127.0.0.1的springboot项目就可以通过配置反向代理域名访问。将通过nginx访问family.com的所有请求,通过nginx反向代理到本地的springboot项目地址本地springboot项目ip192.168.56.1:。server { listen 80; server_name family.com; #charset koi8-r; #access_log /var/log/nginx/log/host.access.log main; location / { proxy_pass http://192.168.56.1:40000; } #error_page 404 /404.html; # redirect server error pages to the static page /50x.html # error_page 500 502 503 504 /50x.html; location = /50x.html { root /usr/share/nginx/html; } # proxy the PHP scripts to Apache listening on 127.0.0.1:80 # #location ~ \.php$ { # proxy_pass http://127.0.0.1; #} # pass the PHP scripts to FastCGI server listening on 127.0.0.1:9000 # #location ~ \.php$ { # root html; # fastcgi_pass 127.0.0.1:9000; # fastcgi_index index.php; # fastcgi_param SCRIPT_FILENAME /scripts$fastcgi_script_name; # include fastcgi_params; #} # deny access to .htaccess files, if Apache's document root # concurs with nginx's one # #location ~ /\.ht { # deny all; #} }梳理流程:1、修改本地host文件,目的是模拟类似访问外网的一个域名,如果有服务器域名绑定了ip,就可以不用这步骤了。2、修改host映射family.com ------->192.168.56.10 (服务地址)。3、访问family.com就相当于访问192.168.56.10 (服务地址)。4、将所有family.com(这个域名默认端口为80)的所有请求,通过nginx反向代理到局域网内的其它服务器,比如这里就是本地搭建的springboot项目端口40000。5、通过反向代理配置listen 80; ------监控哪个端口 server_name family.com; ------监听哪个域名 location / { ---- /:表示所有请求 proxy_pass http://192.168.56.1:40000; --将family.com域名80端,反向代理到http://192.168.56.1:40000 }6、现在family.com:80端口的所有请求就会反向代理到http://192.168.56.1:40000了。反向代理后访问地址:七、nginx代理网关如果我们服务多了,每次都要修改域名,修改nginx配置反向代理到多个服务,这样比较麻烦。那我们就可以通过配置nginx代理到微服务的网关,让网关来负载均衡到各服务。nginx负载均衡参考地址nginx反向代理局域网内网关服务(192.168.56.1:88)。nginx配置如下: user nginx; worker_processes 1; error_log /var/log/nginx/error.log warn; pid /var/run/nginx.pid; events { worker_connections 1024; } http { include /etc/nginx/mime.types; default_type application/octet-stream; log_format main '$remote_addr - $remote_user [$time_local] "$request" ' '$status $body_bytes_sent "$http_referer" ' '"$http_user_agent" "$http_x_forwarded_for"'; access_log /var/log/nginx/access.log main; sendfile on; #tcp_nopush on; keepalive_timeout 65; #gzip on; upstream family { server 192.168.56.1:88; } include /etc/nginx/conf.d/*.conf; }注意修改的地方:upstream family { ----网关取的名字 server 192.168.56.1:88; -----网关服务地址 server srv2.example.com; ----可以配置多个网关地址,我这只有一个网关配一个即可 server srv3.example.com; server srv4.example.com; }修改yanxizhu.nginx配置:server { listen 80; server_name family.com; #charset koi8-r; #access_log /var/log/nginx/log/host.access.log main; location / { proxy_pass http://family; } #error_page 404 /404.html; # redirect server error pages to the static page /50x.html # error_page 500 502 503 504 /50x.html; location = /50x.html { root /usr/share/nginx/html; } # proxy the PHP scripts to Apache listening on 127.0.0.1:80 # #location ~ \.php$ { # proxy_pass http://127.0.0.1; #} # pass the PHP scripts to FastCGI server listening on 127.0.0.1:9000 # #location ~ \.php$ { # root html; # fastcgi_pass 127.0.0.1:9000; # fastcgi_index index.php; # fastcgi_param SCRIPT_FILENAME /scripts$fastcgi_script_name; # include fastcgi_params; #} # deny access to .htaccess files, if Apache's document root # concurs with nginx's one # #location ~ /\.ht { # deny all; #} }注意修改点:location / { proxy_pass http://family; ---这里就反向代理到family这个网关了,也就是上面取的网关名字 }接着就开始配置getway网关服务请求:注意:nginx代理给网关的时候会丢失host信息。解决办法;yanxizhu.conf添加代理host的header。proxy_set_header Host $proxy_host;family.conf整体如下:server { listen 80; server_name family.com; #charset koi8-r; #access_log /var/log/nginx/log/host.access.log main; location / { proxy_set_header Host $proxy_host; proxy_pass http://family; } #error_page 404 /404.html; # redirect server error pages to the static page /50x.html # error_page 500 502 503 504 /50x.html; location = /50x.html { root /usr/share/nginx/html; } # proxy the PHP scripts to Apache listening on 127.0.0.1:80 # #location ~ \.php$ { # proxy_pass http://127.0.0.1; #} # pass the PHP scripts to FastCGI server listening on 127.0.0.1:9000 # #location ~ \.php$ { # root html; # fastcgi_pass 127.0.0.1:9000; # fastcgi_index index.php; # fastcgi_param SCRIPT_FILENAME /scripts$fastcgi_script_name; # include fastcgi_params; #} # deny access to .htaccess files, if Apache's document root # concurs with nginx's one # #location ~ /\.ht { # deny all; #} }getway网关服务负载均衡配置: - id: family_host_route uri: lb://family-booking predicates: - Host=**.family.com比如访问http://family.com/时,nginx就会将请求反向代理给网关服务(192.168.56.1:88),而网关服务通过配置的负载均衡,又会将**.family.com域名的请求,负载均衡到family-booking微服务的80端口。以上就是nginx的反向代理配置。注意将getway网关的配置,放在最后,不然全部服务都被代理到family_host_route了。八、静态资源配置将前端静态资源上传到nginx静态资源目录,后端主页面路径加上static路径。server { listen 80; server_name family.com; #charset koi8-r; #access_log /var/log/nginx/log/host.access.log main; location /static/ { root /var/www/html; } location / { proxy_set_header Host $proxy_host; proxy_pass http://family; } #error_page 404 /404.html; # redirect server error pages to the static page /50x.html # error_page 500 502 503 504 /50x.html; location = /50x.html { root /usr/share/nginx/html; } # proxy the PHP scripts to Apache listening on 127.0.0.1:80 # #location ~ \.php$ { # proxy_pass http://127.0.0.1; #} # pass the PHP scripts to FastCGI server listening on 127.0.0.1:9000 # #location ~ \.php$ { # root html; # fastcgi_pass 127.0.0.1:9000; # fastcgi_index index.php; # fastcgi_param SCRIPT_FILENAME /scripts$fastcgi_script_name; # include fastcgi_params; #} # deny access to .htaccess files, if Apache's document root # concurs with nginx's one # #location ~ /\.ht { # deny all; #} }说明:location /static/ { root /var/www/html; }后端主页访问静态资源都添加上/static/静态资源目录,当请求static资源路径时,会被nginx处理请求nginx下配置的静态资源。
-
SpringBoot整合Sleuth+Zipkin 服务链路追踪 SpringBoot整合Sleuth+Zipkin 服务链路追踪一、整合 Sleu1、服务提供者与消费者导入依赖<!--整合 Sleut:服务提供者与消费者导入依赖--> <dependency> <groupId>org.springframework.cloud</groupId> <artifactId>spring-cloud-starter-sleuth</artifactId> <version>3.1.1</version> </dependency>2、打开 debug 日志logging: level: org.springframework.cloud.openfeign: debug org.springframework.cloud.sleuth: debug3、发起一次远程调用,观察控制台DEBUG [user-service,541450f08573fff5,541450f08573fff5,false]user-service:服务名 541450f08573fff5:是 TranceId,一条链路中,只有一个 TranceId 541450f08573fff5:是 spanId,链路中的基本工作单元 id false:表示是否将数据输出到其他服务,true 则会把信息输出到其他可视化的服务上观察二、整合 zipkin 可视化观察1、docker 安装 zipkin 服务器docker run --name zipkin -d -p 9411:9411 openzipkin/zipkin设置随docker启动docker update --restart=always zipkin2、导入依赖<dependency> <groupId>org.springframework.cloud</groupId> <artifactId>spring-cloud-starter-zipkin</artifactId> <version>2.2.8.RELEASE</version> </dependency>因为spring-cloud-starter-zipkin中引入了spring-cloud-starter-sleuth,因此上面的spring-cloud-starter-sleuth可以不用引入。3、添加 zipkin 相关配置spring: application: name: ifamily-booking zipkin: base-url: http://127.0.0.1:9411/ # zipkin 服务器的地址 # 关闭服务发现,否则 Spring Cloud 会把 zipkin 的 url 当做服务名称 discoveryClientEnabled: false sender: type: web # 设置使用 http 的方式传输数据 sleuth: sampler: probability: 1 # 设置抽样采集率为 100%,默认为 0.1,即 10%4、查看通过http://127.0.0.1:9411即可查看链路追踪信息。三、持久化链路追踪数据到ES启动命令docker run --env STORAGE_TYPE=elasticsearch --env ES_HOSTS=192.168.56.10:9200 openzipkin/zipkin-dependencies注意:这个是openzipkin/zipkin-dependencies,改版后的。