搜索到
189
篇与
的结果
-
 SpringBoot整合SpringCache SpringBoot整合SpringCache1、引入依赖<dependency> <groupId>org.springframework.boot</groupId> <artifactId>spring-boot-starter-cache</artifactId> </dependency>2、引入redis依赖<dependency> <groupId>org.springframework.boot</groupId> <artifactId>spring-boot-starter-data-redis</artifactId> </dependency>配置redis地址密码等等,可参考springboo整合redis3、默认配置自动配置// // Source code recreated from a .class file by IntelliJ IDEA // (powered by FernFlower decompiler) // package org.springframework.boot.autoconfigure.cache; import java.util.List; import java.util.stream.Collectors; import org.springframework.beans.factory.InitializingBean; import org.springframework.beans.factory.ObjectProvider; import org.springframework.boot.autoconfigure.AutoConfigureAfter; import org.springframework.boot.autoconfigure.condition.ConditionalOnBean; import org.springframework.boot.autoconfigure.condition.ConditionalOnClass; import org.springframework.boot.autoconfigure.condition.ConditionalOnMissingBean; import org.springframework.boot.autoconfigure.data.couchbase.CouchbaseDataAutoConfiguration; import org.springframework.boot.autoconfigure.data.redis.RedisAutoConfiguration; import org.springframework.boot.autoconfigure.hazelcast.HazelcastAutoConfiguration; import org.springframework.boot.autoconfigure.orm.jpa.EntityManagerFactoryDependsOnPostProcessor; import org.springframework.boot.autoconfigure.orm.jpa.HibernateJpaAutoConfiguration; import org.springframework.boot.context.properties.EnableConfigurationProperties; import org.springframework.cache.CacheManager; import org.springframework.cache.interceptor.CacheAspectSupport; import org.springframework.context.annotation.Bean; import org.springframework.context.annotation.Configuration; import org.springframework.context.annotation.Import; import org.springframework.context.annotation.ImportSelector; import org.springframework.core.type.AnnotationMetadata; import org.springframework.orm.jpa.AbstractEntityManagerFactoryBean; import org.springframework.orm.jpa.LocalContainerEntityManagerFactoryBean; import org.springframework.util.Assert; @Configuration( proxyBeanMethods = false ) @ConditionalOnClass({CacheManager.class}) @ConditionalOnBean({CacheAspectSupport.class}) @ConditionalOnMissingBean( value = {CacheManager.class}, name = {"cacheResolver"} ) @EnableConfigurationProperties({CacheProperties.class}) @AutoConfigureAfter({CouchbaseDataAutoConfiguration.class, HazelcastAutoConfiguration.class, HibernateJpaAutoConfiguration.class, RedisAutoConfiguration.class}) @Import({CacheAutoConfiguration.CacheConfigurationImportSelector.class, CacheAutoConfiguration.CacheManagerEntityManagerFactoryDependsOnPostProcessor.class}) public class CacheAutoConfiguration { public CacheAutoConfiguration() { } @Bean @ConditionalOnMissingBean public CacheManagerCustomizers cacheManagerCustomizers(ObjectProvider<CacheManagerCustomizer<?>> customizers) { return new CacheManagerCustomizers((List)customizers.orderedStream().collect(Collectors.toList())); } @Bean public CacheAutoConfiguration.CacheManagerValidator cacheAutoConfigurationValidator(CacheProperties cacheProperties, ObjectProvider<CacheManager> cacheManager) { return new CacheAutoConfiguration.CacheManagerValidator(cacheProperties, cacheManager); } static class CacheConfigurationImportSelector implements ImportSelector { CacheConfigurationImportSelector() { } public String[] selectImports(AnnotationMetadata importingClassMetadata) { CacheType[] types = CacheType.values(); String[] imports = new String[types.length]; for(int i = 0; i < types.length; ++i) { imports[i] = CacheConfigurations.getConfigurationClass(types[i]); } return imports; } } static class CacheManagerValidator implements InitializingBean { private final CacheProperties cacheProperties; private final ObjectProvider<CacheManager> cacheManager; CacheManagerValidator(CacheProperties cacheProperties, ObjectProvider<CacheManager> cacheManager) { this.cacheProperties = cacheProperties; this.cacheManager = cacheManager; } public void afterPropertiesSet() { Assert.notNull(this.cacheManager.getIfAvailable(), () -> { return "No cache manager could be auto-configured, check your configuration (caching type is '" + this.cacheProperties.getType() + "')"; }); } } @ConditionalOnClass({LocalContainerEntityManagerFactoryBean.class}) @ConditionalOnBean({AbstractEntityManagerFactoryBean.class}) static class CacheManagerEntityManagerFactoryDependsOnPostProcessor extends EntityManagerFactoryDependsOnPostProcessor { CacheManagerEntityManagerFactoryDependsOnPostProcessor() { super(new String[]{"cacheManager"}); } } }所有相关配置都在CacheProperties。重点关注自动配置中的: static class CacheConfigurationImportSelector implements ImportSelector { CacheConfigurationImportSelector() { } public String[] selectImports(AnnotationMetadata importingClassMetadata) { CacheType[] types = CacheType.values(); String[] imports = new String[types.length]; for(int i = 0; i < types.length; ++i) { imports[i] = CacheConfigurations.getConfigurationClass(types[i]); } return imports; } }CacheConfigurations.getConfigurationClass(types[i]); static String getConfigurationClass(CacheType cacheType) { String configurationClassName = (String)MAPPINGS.get(cacheType); Assert.state(configurationClassName != null, () -> { return "Unknown cache type " + cacheType; }); return configurationClassName; }MAPPINGS.get(cacheType);static { Map<CacheType, String> mappings = new EnumMap(CacheType.class); mappings.put(CacheType.GENERIC, GenericCacheConfiguration.class.getName()); mappings.put(CacheType.EHCACHE, EhCacheCacheConfiguration.class.getName()); mappings.put(CacheType.HAZELCAST, HazelcastCacheConfiguration.class.getName()); mappings.put(CacheType.INFINISPAN, InfinispanCacheConfiguration.class.getName()); mappings.put(CacheType.JCACHE, JCacheCacheConfiguration.class.getName()); mappings.put(CacheType.COUCHBASE, CouchbaseCacheConfiguration.class.getName()); mappings.put(CacheType.REDIS, RedisCacheConfiguration.class.getName()); mappings.put(CacheType.CAFFEINE, CaffeineCacheConfiguration.class.getName()); mappings.put(CacheType.SIMPLE, SimpleCacheConfiguration.class.getName()); mappings.put(CacheType.NONE, NoOpCacheConfiguration.class.getName()); MAPPINGS = Collections.unmodifiableMap(mappings); }mappings.put(CacheType.REDIS, RedisCacheConfiguration.class.getName());CacheAutoConfiguration会导入RedisCacheConfiguration;// // Source code recreated from a .class file by IntelliJ IDEA // (powered by FernFlower decompiler) // package org.springframework.boot.autoconfigure.cache; import java.util.LinkedHashSet; import java.util.List; import org.springframework.beans.factory.ObjectProvider; import org.springframework.boot.autoconfigure.AutoConfigureAfter; import org.springframework.boot.autoconfigure.cache.CacheProperties.Redis; import org.springframework.boot.autoconfigure.condition.ConditionalOnBean; import org.springframework.boot.autoconfigure.condition.ConditionalOnClass; import org.springframework.boot.autoconfigure.condition.ConditionalOnMissingBean; import org.springframework.boot.autoconfigure.data.redis.RedisAutoConfiguration; import org.springframework.cache.CacheManager; import org.springframework.context.annotation.Bean; import org.springframework.context.annotation.Conditional; import org.springframework.context.annotation.Configuration; import org.springframework.core.io.ResourceLoader; import org.springframework.data.redis.cache.RedisCacheManager; import org.springframework.data.redis.cache.RedisCacheManager.RedisCacheManagerBuilder; import org.springframework.data.redis.connection.RedisConnectionFactory; import org.springframework.data.redis.serializer.JdkSerializationRedisSerializer; import org.springframework.data.redis.serializer.RedisSerializationContext.SerializationPair; @Configuration( proxyBeanMethods = false ) @ConditionalOnClass({RedisConnectionFactory.class}) @AutoConfigureAfter({RedisAutoConfiguration.class}) @ConditionalOnBean({RedisConnectionFactory.class}) @ConditionalOnMissingBean({CacheManager.class}) @Conditional({CacheCondition.class}) class RedisCacheConfiguration { RedisCacheConfiguration() { } @Bean RedisCacheManager cacheManager(CacheProperties cacheProperties, CacheManagerCustomizers cacheManagerCustomizers, ObjectProvider<org.springframework.data.redis.cache.RedisCacheConfiguration> redisCacheConfiguration, ObjectProvider<RedisCacheManagerBuilderCustomizer> redisCacheManagerBuilderCustomizers, RedisConnectionFactory redisConnectionFactory, ResourceLoader resourceLoader) { RedisCacheManagerBuilder builder = RedisCacheManager.builder(redisConnectionFactory).cacheDefaults(this.determineConfiguration(cacheProperties, redisCacheConfiguration, resourceLoader.getClassLoader())); List<String> cacheNames = cacheProperties.getCacheNames(); if (!cacheNames.isEmpty()) { builder.initialCacheNames(new LinkedHashSet(cacheNames)); } if (cacheProperties.getRedis().isEnableStatistics()) { builder.enableStatistics(); } redisCacheManagerBuilderCustomizers.orderedStream().forEach((customizer) -> { customizer.customize(builder); }); return (RedisCacheManager)cacheManagerCustomizers.customize(builder.build()); } private org.springframework.data.redis.cache.RedisCacheConfiguration determineConfiguration(CacheProperties cacheProperties, ObjectProvider<org.springframework.data.redis.cache.RedisCacheConfiguration> redisCacheConfiguration, ClassLoader classLoader) { return (org.springframework.data.redis.cache.RedisCacheConfiguration)redisCacheConfiguration.getIfAvailable(() -> { return this.createConfiguration(cacheProperties, classLoader); }); } private org.springframework.data.redis.cache.RedisCacheConfiguration createConfiguration(CacheProperties cacheProperties, ClassLoader classLoader) { Redis redisProperties = cacheProperties.getRedis(); org.springframework.data.redis.cache.RedisCacheConfiguration config = org.springframework.data.redis.cache.RedisCacheConfiguration.defaultCacheConfig(); config = config.serializeValuesWith(SerializationPair.fromSerializer(new JdkSerializationRedisSerializer(classLoader))); if (redisProperties.getTimeToLive() != null) { config = config.entryTtl(redisProperties.getTimeToLive()); } if (redisProperties.getKeyPrefix() != null) { config = config.prefixCacheNameWith(redisProperties.getKeyPrefix()); } if (!redisProperties.isCacheNullValues()) { config = config.disableCachingNullValues(); } if (!redisProperties.isUseKeyPrefix()) { config = config.disableKeyPrefix(); } return config; } } 关注里面的方法:@Bean RedisCacheManager cacheManager(CacheProperties cacheProperties, CacheManagerCustomizers cacheManagerCustomizers, ObjectProvider<org.springframework.data.redis.cache.RedisCacheConfiguration> redisCacheConfiguration, ObjectProvider<RedisCacheManagerBuilderCustomizer> redisCacheManagerBuilderCustomizers, RedisConnectionFactory redisConnectionFactory, ResourceLoader resourceLoader) { RedisCacheManagerBuilder builder = RedisCacheManager.builder(redisConnectionFactory).cacheDefaults(this.determineConfiguration(cacheProperties, redisCacheConfiguration, resourceLoader.getClassLoader())); List<String> cacheNames = cacheProperties.getCacheNames(); if (!cacheNames.isEmpty()) { builder.initialCacheNames(new LinkedHashSet(cacheNames)); } if (cacheProperties.getRedis().isEnableStatistics()) { builder.enableStatistics(); } redisCacheManagerBuilderCustomizers.orderedStream().forEach((customizer) -> { customizer.customize(builder); }); return (RedisCacheManager)cacheManagerCustomizers.customize(builder.build()); }相当于自动配置好了缓存管理器RedisCacheManager,cacheProperties.getCacheNames();方法会读取yml里面的配置,接着初始化缓存builder.initialCacheNames(new LinkedHashSet(cacheNames)); public RedisCacheManager.RedisCacheManagerBuilder initialCacheNames(Set<String> cacheNames) { Assert.notNull(cacheNames, "CacheNames must not be null!"); cacheNames.forEach((it) -> { this.withCacheConfiguration(it, this.defaultCacheConfiguration); }); return this; }this.withCacheConfiguration(it, this.defaultCacheConfiguration);public RedisCacheManager.RedisCacheManagerBuilder withCacheConfiguration(String cacheName, RedisCacheConfiguration cacheConfiguration) { Assert.notNull(cacheName, "CacheName must not be null!"); Assert.notNull(cacheConfiguration, "CacheConfiguration must not be null!"); this.initialCaches.put(cacheName, cacheConfiguration); return this; }RedisCacheConfiguration中默认缓存定义规则:private org.springframework.data.redis.cache.RedisCacheConfiguration createConfiguration(CacheProperties cacheProperties, ClassLoader classLoader) { Redis redisProperties = cacheProperties.getRedis(); org.springframework.data.redis.cache.RedisCacheConfiguration config = org.springframework.data.redis.cache.RedisCacheConfiguration.defaultCacheConfig(); config = config.serializeValuesWith(SerializationPair.fromSerializer(new JdkSerializationRedisSerializer(classLoader))); if (redisProperties.getTimeToLive() != null) { config = config.entryTtl(redisProperties.getTimeToLive()); } if (redisProperties.getKeyPrefix() != null) { config = config.prefixCacheNameWith(redisProperties.getKeyPrefix()); } if (!redisProperties.isCacheNullValues()) { config = config.disableCachingNullValues(); } if (!redisProperties.isUseKeyPrefix()) { config = config.disableKeyPrefix(); } return config; }redisProperties也就是从yml中得到的配置。4、配置需要配置的地方:配置使用redis作为缓存spring.cache.type=redis使用缓存,官方文档 https://docs.spring.io/spring-framework/docs/5.3.18-SNAPSHOT/reference/html/integration.html#cache重点关注几个注解:@Cacheable: Triggers cache population. @CacheEvict: Triggers cache eviction. @CachePut: Updates the cache without interfering with the method execution. @Caching: Regroups multiple cache operations to be applied on a method. @CacheConfig: Shares some common cache-related settings at class-level.@Cacheable: Triggers cache population.触发将数据保存到缓存的操作@CacheEvict: Triggers cache eviction.触发将数据从缓存删除的操作@CachePut: Updates the cache without interfering with the method execution.不影响方法执行更新缓存@Caching: Regroups multiple cache operations to be applied on a method.组合以上多个操作@CacheConfig: Shares some common cache-related settings at class-level.在类级别共享缓存的相同配置5、自定义规则第一步、启动类上开启缓存功能:@EnableCaching第二部、只需要注解就能完成缓存操作@Cacheable:1、代表当前方法的结果需要缓存,如果缓存中有,方法不用调用。如果缓存中没有,会调用方法,最后将方法的结果放入缓存。2、每一个需要缓存的数据我们都来指定要翻到那个名字的缓存【缓存的分区,推荐按照业务类型分】。3、key默认自动生成,value默认是使用jdk默认序列化机制。默认时间是-1,永不过期。因此需要我们自定义规则:自定义规则/** * @description: Cache redis数据格式配置 * @date: 2022/2/17 21:59 * @version: 1.0 */ import com.alibaba.fastjson.support.spring.GenericFastJsonRedisSerializer; import org.springframework.boot.autoconfigure.cache.CacheProperties; import org.springframework.boot.context.properties.EnableConfigurationProperties; import org.springframework.cache.annotation.EnableCaching; import org.springframework.context.annotation.Bean; import org.springframework.context.annotation.Configuration; import org.springframework.data.redis.cache.RedisCacheConfiguration; import org.springframework.data.redis.cache.RedisCacheManager; import org.springframework.data.redis.serializer.GenericJackson2JsonRedisSerializer; import org.springframework.data.redis.serializer.RedisSerializationContext; import org.springframework.data.redis.serializer.StringRedisSerializer; @EnableConfigurationProperties(CacheProperties.class) @Configuration @EnableCaching public class MyCacheConfig { @Bean RedisCacheConfiguration redisCacheConfiguration(CacheProperties cacheProperties){ RedisCacheConfiguration config = RedisCacheConfiguration.defaultCacheConfig(); config = config.serializeKeysWith(RedisSerializationContext.SerializationPair.fromSerializer(new StringRedisSerializer())); config = config.serializeValuesWith(RedisSerializationContext.SerializationPair.fromSerializer(new GenericFastJsonRedisSerializer())); CacheProperties.Redis redisProperties = cacheProperties.getRedis(); if (redisProperties.getTimeToLive() != null) { config = config.entryTtl(redisProperties.getTimeToLive()); } // if (redisProperties.getKeyPrefix() != null) { // config = config.prefixCacheNameWith(redisProperties.getKeyPrefix()); // } if (!redisProperties.isCacheNullValues()) { config = config.disableCachingNullValues(); } if (!redisProperties.isUseKeyPrefix()) { config = config.disableKeyPrefix(); } return config; } }6、使用示例// 使用缓存注解方式,key:为方法名 @Override @Cacheable(value = {"record"},key = "#root.method.name") public RecordEntity getRecordAllInfoById(Long id) { //未使用注解缓存方案 // RecordEntity recordEntity = null; // // ValueOperations<String, String> forValue = redisTemplate.opsForValue(); // String recordData = forValue.get("RecordData"); // if(recordData==null){ // System.out.println("缓存没数据,执行查询数据库方法。。。。"); // recordEntity = getEntityByIdByFbsRedisson(id); // }else{ // System.out.println("从缓存中获取数据。。。。。"); // recordEntity = JSON.parseObject(recordData, new TypeReference<RecordEntity>() { // }); // } //使用注解缓存后 RecordEntity recordEntity = getEntityById(id); if(recordEntity!=null){ Long categoryId = recordEntity.getCategoryId(); Long[] catelogPath = findCatelogPath(categoryId); recordEntity.setCatelogPath(catelogPath); } return recordEntity; }key使用SPEL表达式规则可参考官网中 Using Custom Annotations使用规则。https://docs.spring.io/spring-framework/docs/5.3.18-SNAPSHOT/reference/html/integration.html#cache-annotation-stereotype
 -
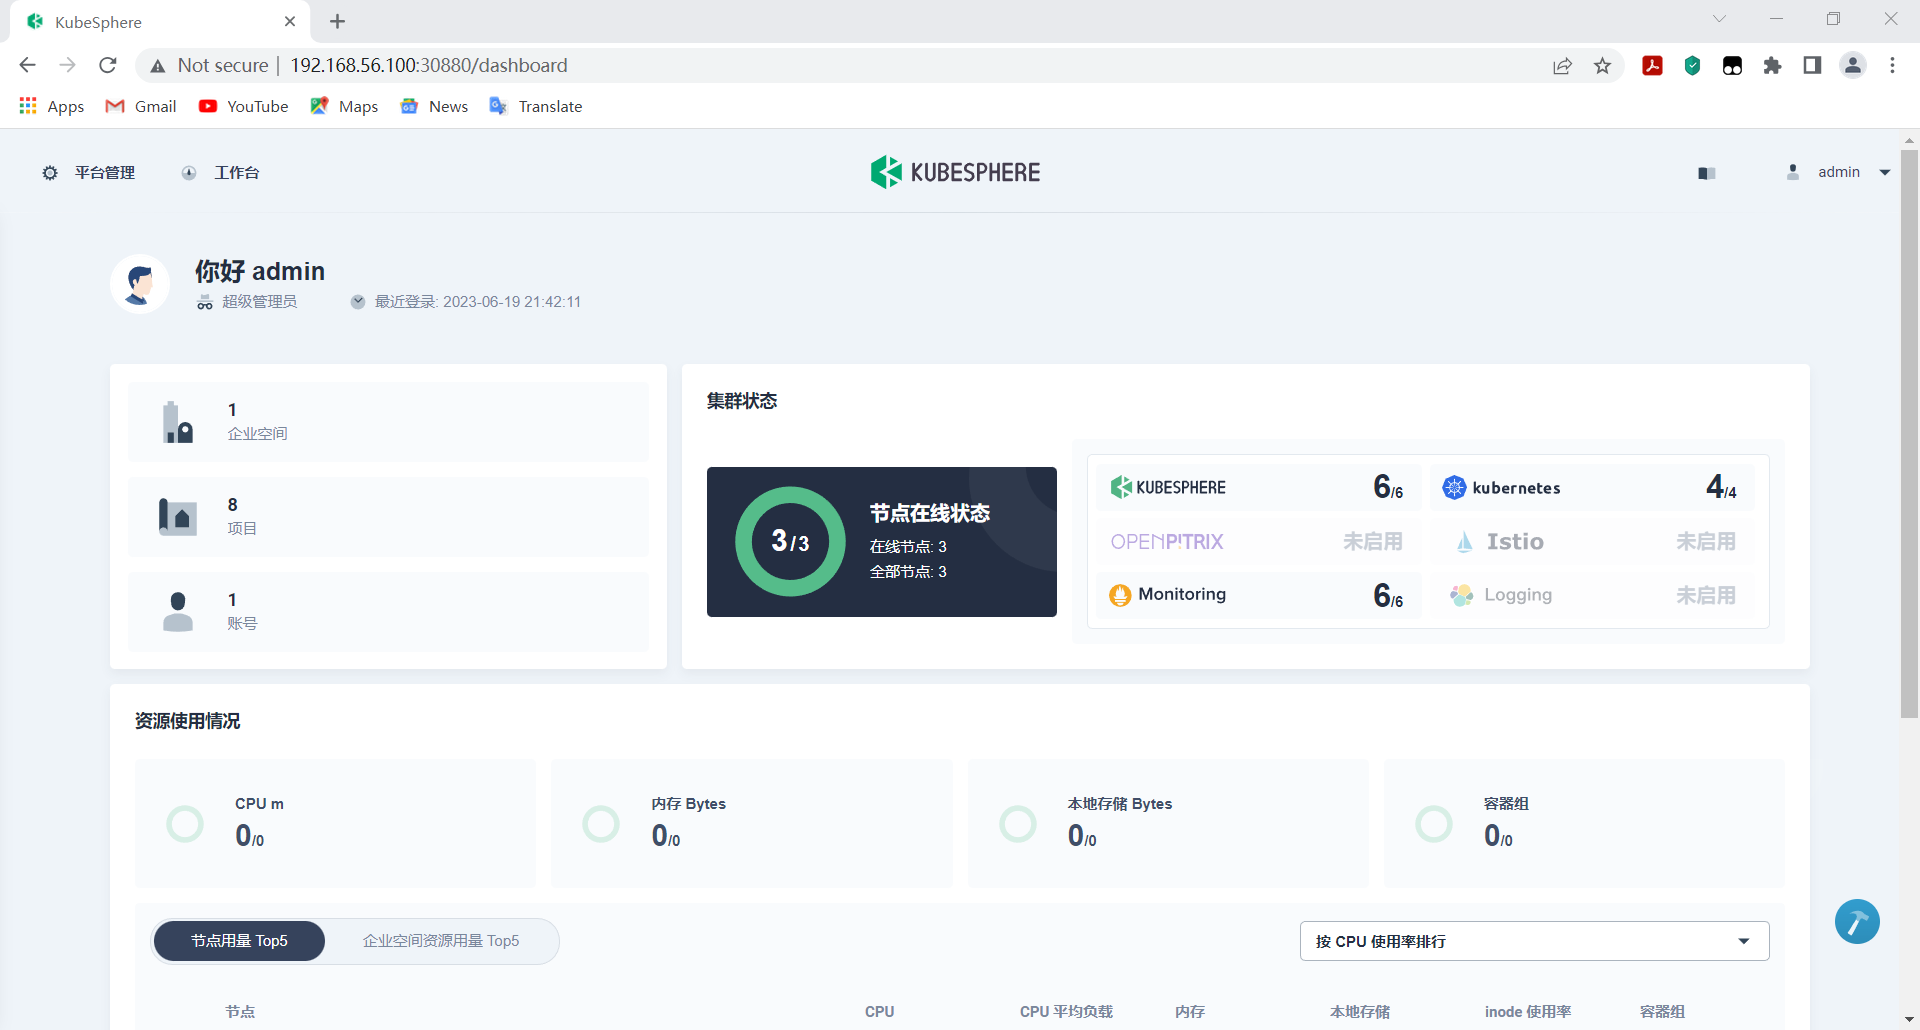
K8S集群部署 K8S集群部署一、VirtualBox虚拟机搭建通过Oracle VM VirtualBox,Vagrant搭建三台虚拟机。准备工作1、准备软件CentOS虚拟系统:CentOS-7-x86_64-Vagrant-2004_01.VirtualBox.box虚拟软件(VirtualBox):VirtualBox-6.1.34-150636-Win.exeVagrant安装虚拟机软件:vagrant_2.2.19_i686.msi。2、软件安装先安装VirtualBox、然后安装Vagrant。3、修改配置虚拟机、配置存放位置如下:虚拟系统安装1、创建配置文件新建Vagrantfile文件,批量创建3台虚拟机,内容如下:该文件是放在个人用户名文件夹下的。Vagrant.configure("2") do |config| (1..3).each do |i| config.vm.define "k8s-node#{i}" do |node| # 设置虚拟机的Box node.vm.box = "centos/7" config.vm.box_url = "https://mirrors.ustc.edu.cn/centos-cloud/centos/7/vagrant/x86_64/images/CentOS-7.box" # 设置虚拟机的主机名 node.vm.hostname="k8s-node#{i}" # 设置虚拟机的IP node.vm.network "private_network", ip: "192.168.56.#{99+i}", netmask: "255.255.255.0" # 设置主机与虚拟机的共享目录 # node.vm.synced_folder "~/Documents/vagrant/share", "/home/vagrant/share" # VirtaulBox相关配置 node.vm.provider "virtualbox" do |v| # 设置虚拟机的名称 v.name = "k8s-node#{i}" # 设置虚拟机的内存大小 v.memory = 4096 # 设置虚拟机的CPU个数 v.cpus = 4 end end end end 注意一个细节,如果不修改配置文件和存放路径,可能一直卡在文件复制过程中,检查是否复制了全部个人目录下数据。如果是请修改Vagrantfile文件:C:\Users\自己用户名\.vagrant.d\boxes\centos-VAGRANTSLASH-7\0\virtualbox\VagrantfileVagrant.configure("2") do |config| config.vm.base_mac = "5254004d77d3" config.vm.synced_folder "./.vagrant", "/vagrant", type: "rsync" end.vagrant:为自己用户名下的.vagrant文件夹2、创建虚拟系统进入配置好的Vagrantfile目录,cmd命令快速批量生成3台虚拟机:vagrant upSSH配置1、cmd进入虚拟机vagrant ssh k8s-node12、切换root账号,默认密码vagrantsu root3、修改ssh配置,开启 root 的密码访问权限vi /etc/ssh/sshd_config修改配置文件:PasswordAuthentication为yesPasswordAuthentication yes4、重启sshdservice sshd restart5、三台虚拟机相同配置。二、网络配置1、全局添加网卡2、网卡配置为每台虚拟配置网卡一NET网络,并重新生成mac地址。说明:网卡1是实际用的地址,网卡2是用于本地ssh链接到虚拟机的网络。注意:三台虚拟机进行同样操作,记得重新生成mac地址。3、linux 环境配置通过上面配置后,启动3太虚拟机,通过SSH软件连接到3台虚拟机,都进行下面操作:注意:三个节点都执行关闭防火墙systemctl stop firewalld systemctl disable firewalld关闭 selinuxsed -i 's/enforcing/disabled/' /etc/selinux/config setenforce 0关闭 swap临时关闭swapoff -a 永久sed -ri 's/.*swap.*/#&/' /etc/fstab验证,swap 必须为 0;free -g 添加主机名与 IP 对应关系vi /etc/hosts添加自己主机net网络ip与虚拟机名字映射:(注意,重点,ip不要搞错了,是eth0的ip)10.0.2.15 k8s-node1 10.0.2.6 k8s-node2 10.0.2.7 k8s-node3将桥接的 IPv4 流量传递到 iptables 的链:cat > /etc/sysctl.d/k8s.conf << EOF net.bridge.bridge-nf-call-ip6tables = 1 net.bridge.bridge-nf-call-iptables = 1 EOF重启sysctl --syste疑难问题,遇见提示是只读的文件系统,运行如下命令mount -o remount rw三、安装K8S环境所有节点安装 Docker、kubeadm、kubelet、kubectldocker安装1、卸载系统之前的 dockersudo yum remove docker \ docker-client \ docker-client-latest \ docker-common \ docker-latest \ docker-latest-logrotate \ docker-logrotate \ docker-engine2、安装 Docker-CEsudo yum install -y yum-utils \ device-mapper-persistent-data \ lvm23、设置 docker repo 的 yum 位置sudo yum-config-manager --add-repo https://mirrors.aliyun.com/docker-ce/linux/centos/docker-ce.repo4、安装 docker,以及 docker-clisudo yum install -y docker-ce docker-ce-cli containerd.iosudo sed -i 's+download.docker.com+mirrors.aliyun.com/docker-ce+' /etc/yum.repos.d/docker-ce.repo5、更新并安装Docker-CEsudo yum makecache fastsudo yum install -y docker-ce docker-ce-cli containerd.io6、配置docker加速sudo mkdir -p /etc/docker sudo tee /etc/docker/daemon.json <<-'EOF' { "registry-mirrors": ["https://82m9ar63.mirror.aliyuncs.com"] } EOF sudo systemctl daemon-reload sudo systemctl restart docker注意看看daemon.json最后文件是否创建成功,对不对。7、启动 docker & 设置 docker 开机自启systemctl enable docker8、添加阿里云 yum 源cat > /etc/yum.repos.d/kubernetes.repo << EOF [kubernetes] name=Kubernetes baseurl=https://mirrors.aliyun.com/kubernetes/yum/repos/kubernetes-el7-x86_64 enabled=1 gpgcheck=0 repo_gpgcheck=0 gpgkey=https://mirrors.aliyun.com/kubernetes/yum/doc/yum-key.gpg https://mirrors.aliyun.com/kubernetes/yum/doc/rpm-package-key.gpg EOF安装 kubeadm,kubelet 、 kubectlyum install -y kubelet-1.17.3 kubeadm-1.17.3 kubectl-1.17.31、设置开机启动systemctl enable kubelet systemctl start kubelet2、通过命令查看现在是起不来得,还没配置好。systemctl status kubelet四、部署 k8s-mastermaster 节点初始化1、初始化注意修改为自己master主机地址,我的master虚拟机IP:10.0.2.15kubeadm init \ --apiserver-advertise-address=10.0.2.15 \ --image-repository registry.cn-hangzhou.aliyuncs.com/google_containers \ --kubernetes-version v1.17.3 \ --service-cidr=10.96.0.0/16 \ --pod-network-cidr=10.244.0.0/162、/root/新建文件夹k8s,然后cd k8s目录,新建master_images.sh文件:注意版本。#!/bin/bash images=( kube-apiserver:v1.17.3 kube-proxy:v1.17.3 kube-controller-manager:v1.17.3 kube-scheduler:v1.17.3 coredns:1.6.5 etcd:3.4.3-0 pause:3.1 ) for imageName in ${images[@]} ; do docker pull registry.cn-hangzhou.aliyuncs.com/google_containers/$imageName # docker tag registry.cn-hangzhou.aliyuncs.com/google_containers/$imageName k8s.gcr.io/$imageName done3、修改脚本权限:chmod 700 master_images.sh4、执行脚本:./master_images.sh执行结果:[bootstrap-token] Using token: zrevjr.nwh8xqynzt2yopdb [bootstrap-token] Configuring bootstrap tokens, cluster-info ConfigMap, RBAC Roles [bootstrap-token] configured RBAC rules to allow Node Bootstrap tokens to post CSRs in order for nodes to get long term certificate credentials [bootstrap-token] configured RBAC rules to allow the csrapprover controller automatically approve CSRs from a Node Bootstrap Token [bootstrap-token] configured RBAC rules to allow certificate rotation for all node client certificates in the cluster [bootstrap-token] Creating the "cluster-info" ConfigMap in the "kube-public" namespace [kubelet-finalize] Updating "/etc/kubernetes/kubelet.conf" to point to a rotatable kubelet client certificate and key [addons] Applied essential addon: CoreDNS [addons] Applied essential addon: kube-proxy Your Kubernetes control-plane has initialized successfully! To start using your cluster, you need to run the following as a regular user: mkdir -p $HOME/.kube sudo cp -i /etc/kubernetes/admin.conf $HOME/.kube/config sudo chown $(id -u):$(id -g) $HOME/.kube/config You should now deploy a pod network to the cluster. Run "kubectl apply -f [podnetwork].yaml" with one of the options listed at: https://kubernetes.io/docs/concepts/cluster-administration/addons/ Then you can join any number of worker nodes by running the following on each as root: kubeadm join 10.0.2.15:6443 --token zrevjr.nwh8xqynzt2yopdb \ --discovery-token-ca-cert-hash sha256:500b649b719b910b065659bd3dfac38aa184b9450d37fd2de0e8c0e69840de88 5、master根据提示执行命令:mkdir -p $HOME/.kube sudo cp -i /etc/kubernetes/admin.conf $HOME/.kube/config sudo chown $(id -u):$(id -g) $HOME/.kube/config注意:记录下自己上面的打印信息,后面会用到生成的信息。kubeadm join 10.0.2.15:6443 --token zrevjr.nwh8xqynzt2yopdb \ --discovery-token-ca-cert-hash sha256:500b649b719b910b065659bd3dfac38aa184b9450d37fd2de0e8c0e69840de88 安装网络插件1、安装kube-flannel.yml文件地址https://raw.githubusercontent.com/coreos/flannel/master/Documentation/kube-flannel.ymlkubectl apply -f kube-flannel.yml由于是海外站点可能访问不到,kube-flannel.yml配置文件内容如下:--- apiVersion: policy/v1beta1 kind: PodSecurityPolicy metadata: name: psp.flannel.unprivileged annotations: seccomp.security.alpha.kubernetes.io/allowedProfileNames: docker/default seccomp.security.alpha.kubernetes.io/defaultProfileName: docker/default apparmor.security.beta.kubernetes.io/allowedProfileNames: runtime/default apparmor.security.beta.kubernetes.io/defaultProfileName: runtime/default spec: privileged: false volumes: - configMap - secret - emptyDir - hostPath allowedHostPaths: - pathPrefix: "/etc/cni/net.d" - pathPrefix: "/etc/kube-flannel" - pathPrefix: "/run/flannel" readOnlyRootFilesystem: false # Users and groups runAsUser: rule: RunAsAny supplementalGroups: rule: RunAsAny fsGroup: rule: RunAsAny # Privilege Escalation allowPrivilegeEscalation: false defaultAllowPrivilegeEscalation: false # Capabilities allowedCapabilities: ['NET_ADMIN'] defaultAddCapabilities: [] requiredDropCapabilities: [] # Host namespaces hostPID: false hostIPC: false hostNetwork: true hostPorts: - min: 0 max: 65535 # SELinux seLinux: # SELinux is unused in CaaSP rule: 'RunAsAny' --- kind: ClusterRole apiVersion: rbac.authorization.k8s.io/v1beta1 metadata: name: flannel rules: - apiGroups: ['extensions'] resources: ['podsecuritypolicies'] verbs: ['use'] resourceNames: ['psp.flannel.unprivileged'] - apiGroups: - "" resources: - pods verbs: - get - apiGroups: - "" resources: - nodes verbs: - list - watch - apiGroups: - "" resources: - nodes/status verbs: - patch --- kind: ClusterRoleBinding apiVersion: rbac.authorization.k8s.io/v1beta1 metadata: name: flannel roleRef: apiGroup: rbac.authorization.k8s.io kind: ClusterRole name: flannel subjects: - kind: ServiceAccount name: flannel namespace: kube-system --- apiVersion: v1 kind: ServiceAccount metadata: name: flannel namespace: kube-system --- kind: ConfigMap apiVersion: v1 metadata: name: kube-flannel-cfg namespace: kube-system labels: tier: node app: flannel data: cni-conf.json: | { "name": "cbr0", "cniVersion": "0.3.1", "plugins": [ { "type": "flannel", "delegate": { "hairpinMode": true, "isDefaultGateway": true } }, { "type": "portmap", "capabilities": { "portMappings": true } } ] } net-conf.json: | { "Network": "10.244.0.0/16", "Backend": { "Type": "vxlan" } } --- apiVersion: apps/v1 kind: DaemonSet metadata: name: kube-flannel-ds-amd64 namespace: kube-system labels: tier: node app: flannel spec: selector: matchLabels: app: flannel template: metadata: labels: tier: node app: flannel spec: affinity: nodeAffinity: requiredDuringSchedulingIgnoredDuringExecution: nodeSelectorTerms: - matchExpressions: - key: beta.kubernetes.io/os operator: In values: - linux - key: beta.kubernetes.io/arch operator: In values: - amd64 hostNetwork: true tolerations: - operator: Exists effect: NoSchedule serviceAccountName: flannel initContainers: - name: install-cni image: quay.io/coreos/flannel:v0.11.0-amd64 command: - cp args: - -f - /etc/kube-flannel/cni-conf.json - /etc/cni/net.d/10-flannel.conflist volumeMounts: - name: cni mountPath: /etc/cni/net.d - name: flannel-cfg mountPath: /etc/kube-flannel/ containers: - name: kube-flannel image: quay.io/coreos/flannel:v0.11.0-amd64 command: - /opt/bin/flanneld args: - --ip-masq - --kube-subnet-mgr resources: requests: cpu: "100m" memory: "50Mi" limits: cpu: "100m" memory: "50Mi" securityContext: privileged: false capabilities: add: ["NET_ADMIN"] env: - name: POD_NAME valueFrom: fieldRef: fieldPath: metadata.name - name: POD_NAMESPACE valueFrom: fieldRef: fieldPath: metadata.namespace volumeMounts: - name: run mountPath: /run/flannel - name: flannel-cfg mountPath: /etc/kube-flannel/ volumes: - name: run hostPath: path: /run/flannel - name: cni hostPath: path: /etc/cni/net.d - name: flannel-cfg configMap: name: kube-flannel-cfg --- apiVersion: apps/v1 kind: DaemonSet metadata: name: kube-flannel-ds-arm64 namespace: kube-system labels: tier: node app: flannel spec: selector: matchLabels: app: flannel template: metadata: labels: tier: node app: flannel spec: affinity: nodeAffinity: requiredDuringSchedulingIgnoredDuringExecution: nodeSelectorTerms: - matchExpressions: - key: beta.kubernetes.io/os operator: In values: - linux - key: beta.kubernetes.io/arch operator: In values: - arm64 hostNetwork: true tolerations: - operator: Exists effect: NoSchedule serviceAccountName: flannel initContainers: - name: install-cni image: quay.io/coreos/flannel:v0.11.0-arm64 command: - cp args: - -f - /etc/kube-flannel/cni-conf.json - /etc/cni/net.d/10-flannel.conflist volumeMounts: - name: cni mountPath: /etc/cni/net.d - name: flannel-cfg mountPath: /etc/kube-flannel/ containers: - name: kube-flannel image: quay.io/coreos/flannel:v0.11.0-arm64 command: - /opt/bin/flanneld args: - --ip-masq - --kube-subnet-mgr resources: requests: cpu: "100m" memory: "50Mi" limits: cpu: "100m" memory: "50Mi" securityContext: privileged: false capabilities: add: ["NET_ADMIN"] env: - name: POD_NAME valueFrom: fieldRef: fieldPath: metadata.name - name: POD_NAMESPACE valueFrom: fieldRef: fieldPath: metadata.namespace volumeMounts: - name: run mountPath: /run/flannel - name: flannel-cfg mountPath: /etc/kube-flannel/ volumes: - name: run hostPath: path: /run/flannel - name: cni hostPath: path: /etc/cni/net.d - name: flannel-cfg configMap: name: kube-flannel-cfg --- apiVersion: apps/v1 kind: DaemonSet metadata: name: kube-flannel-ds-arm namespace: kube-system labels: tier: node app: flannel spec: selector: matchLabels: app: flannel template: metadata: labels: tier: node app: flannel spec: affinity: nodeAffinity: requiredDuringSchedulingIgnoredDuringExecution: nodeSelectorTerms: - matchExpressions: - key: beta.kubernetes.io/os operator: In values: - linux - key: beta.kubernetes.io/arch operator: In values: - arm hostNetwork: true tolerations: - operator: Exists effect: NoSchedule serviceAccountName: flannel initContainers: - name: install-cni image: quay.io/coreos/flannel:v0.11.0-arm command: - cp args: - -f - /etc/kube-flannel/cni-conf.json - /etc/cni/net.d/10-flannel.conflist volumeMounts: - name: cni mountPath: /etc/cni/net.d - name: flannel-cfg mountPath: /etc/kube-flannel/ containers: - name: kube-flannel image: quay.io/coreos/flannel:v0.11.0-arm command: - /opt/bin/flanneld args: - --ip-masq - --kube-subnet-mgr resources: requests: cpu: "100m" memory: "50Mi" limits: cpu: "100m" memory: "50Mi" securityContext: privileged: false capabilities: add: ["NET_ADMIN"] env: - name: POD_NAME valueFrom: fieldRef: fieldPath: metadata.name - name: POD_NAMESPACE valueFrom: fieldRef: fieldPath: metadata.namespace volumeMounts: - name: run mountPath: /run/flannel - name: flannel-cfg mountPath: /etc/kube-flannel/ volumes: - name: run hostPath: path: /run/flannel - name: cni hostPath: path: /etc/cni/net.d - name: flannel-cfg configMap: name: kube-flannel-cfg --- apiVersion: apps/v1 kind: DaemonSet metadata: name: kube-flannel-ds-ppc64le namespace: kube-system labels: tier: node app: flannel spec: selector: matchLabels: app: flannel template: metadata: labels: tier: node app: flannel spec: affinity: nodeAffinity: requiredDuringSchedulingIgnoredDuringExecution: nodeSelectorTerms: - matchExpressions: - key: beta.kubernetes.io/os operator: In values: - linux - key: beta.kubernetes.io/arch operator: In values: - ppc64le hostNetwork: true tolerations: - operator: Exists effect: NoSchedule serviceAccountName: flannel initContainers: - name: install-cni image: quay.io/coreos/flannel:v0.11.0-ppc64le command: - cp args: - -f - /etc/kube-flannel/cni-conf.json - /etc/cni/net.d/10-flannel.conflist volumeMounts: - name: cni mountPath: /etc/cni/net.d - name: flannel-cfg mountPath: /etc/kube-flannel/ containers: - name: kube-flannel image: quay.io/coreos/flannel:v0.11.0-ppc64le command: - /opt/bin/flanneld args: - --ip-masq - --kube-subnet-mgr resources: requests: cpu: "100m" memory: "50Mi" limits: cpu: "100m" memory: "50Mi" securityContext: privileged: false capabilities: add: ["NET_ADMIN"] env: - name: POD_NAME valueFrom: fieldRef: fieldPath: metadata.name - name: POD_NAMESPACE valueFrom: fieldRef: fieldPath: metadata.namespace volumeMounts: - name: run mountPath: /run/flannel - name: flannel-cfg mountPath: /etc/kube-flannel/ volumes: - name: run hostPath: path: /run/flannel - name: cni hostPath: path: /etc/cni/net.d - name: flannel-cfg configMap: name: kube-flannel-cfg --- apiVersion: apps/v1 kind: DaemonSet metadata: name: kube-flannel-ds-s390x namespace: kube-system labels: tier: node app: flannel spec: selector: matchLabels: app: flannel template: metadata: labels: tier: node app: flannel spec: affinity: nodeAffinity: requiredDuringSchedulingIgnoredDuringExecution: nodeSelectorTerms: - matchExpressions: - key: beta.kubernetes.io/os operator: In values: - linux - key: beta.kubernetes.io/arch operator: In values: - s390x hostNetwork: true tolerations: - operator: Exists effect: NoSchedule serviceAccountName: flannel initContainers: - name: install-cni image: quay.io/coreos/flannel:v0.11.0-s390x command: - cp args: - -f - /etc/kube-flannel/cni-conf.json - /etc/cni/net.d/10-flannel.conflist volumeMounts: - name: cni mountPath: /etc/cni/net.d - name: flannel-cfg mountPath: /etc/kube-flannel/ containers: - name: kube-flannel image: quay.io/coreos/flannel:v0.11.0-s390x command: - /opt/bin/flanneld args: - --ip-masq - --kube-subnet-mgr resources: requests: cpu: "100m" memory: "50Mi" limits: cpu: "100m" memory: "50Mi" securityContext: privileged: false capabilities: add: ["NET_ADMIN"] env: - name: POD_NAME valueFrom: fieldRef: fieldPath: metadata.name - name: POD_NAMESPACE valueFrom: fieldRef: fieldPath: metadata.namespace volumeMounts: - name: run mountPath: /run/flannel - name: flannel-cfg mountPath: /etc/kube-flannel/ volumes: - name: run hostPath: path: /run/flannel - name: cni hostPath: path: /etc/cni/net.d - name: flannel-cfg configMap: name: kube-flannel-cfg2、查看所有名称空间的 pods注意注意:多等一会,如果一直Pending状态,缺少网络插件,需要重新部署flannel网络插件。处理方案:执行脚本kubectl apply -f https://docs.projectcalico.org/v3.14/manifests/calico.yaml重新查看:如果都是Running表示安装成功。kubectl get pods --all-namespaces查看节点信息:kubectl get nodes加入节点1、在 Node2、node3 节点执行,上面初始化master时生成的,加入:kubeadm join 10.0.2.15:6443 --token zrevjr.nwh8xqynzt2yopdb \ --discovery-token-ca-cert-hash sha256:500b649b719b910b065659bd3dfac38aa184b9450d37fd2de0e8c0e69840de88 2、查看节点信息:多等一会等全部Ready时表示成功。kubectl get nodes可监控 pod进度:watch kubectl get pod -n kube-system -o wide再次查看节点信息:kubectl get nodes此时都是Ready状态,整个集群就搭建成功了。一个manster+2个node节点。五、K8S测试1、master自动选择哪个节点,部署一个 tomcat。kubectl create deployment tomcat6 --image=tomcat:6.0.53-jre8说明:tomcat6:部署应用名称image:镜像获取到 tomcat 信息查看资源:kubectl get all查看更详细信息:kubectl get all -o wide可以看到tomcat部署在了node3节点。在node3执行docker命令可以看到tomcat已经执行:docker imagesdocker ps查看默认命名空间信息:kubectl get pods查看全部命名空间信息:kubectl get pods --all-namespaces2、容灾恢复node3节点模拟宕机,停掉tomcat应用:docker stop 9f2fad305252会自动再部署一个tomcat容器。node3节点直接关机测试模拟宕机。查看节点信息node3已经是noreadykubectl get nodes查看详细信息:kubectl get pods -o wide此时node2节点已经在拉去创建tomcat镜像创建tomcat了node2节点查看docker信息,已经有tomcat了:docker imagesdocker ps这就是所谓的容灾恢复。3、暴露 nginx 访问kubectl expose deployment tomcat6 --port=80 --target-port=8080 --type=NodePort说明:Pod 的 80 映射容器的 8080;service 会代理 Pod 的 80端口。查看服务信息:svc(service的简写)kubectl get svc -o wide然后就可以通过http://192.168.56.101:32476/访问了查看信息:kubectl get all4、动态扩容测试kubectl scale --replicas=3 deployment tomcat6扩容了多份,所有无论访问哪个 node 的指定端口,都可以访问到 tomcat6。上面扩容了3个tomcat6.查看扩容后情况:kubectl get pods -o wide查看服务端口信息:kubectl get svc -o wide此时通过任何节点32476端口都可以访问tomcat了。缩容同样可以实现:kubectl scale --replicas=1 deployment tomcat65、删除部署 查看资源信息kubectl get all删除整个部署信息 kubectl delete deployment.apps/tomcat6此时再查看kubectl get allkubectl get pods已经没有tomcat部署信息了流程:创建 deployment 会管理 replicas,replicas 控制 pod 数量,有 pod 故障会自动拉起 新的 pod。六、kubesphere最小化安装安装helmHelm 是Kubernetes 的包管理器。包管理器类似于我们在Ubuntu 中使用的apt、Centos中使用的yum 或者Python 中的pip 一样,能快速查找、下载和安装软件包。Helm 由客户端组件helm 和服务端组件Tiller 组成, 能够将一组K8S 资源打包统一管理, 是查找、共享和使用为Kubernetes 构建的软件的最佳方式。有3种安装方案,推荐第三种方案。1、helm安装方案一:直接下载安装curl -L https://git.io/get_helm.sh | bash方案二:使用通过给定的get_helm.sh脚本安装。chmod 700 get_helm.sh然后执行安装./get_helm.sh可能有文件格式兼容性问题,用vi 打开该sh 文件,输入::set ff 回车,显示fileformat=dos,重新设置下文件格式: :set ff=unix 保存退出: :wq方案三:上面2种方案都需要可以访问外网。因此有了这种离线安装方案。离线下载安装,推荐使用这种国内。注意:指定版本才行,其他版本官网不支持。1、下载离线安装包https://get.helm.sh/helm-v2.16.3-linux-amd64.tar.gz2、解压tar -zxvf helm-v2.16.3-linux-amd64.tar.gz3、安装cp linux-amd64/helm /usr/local/bin cp linux-amd64/tiller /usr/local/bin4、修改权限chmod 777 /usr/local/bin/helm chmod 777 /usr/local/bin/tiller5、验证:helm version2、授权文件配置创建权限(只需要master 执行),创建授权文件helm-rbac.yaml,内容如下:apiVersion: v1 kind: ServiceAccount metadata: name: tiller namespace: kube-system --- apiVersion: rbac.authorization.k8s.io/v1 kind: ClusterRoleBinding metadata: name: tiller roleRef: apiGroup: rbac.authorization.k8s.io kind: ClusterRole name: cluster-admin subjects: - kind: ServiceAccount name: tiller namespace: kube-system应用配置文件:kubectl apply -f helm-rbac.yaml3、安装Tiller(master 执行)初始化:helm init --service-account tiller --upgrade \ -i registry.cn-hangzhou.aliyuncs.com/google_containers/tiller:v2.16.3 \ --stable-repo-url https://kubernetes.oss-cn-hangzhou.aliyuncs.com/charts查看:kubectl get pods --all-namespaces3、去掉 master 节点的 Taint等所有组件Running后,确认 master 节点是否有 Taint,如下表示master 节点有 Taint。kubectl describe node k8s-node1 | grep Taint去掉污点,否则污点会影响OpenEBS安装:kubectl taint nodes k8s-node1 node-role.kubernetes.io/master:NoSchedule-安装 OpenEBS创建 OpenEBS 的 namespace,OpenEBS 相关资源将创建在这个 namespace 下:kubectl create ns openebs安装 OpenEBS如果直接安装可能会报错:"Error: failed to download "stable/openebs" (hint: running helm repo update may help"解决方法:换镜像helm repo remove stable helm repo add stable http://mirror.azure.cn/kubernetes/charts执行安装helm install --namespace openebs --name openebs stable/openebs --version 1.5.03、安装 OpenEBS 后将自动创建 4 个 StorageClass,查看创建的 StorageClass:kubectl get sc4、将 openebs-hostpath设置为 默认的 StorageClass:kubectl patch storageclass openebs-hostpath -p '{"metadata": {"annotations":{"storageclass.kubernetes.io/is-default-class":"true"}}}'最小化安装kubesphere下载最小化安装配置文件kubesphere-mini.yaml内容如下:--- apiVersion: v1 kind: Namespace metadata: name: kubesphere-system --- apiVersion: v1 data: ks-config.yaml: | --- persistence: storageClass: "" etcd: monitoring: False endpointIps: 192.168.0.7,192.168.0.8,192.168.0.9 port: 2379 tlsEnable: True common: mysqlVolumeSize: 20Gi minioVolumeSize: 20Gi etcdVolumeSize: 20Gi openldapVolumeSize: 2Gi redisVolumSize: 2Gi metrics_server: enabled: False console: enableMultiLogin: False # enable/disable multi login port: 30880 monitoring: prometheusReplicas: 1 prometheusMemoryRequest: 400Mi prometheusVolumeSize: 20Gi grafana: enabled: False logging: enabled: False elasticsearchMasterReplicas: 1 elasticsearchDataReplicas: 1 logsidecarReplicas: 2 elasticsearchMasterVolumeSize: 4Gi elasticsearchDataVolumeSize: 20Gi logMaxAge: 7 elkPrefix: logstash containersLogMountedPath: "" kibana: enabled: False openpitrix: enabled: False devops: enabled: False jenkinsMemoryLim: 2Gi jenkinsMemoryReq: 1500Mi jenkinsVolumeSize: 8Gi jenkinsJavaOpts_Xms: 512m jenkinsJavaOpts_Xmx: 512m jenkinsJavaOpts_MaxRAM: 2g sonarqube: enabled: False postgresqlVolumeSize: 8Gi servicemesh: enabled: False notification: enabled: False alerting: enabled: False kind: ConfigMap metadata: name: ks-installer namespace: kubesphere-system --- apiVersion: v1 kind: ServiceAccount metadata: name: ks-installer namespace: kubesphere-system --- apiVersion: rbac.authorization.k8s.io/v1 kind: ClusterRole metadata: creationTimestamp: null name: ks-installer rules: - apiGroups: - "" resources: - '*' verbs: - '*' - apiGroups: - apps resources: - '*' verbs: - '*' - apiGroups: - extensions resources: - '*' verbs: - '*' - apiGroups: - batch resources: - '*' verbs: - '*' - apiGroups: - rbac.authorization.k8s.io resources: - '*' verbs: - '*' - apiGroups: - apiregistration.k8s.io resources: - '*' verbs: - '*' - apiGroups: - apiextensions.k8s.io resources: - '*' verbs: - '*' - apiGroups: - tenant.kubesphere.io resources: - '*' verbs: - '*' - apiGroups: - certificates.k8s.io resources: - '*' verbs: - '*' - apiGroups: - devops.kubesphere.io resources: - '*' verbs: - '*' - apiGroups: - monitoring.coreos.com resources: - '*' verbs: - '*' - apiGroups: - logging.kubesphere.io resources: - '*' verbs: - '*' - apiGroups: - jaegertracing.io resources: - '*' verbs: - '*' - apiGroups: - storage.k8s.io resources: - '*' verbs: - '*' - apiGroups: - admissionregistration.k8s.io resources: - '*' verbs: - '*' --- kind: ClusterRoleBinding apiVersion: rbac.authorization.k8s.io/v1 metadata: name: ks-installer subjects: - kind: ServiceAccount name: ks-installer namespace: kubesphere-system roleRef: kind: ClusterRole name: ks-installer apiGroup: rbac.authorization.k8s.io --- apiVersion: apps/v1 kind: Deployment metadata: name: ks-installer namespace: kubesphere-system labels: app: ks-install spec: replicas: 1 selector: matchLabels: app: ks-install template: metadata: labels: app: ks-install spec: serviceAccountName: ks-installer containers: - name: installer image: kubesphere/ks-installer:v2.1.1 imagePullPolicy: "Always"1、执行安装kubectl apply -f kubesphere-mini.yaml2、等所有pod启动好后,执行日志查看。查看所有pod状态kubectl get pods --all-namespaces查看所有节点:kubectl get nodes3、查看日志:kubectl logs -n kubesphere-system $(kubectl get pod -n kubesphere-system -l app=ks-install -o jsonpath='{.items[0].metadata.name}') -f最后控制台显示:4、最后,由于在文档开头手动去掉了 master 节点的 Taint,我们可以在安装完 OpenEBS 和 KubeSphere 后,可以将 master 节点 Taint 加上,避免业务相关的工作负载调度到 master 节点抢占 master 资源: kubectl describe node k8s-node1 | grep Taint添加Taint:kubectl taint nodes k8s-node1 node-role.kubernetes.io/master=:NoSchedule5、访问测试注意:日志如果显示的是内网地址,也可以直接通过Net网络IP地址地址访问。http://192.168.56.100:30880/dashboard默认账号:admin 密码:P@88w0rd七、定制化安装master节点执行下面命令,修改需要开启的功能为True保存后会自动安装新开启的组件。kubectl edit cm -n kubesphere-system ks-installer同样可以通过命令监听安装情况:kubectl logs -n kubesphere-system $(kubectl get pod -n kubesphere-system -l app=ks-install -o jsonpath='{.items[0].metadata.name}') -f
-
MySQL优化 索引一、全表扫描没有使用索引的时候,数据的查询需要进行多次IO读写,这样的性能较差——全表扫描的过程。二、索引为数据库的某个字段创建索引,相当是为这个字段的内容创建了一个目录。通过这个目录可以快速的实现数据的定位,也就是通过索引能够快速的找到某条数据所在磁盘的位置。三、索引存放位置InnoDB存储引擎的表:将索引和数据存放在同一个文件里。(为什么?有什么优势?)*ibdMyISAM存储引擎的表:索引和数据分开两个文件来存储。 索引:*.MYI; 数据:MYD四、索引分类1、主键索引:主键自带索效果,也就意味着通过主键来查询表中的记录,性能是非常好的。2、普通索引:为普通列创建的索引。索引名一般格式: **idx_字段名** create index 索引名 on 表明(字段); 例子: create index idx_participant_ on cal_resource_permission(participant_);3、唯一索引:就像是唯一列,列中的数据是唯一的。比普通索引的性能要好。唯一索引名称:idx_unique_列明 create unique index 唯一索引名称 on 表明(列名); 例子: create unique index idx_unique_resource_id_ on cal_resource_permission(resource_id_);4、联合索引(组合索引):一次性为表中的多个字段一起创建索引,最左前缀法则(如何命中联合索引中的索引列)。注意:一个联合索引建议不要超过5个列格式:联合索引名一般格式: idx_字段1_字段2_字段3 create index 联合索引名 on 表明(字段1,字段2,字段3); 例子: create index idx_resource_scope_type on cal_resource_permission(resource_id_,scope_,type_id_);5、全文索引:进行查询的时候,数据源可能来自于不同的字段或者不同的表。比如去百度中查询数据,yanxizhu,来自于网页的标题或者网页的内容。MyISAM存储引擎支持全文索引。在实际生产环境中,并不会使用MySQL提供的MyISAM存储引擎的全文索引功能来是实现全文查找。而是会使用第三方的搜索引擎中间件比如ElasticSearch(比较多)、Solr。索引使用的数据结构使用索引查找数据性能很快,避免了全表扫描的多次磁盘IO读写。但是我们发现,使用索引实际上也需要在索引中查找数据,而且数据量是一样的,那么凭什么索引就能快呢?这就跟索引使用了哪种数据结构支持快速查找。什么叫数据结构:存放数据的结构。比如:数组、链表、栈、堆、队列等等这些概念。一、线性表线性的维护数据的顺序。对于线性表来说,有两种数据结构来支撑:线性顺序表:相邻两个数据的逻辑关系和物理位置是相同的。线性链式表:相邻两个数据的逻辑关系和物理存放位置没有关系。数据是有先后的逻辑关系,但是数据的物理存储位置并不连续。线性链式表又分为单项链表和双向链表:单向链表:能够通过当前结点找到下一个节点的位置,以此来维护链表的逻辑关系结点结构:数据内容+下一个数据的指针双向链表:能够通过当前结点找到上一个或下一个节点的位置,双向都可找。结点结构:上一个数据的指针+数据内容+下一个数据的指针。时间复杂度(比较次数)/空间复杂度(算法需要使用多少个变量空间)顺序表和链式表的区别:顺序表--数组:进行数据的查询性能(可以通过数组的索引/下标),数组的查询性能非常好,时间复杂度是0(1)数组的增删性能是非常差。链式表--链表:查询的性能是非常差的:时间复杂度是O(n),增删性能是非常好。二、栈、队列、串、广义表栈分为:顺序栈、链式栈顺序栈链式栈栈特点:先进后出,FIFO。队列分为:顺序队列、链式队列顺序队列链式队列队列特点:先进先出。串:String定长串、StringBuffer/Stringbuilder动态串广义表:更加灵活的多维数组,可以在不同的元素中创建不同的维度的数组。树查找树的查找性能是明显比线性表的性能要好,有这么几种树:多叉树、二叉树、二又查找树、平衡二叉树、红黑树、B树、B+树一、多叉树:非二叉树二、二叉树:一个结点最多只能有2个子结点,可以是0、1、2子结点。三、二叉查找树:二又查找树的查找性能是ok的。查询性能跟树的高度有关,树的高度又根你插入数据的顺序有关系。特点:二又树的根结点的数值是比所有左子树的结点的数值大,比右子树的几点的数值小。这样的规律同样满足于他的所有子树。四、平衡二又树,又称为AVL树实际上就是遵循以下两个特点的二叉树:每棵子树中的左子树和右子树的深度差不能超过1;二叉树中每棵子树都要求是平衡二叉树;其实就是在二又树的基础上,若树中每棵子树都满足其左子树和右子树的深度差都不超过1,则这棵二又树就是平衡二又树。二又排序树转化为平衡二叉树为了排除动态查找表中不同的数据排列方式对算法性能的影响,需要考虑在不会破坏二又排序树本身结构的前提下,将二又排序树转化为平衡二叉树,左旋、右旋、双向(先左后右、先右后左)。五、红黑树红黑树是一种特化的AVL树(平衡二叉树)(平衡二叉树的一种体现),都是在进行插入和删除操作时通过特定操作保持二又查找树的平衡,从而获得较高的查找性能。在二又查找树强制一般要求以外,对于任何有效的红黑树我们增加了如下的额外要求:性质1.结点是红色或黑色。性质2.根结点是黑色。性质3.不可能有连在一起的红色节点。性质4.每个红色结点的两个子结点都是黑色。叶子结点都是黑色(nil-黑色的空节点)这些约束强制了红黑树的关键性质:从根到叶子的最长的可能路径不多于最短的可能路径的两倍长。结果是这个树大致上是平衡的。因为操作比如插入、删除和查找某个值的最坏情况时间都要求与树的高度成比例,这个在高度上的理论上限允许红黑树在最坏情况下都是高效的,而不同于普通的二叉查找树。平衡二又树为了维护树的平衡,在一旦不满足平衡的情况就要进行自旋,但是自旋会造成一定的系统开销。因此红黑树在自旋造成的系统开销和减少查询次数之间做了权衡。因此红黑树有时候并不是一颗平衡二叉树。红黑树已经是在查询性能上得到了优化,但索引依然没有使用红黑树作为数据结构来存储数据,因为红黑树在每一层上存放的数据内容是有限的,导致数据量一大,树的深度就变得非常大,于是查询性能非常差。因此索引没有使用红黑树。六、B树B树允许一个结点存放多个数据。这样可以使更小的树的深度来存放更多的数据。但是,B树的一个结点中到底能存放多少个数据,决定了树的深度。七、B+树特点:非叶子结点冗余了叶子结点中的键。叶子结点是从小到大、从左到右排列的。叶子结点之间提供了指针,提高了区间访问的性能。只有叶子结点存放数据。非叶子结点是不存放数据的,只存放键。八、哈希表(散列表)使用哈希表来存取数据的性能是最快的,O(1),但是不支持范围查找(区间访问)。InnoDB和MyISAM的区别InnoDB和MyISAM都是数据库表的存储引擎。那么在互联网公司,或者追求查询性能的场景下,都会使用lnnoDB作为表的存储引擎。为什么?1、InnoDB引擎把索引和数据存放在一个文件中,通过找到索引后就能直接在索引树上得叶子节点中获取完整得数据。------聚集索引可以实现行锁/表锁。2、MyISAM存储引擎把索引和数据存放在两个文件中,查找到索引后还要去另一个文件中找数据,性能会慢一些——非聚集索引。除此之外,MyISAM天然支持表锁,而且支持全文索引。|关键点:InnoDB聚集索引与MyISAM-非聚集索引面试题1.问题一:为什么非主键索引的叶子节点存放的数据是主键值如果普通索引中不存放主键,而存放完整数据,那么就会造成:数据冗余:虽然提升了查询性能,但是需要更多的空间来存放冗余的数据维护麻烦:一个地方修改数据,需要在多棵索引树上修改。2.问题二:为什么InnoDB表必须创建主键创建InnoDB表不使用主键能创建成功吗?如果能创建功能,能不能为这张表的普通列创建索引?如果没有主键,MySQL优化器会给一个虚拟的主键,于是普通索引会使用这个虚拟主键——也会造成性能开销。为了性能考虑,和设计初衷,那么创建表的时候就应该创建主键。3.问题三:为什么使用主键时推荐使用整型的自增主键1)为什么要使用整型:主键-主键索引树-树里的叶子结点和非叶子结点的键存放的是主键的值,而且这颗树是一个二又查找树。数据的存放是有大小顺序的。·整型:大小顺序是很好比较的·字符串:字符串的自然顺序的比较是要进行一次编码成为数值后再进行比较的。(字符串的自然顺序,AZ)uuid随机字符串2)为什么要自增:如果不用自增:(1016。200。18。29)使用不规律的整数来作为主键,那么主键索引树会使用更多的自旋次数来保证树索引树的叶子节点中的数据是从小到大-从左到右排列,因此性能必然比使用了自增主键的性能要差!联合索引和最左前缀法则1.联合索引的特点在使用一个索引来实现多个表中字段的索引效果。2.联合索引是如何存储的3.最左前缀法则最左前缀法则是表示一条sql语句在联合索引中有没有走索引(命中索引/不会全表扫描)#创建联合索引 create index idx_name_repaymentAmount_userName on pay(name,repaymentAmount,userName); #sql是否走联合索引 select * from pay where name="早餐"; //走索引 select * from pay where name="早餐" and repaymentAmount=5.50; //走索引 select * from pay where name="早餐" and repaymentAmount=5.50 and userName="邓凌"; //走索引 select * from pay where repaymentAmount=5.50; //不走索引 select * from pay where name="早餐" and userName="邓凌"; //走一个索引 select * from pay where userName="邓凌"; //不走索引 select * from pay where name="早餐" and userName="邓凌" and repaymentAmount=5.50 ; //走索引,因为mysql内部有优化器SQL优化SQL优化的目的是为了SQL语句能够具备优秀的查询性能,实现这样的目的有很多的途径:工程优化如何实现:数据库标准、表的结构标准、字段的标准、创建索引SQL语句的优化:当前SQL语句有没有命中索引。一、工程优化基础规范表存储引擎必须使用InnoDB表字符集默认使用utf8,必要时候使用utf8mb4通用,无乱码风险,汉字3字节,英文1字节utff8mb4是utf8的超集,有存储4字节例如表情符号时,使用它禁止使用存储过程,视图,触发器,Event对数据库性能影响较大,互联网业务,能让站点层和服务层干的事情,不要交到数据库层调试,排错,迁移都比较困难,扩展性较差禁止在数据库中存储大文件,例如照片,可以将大文件存储在对象存储系统,数据库中存储路径禁止在线上环境做数据库压力测试测试,开发,线上数据库环境必须隔离命名规范库名,表名,列名必须用小写,采用下划线分隔 tb_book t_bookabc,Abc,ABC都是给自己埋坑库名,表名,列名必须见名知义,长度不要超过32字符tmp,wushan谁TM知道这些库是干嘛的库备份必须以bak为前缀,以日期为后缀从库必须以-s为后缀备库必须以-ss为后缀表设计规范单实例表个数必须控制在2000个以内·单表分表个数必须控制在1024个以内表必须有主键,推荐使用UNSIGNED整数为主键删除无主键的表,如果是row模式的主从架构,从库会挂住禁止使用物理外键,如果要保证完整性,应由应用程式实现外键使得表之间相互耦合,影响 update/delete等SQL性能,有可能造成死锁,高并发情况下容易成为数据库瓶颈建议将大字段,访问频度低的字段拆分到单独的表中存储,分离冷热数据(具体参考:《如何实施数据库垂直拆分》)列设计规范根据业务区分使用tinyint/int/bigint,分别会占用1/4/8字节根据业务区分使用char/varchar字段长度固定,或者长度近似的业务场景,适合使用char,能够减少碎片,查询性能高字段长度相差较大,或者更新较少的业务场景,适合使用varchar,能够减少空间根据业务区分使用datetime/timestamp前者占用5个字节,后者占用4个字节,存储年使用YEAR,存储日期使用DATE,存储时间使用datetime必须把字段定义为NoT NULL并设默认值NULL的列使用索引,索引统计,值都更加复杂,MySQL 更难优化NULL需要更多的存储空间NULL只能采用Is NUL或者IS NoT NULL,而在=/!=/in/not in 时有大坑使用INT UNSIGNED存储IPv4,不要用char(15)使用varchar(20)存储手机号,不要使用整数牵扯到国家代号,可能出现+/-/()等字符,例如+86手机号不会用来做数学运算varchar 可以模糊查询,例如like'138%'使用TINYINT来代替ENUM。ENUM增加新值要进行DDL操作索引规范唯一索引使用uniq_[字段名]来命名非唯一索引使用idx_[字段名]来命名单张表索引数量建议控制在5个以内互联网高并发业务,太多索引会影响写性能生成执行计划时,如果索引太多,会降低性能,并可能导致MySQL 选择不到最优索引异常复杂的查询需求,可以选择Es等更为适合的方式存储组合索引字段数不建议超过5个如果5个字段还不能极大缩小row范围,八成是设计有问题不建议在频繁更新的字段上建立索引非必要不要进行JoIN查询,如果要进行JoIN查询,被JorN的字段必须类型相同,并建立索引踩过因为JoIN字段类型不一致,而导致全表扫描的坑么?理解组合索引最左前缀原则,避免重复建设索引,如果建立了(a,b,c),相当于建立了(a),(a,b),(a,b,c)二、Explain执行计划--SQL优化神奇1、Explain介绍在完成工程结构的优化之后,数据库、表、表中的字段及表的索引,都能够支持海量数据的快速查找。但是查找依然需要通过SQL语句来实现,因此性能优秀的SQL语句是能够走索引,快速查找到数据的。性能不Ok的SQL语句,就不会走索引,导致全表扫描。阿里云rds提供了慢sql的查询功能。找到慢SQL后,如何做优化,以及如何查询一条SQL语句是否是慢SQL,那就可以通过Explain工具。通过在SQL语句前面加上Explain关键来执行,于是就能看出当前SQL语句的执行性能。得知道当前系统里有哪些SQL是慢SQL,查询性能超过1s的sql,然后再通过Explain工具可以对当前SQL语句的性能进行判断——为什么慢,怎么解决。要想知道哪些SQL是慢SQL,有两种方式,一种是开启本地MySQL的慢查询日志;另一种是阿里云提供的RDS(第三方部署的MySQL服务器),提供了查询慢SQL的功能。explain select * from pay where name like "早%";2、MySQL内部优化器在SQL查询开始之前,MySQL内部优化器会进行一次自我优化,让这一次的查询性能尽可能的好。查看内部优化器优化后结果:explain select * from pay where name like "早%"; show WARNINGS;内部优化器优化后结果:/* select#1 */ select `family`.`pay`.`id` AS `id`,`family`.`pay`.`name` AS `name`,`family`.`pay`.`repaymentAmount` AS `repaymentAmount`,`family`.`pay`.`repaymentTime` AS `repaymentTime`,`family`.`pay`.`repaymentUser` AS `repaymentUser`,`family`.`pay`.`userName` AS `userName`,`family`.`pay`.`updateTime` AS `updateTime`,`family`.`pay`.`description` AS `description` from `family`.`pay` where (`family`.`pay`.`name` like '早%')3、Explain细节关闭MySQL对衍生表的优化:set session optimizer_switch='derived_merge=off'一、select_type该列描述了查询的类型:simple:简单查询primary:外部的主查询derived:在from后面进行的子查询,会产生衍生表subquery:在from的前面进行的子查询union:进行的联合查询explain select (select 1 from type where id=1) from (select * from pay where id=1) des; show WARNINGS;结果:derived##第一条执行sql select * from pay where id=1第一条执行的sql是from后面的子查询,该子查询只要在from后面,就会生成一张衍生表,因此他的查询类型:derivedsubqueryselect 1 from type where id=1在select之后from之前的子查询primary最外部的查询simple不包含子查询的简单的查询unionexplain select * from pay where id=1 union select * from pay where id=2结果:使用union进行的联合查询二、table列这一列表示该sql正在访问哪一张表。也可以看出正在访问的衍生表三、tyge列通过Type列,可以直接的看出SQL语句的查询性能,性能从大到小的排列:null>system>const>eq_ref>ref>range>index>ALL一般情况下我们要保证我们的sql类型的性能是range级别。不同的级别的情况:null性能最好的,一般在查询时使用了聚合函数,于是直接从索引树里获取数据,而不用查询表中的记录。explain select min(id) from pay;const在进行查询时,查询的条件,使用了主键列或者唯一索引列的值与常量进行比较,这种性能是非常快的,所以是constsystem是const的特殊情况,一般在衍生表里,直接匹配一条记录,就是systemeq_ref如果顺序一直,按按顺序执行。在进行多表连接查询时。如果查询条件是使用了主键进行比较,那么当前查询类型是eq_refEXPLAIN select * from pay p left join type t on t.id=p.id;ref简单查询:使用普通索引列作为查询条件EXPLAIN select * from pay where name="早餐";复杂查询里:在进行连接查询时,连接查询的条件中使用了本表的联合索引列,因此这种类型的sql就是refrange在索引列上使用了范围查找,性能是ok的。EXPLAIN select * from pay where id<5;index在查询表中的所有的记录,但是所有的记录可以直接从索引树上获取,因此这种sql的查询类型就是index(pay表所有列都有索引)EXPLAIN select name from payall没有走索引,进行全表扫描。全表扫描。就是要从头到尾对表中的数据扫描一遍。这种查询性能是一定要做优化的。4、id列在多个select中,id越大越先执行,如果id相同。上面的先执行。5、possible_keys这一次查询可能使用到的索引(名称)。为什么要设计possiblekey这一列。因为在实际MySQL内部优化器做优化选择时,虽然我们写的sql语句是使用了索引列,但是MySQL内部优化器发现,使用索引列查找的性能并没有比全表扫描的性能要好(可以通过trace工具来查看),于是MySQL内部优化器就选择使用全表扫描。explain select * from pay where name like "早%"结果:可能使用idx_name_repaymentAmount_userName联合索引,实际上没用到。一共有142条记录,使用索引可能也需要扫描142条数据,使用索引效率可能还没有使用全表扫描快。6、key实际sql使用的索引7、rows列该sql语句可能要查询的数据条数8、key_len列键的长度,通过这一列可以让我们知道当前命中了联合索引中的哪几列。name长度是74,也就是当看到key-len是74,表示使用了联合索引中的name列。ken_len计算规则:-字符串1.char(n):n字节长度2.varchar(n):2字节存储字符串长度,如果是utf-8,则长度3n+2-数值类型1.tinyint:1字节2.smallint:2字节3.int:4字节4.bigint:8字节--时间类型1、date:3字节2、timestamp:4字节3、datetime:8字节如果字段允许位null,需要1字节记录是否位null。索引最大长度768字节,当字符串过长时,mysql会做一个类似左前缀索引的处理,讲前半部分的字符提取出来做索引。9、extraextra列提供了额外的信息,是能够帮助我们判断当前sql的是否使用了覆盖索引、文件排序、使用了索引进行查询条件等等的信息。using index覆盖索引:所谓的覆盖索引,指的是当前查询的所有数据字段都是索引列,这就意味着可以直接从索引列中获取数据,而不需要进行查表。使用了覆盖索引explain select repaymentAmount from pay where name ="早餐";using wherewhere的条件没有使用索引列。这种性能不ok的,我们如果条件允许可以给列设置索引,也同样尽可能的使用覆盖索引。explain select * from pay where name like "早%"using index condition查询的列没有完全被索引覆盖,并且where条件中使用普通索引。using temporary会创建临时表来执行,比如在没有索引的列上执行去重操作,就需要临时表来实现。explain select distinct(description) from pay;这种情况可以通过给列加索引进行优化。using filesortMySQL对数据进行排序,都会使用磁盘来完成,可能会借助内存,设计到两个概念:单路排序、双路排序explain select * from pay ORDER BY description;select tables optimized away当直接在索引列上使用聚合函数,意味着不需要操作表。explain select min(id) from pay;编写SQL注意点等值匹配:下面3个都命中:最左前缀法:1、2没命中,4name,age命中。不能在索引列上做计算、函数、类型转换:日志查找如何处理:尽量使用覆盖索引使用不等于(!=或者<>)会导致全表扫描使用is null、is not null会导致全表扫描使用like以通配符开头('%abc..')会导致全表扫描字符串不加单引号会到会导致全表扫描少用or或in,MySQL内部优化器可能不走索引in进行几千条数据查询时,解决方案:在后端通过多线程countDownlatch将几千条数据拆分,通过多个线程每个查询1000条进行结果汇总。范围查询优化Trace工具在执行计划中我们发现有的sql会走索引,有的sql即使明确使用了索引也不会走索引。这是因为mysql的内部优化器任务走索引的性能比不走索引全表扫描的性能要差,因此mysql内部优化器选择了使用全表扫描。依据来自于trace工具的结论。1、开启Traceset session optimizer_trace="enabled=on",end_markers_in_json=on; --开启Traceexplain select * from pay where name>1; --查询 SELECT * FROM information_schema.OPTIMIZER_ ; --获得TRACE信息Trace信息:{ "steps": [ { "join_preparation": { --- 阶段1:准备阶段 "select#": 1, "steps": [ { ----sql变成成下面这种 "expanded_query": "/* select#1 */ select `pay`.`id` AS `id`,`pay`.`name` AS `name`,`pay`.`repaymentAmount` AS `repaymentAmount`,`pay`.`repaymentTime` AS `repaymentTime`,`pay`.`repaymentUser` AS `repaymentUser`,`pay`.`userName` AS `userName`,`pay`.`updateTime` AS `updateTime`,`pay`.`description` AS `description` from `pay` where (`pay`.`name` > 1)" } ] /* steps */ } /* join_preparation */ }, { "join_optimization": { ----阶段2:进入优化阶段 "select#": 1, "steps": [ { "condition_processing": { ---条件处理 "condition": "WHERE", "original_condition": "(`pay`.`name` > 1)", "steps": [ { "transformation": "equality_propagation", "resulting_condition": "(`pay`.`name` > 1)" }, { "transformation": "constant_propagation", "resulting_condition": "(`pay`.`name` > 1)" }, { "transformation": "trivial_condition_removal", "resulting_condition": "(`pay`.`name` > 1)" } ] /* steps */ } /* condition_processing */ }, { "substitute_generated_columns": { } /* substitute_generated_columns */ }, { "table_dependencies": [ -----表依赖详情 { "table": "`pay`", "row_may_be_null": false, "map_bit": 0, "depends_on_map_bits": [ ] /* depends_on_map_bits */ } ] /* table_dependencies */ }, { "ref_optimizer_key_uses": [ ] /* ref_optimizer_key_uses */ }, { "rows_estimation": [ { "table": "`pay`", "range_analysis": { "table_scan": {--表的扫描 "rows": 142, --扫描行数 "cost": 31.5 --花费时间 } /* table_scan */, "potential_range_indexes": [ ----(关键)可能使用的索引 { "index": "PRIMARY", ---主键索引 "usable": false, "cause": "not_applicable" }, { "index": "idx_name_repaymentAmount_userName", ---联合索引 "usable": true, --是否可用 "key_parts": [ "name", "repaymentAmount", "userName", "id" ] /* key_parts */ }, { "index": "idx_id", "usable": false, "cause": "not_applicable" } ] /* potential_range_indexes */, "setup_range_conditions": [ ] /* setup_range_conditions */, "group_index_range": { "chosen": false, "cause": "not_group_by_or_distinct" } /* group_index_range */ } /* range_analysis */ } ] /* rows_estimation */ }, { "considered_execution_plans": [---分析执行计划 { "plan_prefix": [ ] /* plan_prefix */, "table": "`pay`", "best_access_path": { ---最优访问路径 "considered_access_paths": [ --最后选择访问的路径 { "rows_to_scan": 142, --全表扫描行数 "access_type": "scan", --全表扫描 "resulting_rows": 47.329, --结果的行数 "cost": 29.4, ---花费时间 "chosen": true --选择这种方式 } ] /* considered_access_paths */ } /* best_access_path */, "condition_filtering_pct": 100, "rows_for_plan": 47.329, "cost_for_plan": 29.4, "chosen": true } ] /* considered_execution_plans */ }, { "attaching_conditions_to_tables": { "original_condition": "(`pay`.`name` > 1)", "attached_conditions_computation": [ ] /* attached_conditions_computation */, "attached_conditions_summary": [ { "table": "`pay`", "attached": "(`pay`.`name` > 1)" } ] /* attached_conditions_summary */ } /* attaching_conditions_to_tables */ }, { "refine_plan": [ { "table": "`pay`" } ] /* refine_plan */ } ] /* steps */ } /* join_optimization */ }, { "join_explain": { "select#": 1, "steps": [ ] /* steps */ } /* join_explain */ } ] /* steps */ }常见优化方案、1、Order by在Order by中,如果排序会造成文件排序(在磁盘中完成排序,这样的性能会比较差),那么就说明sql没有命中索引,怎么解决?可以使用最左前缀法则,让排序遵循最左前缀法则,避免文件排序。优化手段:如果排序的字段创建了联合索引,那么尽量在业务不冲突的情况下,遵循最左前缀法则来写排序语句。如果文件排序没办法避免,那么尽量想办法使用覆盖索引。all-->index2.Group by优化group by 本质上是先排序后分组,所以排序优化参考Order by优化。3.文件排序的执行原理MySQL在进行文件排序时,会设置一个缓冲区,比较要排序的所有列的数据大小之和,与max_length_for_sort_data(默认是1024个字节)进行比较。如果比系统变量小,那么执行单路排序,反正执行双路排序。单路排序:把所有的数据扔到sort_buffer内存缓冲区中,进行排序,然后结束双路排序:取数据的排序字段和主键字段,在内存缓冲区中排序完成后,将主键字段做一次回表查询,获取完整数据。4、分页查询优化优化方式一:比较少见,因为有curd注意:主键是连续的,如果删除了,获取到的数据条数不对。优化方式二:先覆盖查询,在到小范围里面全表扫描5、join连表查询优化方式一:在join查询中,如果关联字段建立了索引,mysql就会使用nlj算法,去找小表(数据量比较小的表)作为驱动表,先从驱动表中读一行数据,然后拿这一行数据去被驱动表(数据量比较大的表)中做查询。这样的大表和小表是由mysql内部优化器来决定的,跟sql语句中表的书写顺序无关。—NLJ算法(nested loop join:嵌套循环join)方式二:如果没有索引,会创建一个join buffer内存缓冲区,把小表数据存进来(为什么不存大表,因为缓冲区大小限制,及存数据消耗性能的考虑),用内存缓冲区中100行记录去和大表中的1万行记录进行比较,比较的过程依然是在内存中进行的。索引join buffer起到了提高join效率的效果。-BNLJ算法(block nested loop join:块嵌套循环join)结论:如果使用join查询,那么join的两个表的关联字段一定要创建索引,而且字段的长度类型一定是要一致的(在建表时就要做好),否则索引会失效,会使用BNLJ算法,全表扫描的效果。6、in和exits优化在sql中如果A表是大表,B表是小表,那么使用in会更加合适。反之应该使用exists。in:前提B数据量<A数据量select * from A where id in (select id from B);exists: B的数据量>A的数据量select * from A where exists (select id from B where B.id=A.id);select id from B where B.id=A.id ---会返回true/false,true才查询B7、count优化对于count的优化应该是架构层面的优化,因为count的统计是在一个产品会经常出现,而且每个用户访问,所以对于访问频率过高的数据建议维护在缓存中。锁的定义和分类1、锁的定义锁是用来解决多个任务(线程、进程)在并发访问同一共享资源时带来的数据安全问题。虽然使用锁解决了数据安全问题,但是会带来性能的影响,频繁使用锁的程序的性能是必然很差的。对于数据管理软件MySQL来说,必然会到任务的并发访问。那么MySQL是怎么样在数据安全和性能上做权衡的呢?——MVCC设计思2、锁的分类1、)从性能上划分:乐观锁和悲观锁悲观锁:悲观的认为当前的并发是非常严重的,所以在任何时候操作都是互斥。保证了线程的安全,但牺牲了并发性。乐观锁:乐观的认为当前的并发并不严重,因此对于读的情况,大家都可以进行,但是对于写的情况,再进行上锁。以CAS自旋锁在某种性能是ok的,但是频繁自旋会消耗很大的资源。2、)从数据的操作细粒度上划分:表锁和行锁表锁:对整张表上锁行锁:对表中的某一行上锁。3、)从数据库的操作类型上划分:读锁和写锁,这2中锁都是悲观锁。读锁(共享锁):对于同一行数据进行”读“来说,是可以同时进行但是写不行。写锁(拍他锁):在上了写锁之后,及释放写锁之前,在整个过程中是不能进行任何的其他并发操作(其他任务的读和写是都不能进行的)。表锁:对整张表进行上锁。MyISAM存储引擎是天然支持表锁的,也就是说在MyISAM的存储引擎的表中如果出现并发的情况,将会出现表锁的效果。MyISAM不支持事务。读锁:其他任务可以进行读,但是不能进行写写锁:其他任务不能进行读和写。行锁:MyISAM只支持表锁,但不支持行锁,InnoDB可以支持行锁。在并发事务里,每个事务的增删改的操作相当于是上了行锁。MVCC设计思想MySQL为了权衡数据安全和性能,使用了MVCC多版本并发控制的设计。MVCC,全称Multi-Version Concurrency Control,即多版本并发控制。MVCC是一种并发控制的方法,一般在数据库管理系统中,实现对数据库的并发访问,在编程语言中实现事务内存。1、事务的特性原子性:一个事务是一个最小的操作单位(原子),多条sql语句在一个事务中要么同时成功,要么同时失败。一致性:事务提交之前和回滚之后的数据是一致的。持久性:事务一旦提交,对数据的影响是持久的。隔离性:多个事务在并发访问下,提供了一套隔离机制,不同的隔离级别会有不同的并发效果。2、事务的隔离级别幻读:开启2个事务(隔离级别位可重复读),2个事务进行查询,第一个事务插入了一条记录,然后提交。第二个事务,再次插入相同id记录时,提示id重复,查询却看不到第一个事务插入的记录。这种现象就是幻读(虚度).解决办法,将隔离级别设置成Serializable串行化,但是却西能了性能。另一种解决方案:通过上行锁来解决虚读问题。MVCC思想解读:MySQL在读和写的操作中,对读的性能做了并发性的保障,让所有的读都是快照读,对于写的时候,进行版本控制,如果真实数据的版本比快照版本要新,那么写之前就要进行版本(快照)更新,这样就可以既能够提高读的并发性,又能够保证写的数据安全。死锁和间歇锁1、死锁所谓的死锁,就是开启的锁没有办法关闭,导致资源的访问因为无法获得锁而处于阻塞状态。演示:事务A和事物B相互持有对方需要的锁而不释放,造成死锁的情况。2、间隙锁行锁只能对某一行上锁,如果相对某一个范围上锁,就可以使用间隙锁。间隙锁给的条件where id>13 and id<19,会对13和19所处的间隙进行上锁。
-
线程八锁 线程八锁package com.yanxizhu; /* * 题目:判断打印的 "one" or "two" ? * * 1. 两个普通同步方法,两个线程,标准打印, 打印? //one two * 2. 新增 Thread.sleep() 给 getOne() ,打印? //one two * 3. 新增普通方法 getThree() , 打印? //three one two * 4. 两个普通同步方法,两个 Number 对象,打印? //two one * 5. 修改 getOne() 为静态同步方法,打印? //two one * 6. 修改两个方法均为静态同步方法,一个 Number 对象? //one two * 7. 一个静态同步方法,一个非静态同步方法,两个 Number 对象? //two one * 8. 两个静态同步方法,两个 Number 对象? //one two * * 线程八锁的关键: * ①非静态方法的锁默认为 this, 静态方法的锁为 对应的 Class 实例 * ②某一个时刻内,只能有一个线程持有锁,无论几个方法。 */ public class TestThread8Monitor { public static void main(String[] args) { Number number = new Number(); Number number2 = new Number(); new Thread(new Runnable() { @Override public void run() { number.getOne(); } }).start(); new Thread(new Runnable() { @Override public void run() { //number.getTwo(); number2.getTwo(); } }).start(); /*new Thread(new Runnable() { @Override public void run() { number.getThree(); } }).start();*/ } } class Number{ public static synchronized void getOne(){//Number.class try { Thread.sleep(3000); } catch (InterruptedException e) { } System.out.println("one"); } public synchronized void getTwo(){//this System.out.println("two"); } public void getThree(){ System.out.println("three"); } }一个对象里面如果有多个synchronized方法,某一个时刻内,只要一个线程去调用 其中的一个synchronized方法了,其它的线程都只能等待,换句话说,某一个时刻 内,只能有唯一一个线程去访问这些synchronized方法锁的是当前对象this,被锁定后,其它的线程都不能进入到当前对象的其它的 synchronized方法加个普通方法后发现和同步锁无关换成两个对象后,不是同一把锁了,情况立刻变化。都换成静态同步方法后,情况又变化所有的非静态同步方法用的都是同一把锁——实例对象本身,也就是说如果一个实 例对象的非静态同步方法获取锁后,该实例对象的其他非静态同步方法必须等待获 取锁的方法释放锁后才能获取锁,可是别的实例对象的非静态同步方法因为跟该实 例对象的非静态同步方法用的是不同的锁,所以毋须等待该实例对象已获取锁的非 静态同步方法释放锁就可以获取他们自己的锁。所有的静态同步方法用的也是同一把锁——类对象本身,这两把锁是两个不同的对 象,所以静态同步方法与非静态同步方法之间是不会有竞态条件的。但是一旦一个 静态同步方法获取锁后,其他的静态同步方法都必须等待该方法释放锁后才能获取 锁,而不管是同一个实例对象的静态同步方法之间,还是不同的实例对象的静态同 步方法之间,只要它们同一个类的实例对象!
-
ScheduledThreadPool线程调度 ScheduledThreadPool线程调度package com.yanxizhu; import java.util.Random; import java.util.concurrent.Callable; import java.util.concurrent.Executors; import java.util.concurrent.Future; import java.util.concurrent.ScheduledExecutorService; import java.util.concurrent.TimeUnit; /* * 一、线程池:提供了一个线程队列,队列中保存着所有等待状态的线程。避免了创建与销毁额外开销,提高了响应的速度。 * * 二、线程池的体系结构: * java.util.concurrent.Executor : 负责线程的使用与调度的根接口 * |--**ExecutorService 子接口: 线程池的主要接口 * |--ThreadPoolExecutor 线程池的实现类 * |--ScheduledExecutorService 子接口:负责线程的调度 * |--ScheduledThreadPoolExecutor :继承 ThreadPoolExecutor, 实现 ScheduledExecutorService * * 三、工具类 : Executors * ExecutorService newFixedThreadPool() : 创建固定大小的线程池 * ExecutorService newCachedThreadPool() : 缓存线程池,线程池的数量不固定,可以根据需求自动的更改数量。 * ExecutorService newSingleThreadExecutor() : 创建单个线程池。线程池中只有一个线程 * * ScheduledExecutorService newScheduledThreadPool() : 创建固定大小的线程,可以延迟或定时的执行任务。 */ public class TestScheduledThreadPool { public static void main(String[] args) throws Exception { ScheduledExecutorService pool = Executors.newScheduledThreadPool(5); for (int i = 0; i < 5; i++) { Future<Integer> result = pool.schedule(new Callable<Integer>(){ @Override public Integer call() throws Exception { int num = new Random().nextInt(100);//生成随机数 System.out.println(Thread.currentThread().getName() + " : " + num); return num; } }, 1, TimeUnit.SECONDS); System.out.println(result.get()); } pool.shutdown(); } }
-
Executor线程池 Executors线程池package com.yanxizhu; import java.util.ArrayList; import java.util.List; import java.util.concurrent.Callable; import java.util.concurrent.ExecutorService; import java.util.concurrent.Executors; import java.util.concurrent.Future; /* * 一、线程池:提供了一个线程队列,队列中保存着所有等待状态的线程。避免了创建与销毁额外开销,提高了响应的速度。 * * 二、线程池的体系结构: * java.util.concurrent.Executor : 负责线程的使用与调度的根接口 * |--**ExecutorService 子接口: 线程池的主要接口 * |--ThreadPoolExecutor 线程池的实现类 * |--ScheduledExecutorService 子接口:负责线程的调度 * |--ScheduledThreadPoolExecutor :继承 ThreadPoolExecutor, 实现 ScheduledExecutorService * * 三、工具类 : Executors * ExecutorService newFixedThreadPool() : 创建固定大小的线程池 * ExecutorService newCachedThreadPool() : 缓存线程池,线程池的数量不固定,可以根据需求自动的更改数量。 * ExecutorService newSingleThreadExecutor() : 创建单个线程池。线程池中只有一个线程 * * ScheduledExecutorService newScheduledThreadPool() : 创建固定大小的线程,可以延迟或定时的执行任务。 */ public class TestThreadPool { public static void main(String[] args) throws Exception { //1. 创建线程池 ExecutorService pool = Executors.newFixedThreadPool(5); List<Future<Integer>> list = new ArrayList<>(); for (int i = 0; i < 10; i++) { Future<Integer> future = pool.submit(new Callable<Integer>(){ @Override public Integer call() throws Exception { int sum = 0; for (int i = 0; i <= 100; i++) { sum += i; } return sum; } }); list.add(future); } pool.shutdown(); for (Future<Integer> future : list) { System.out.println(future.get()); } /*ThreadPoolDemo tpd = new ThreadPoolDemo(); //2. 为线程池中的线程分配任务 for (int i = 0; i < 10; i++) { pool.submit(tpd); } //3. 关闭线程池 pool.shutdown();*/ } // new Thread(tpd).start(); // new Thread(tpd).start(); } class ThreadPoolDemo implements Runnable{ private int i = 0; @Override public void run() { while(i <= 100){ System.out.println(Thread.currentThread().getName() + " : " + i++); } } }
-
ReadWriteLock读写锁 读写锁package com.yanxizhu; import java.util.concurrent.locks.ReadWriteLock; import java.util.concurrent.locks.ReentrantReadWriteLock; /** * @description: 读写锁(互斥锁) * @author: <a href="mailto:batis@foxmail.com">清风</a> * @date: 2022/3/19 15:23 * @version: 1.0 */ public class ReadWriteDemo { public static void main(String[] args) { ReadWriteTest readWriteTest = new ReadWriteTest(); new Thread(()->{ readWriteTest.write((int) (Math.random()*101)); },"写锁").start(); for(int i=1;i<50;i++){ new Thread(()->{ readWriteTest.get(); },"读锁").start(); } } } class ReadWriteTest{ int num =0; private ReadWriteLock readWriteLock = new ReentrantReadWriteLock(); //读 public void get(){ readWriteLock.readLock().lock(); try{ System.out.println(num+"=="+Thread.currentThread().getName()); }finally { readWriteLock.readLock().unlock(); } } //写 public void write(int i){ readWriteLock.writeLock().lock(); try{ this.num=i; }finally { readWriteLock.writeLock().unlock(); } } }
-
线程按序交替 线程按序交替package com.yanxizhu; import java.util.concurrent.locks.Condition; import java.util.concurrent.locks.Lock; import java.util.concurrent.locks.ReentrantLock; /** * @description: 线程按序交替 * @date: 2022/3/19 14:47 * @version: 1.0 */ public class PrintInfo { public static void main(String[] args) { print print = new print(); new Thread(new Runnable() { @Override public void run() { for(int i=1;i<5;i++){ try { print.printA(i); } catch (InterruptedException e) { e.printStackTrace(); } } } },"A").start(); new Thread(new Runnable() { @Override public void run() { for(int i=1;i<5;i++){ try { print.printB(i); } catch (InterruptedException e) { e.printStackTrace(); } } } },"B").start(); new Thread(new Runnable() { @Override public void run() { for(int i=1;i<5;i++){ try { print.printC(i); } catch (InterruptedException e) { e.printStackTrace(); } } } },"C").start(); } } class print{ private int num =1; Lock lock = new ReentrantLock(); Condition condition1 = lock.newCondition(); Condition condition2 = lock.newCondition(); Condition condition3 = lock.newCondition(); public void printA(int i) throws InterruptedException { lock.lock(); try{ if(num != 1){ condition1.await(); } System.out.println("A=="+Thread.currentThread().getName()+"====i="+i); num=2; condition2.signal(); }finally { lock.unlock(); } } public void printB(int i) throws InterruptedException { lock.lock(); try{ if(num != 2){ condition2.await(); } System.out.println("B=="+Thread.currentThread().getName()+"====i="+i); num=3; condition3.signal(); }finally { lock.unlock(); } } public void printC(int i) throws InterruptedException { lock.lock(); try{ if(num != 3){ condition3.await(); } System.out.println("C=="+Thread.currentThread().getName()+"====i="+i); num=1; condition1.signal(); }finally { lock.unlock(); } } }打印结果:A==A====i=1 B==B====i=1 C==C====i=1 A==A====i=2 B==B====i=2 C==C====i=2 A==A====i=3 B==B====i=3 C==C====i=3 A==A====i=4 B==B====i=4 C==C====i=4
-
wait、notifyAll()、await()、signalAll() wait、notifyAll()、await()、signalAll()为了避免虚假唤醒问题,应该总是使用在循环中wait、notifyAll():package com.yanxizhu; import java.util.function.Consumer; /* * 生产者和消费者案例 */ public class TestProductorAndConsumer { public static void main(String[] args) { Clerk clerk = new Clerk(); Productor pro = new Productor(clerk); Consumers cus = new Consumers(clerk); new Thread(pro, "生产者 A").start(); new Thread(cus, "消费者 B").start(); new Thread(pro, "生产者 C").start(); new Thread(cus, "消费者 D").start(); } } //店员 class Clerk{ private int product = 0; //进货 public synchronized void get(){//循环次数:0 while(product >= 1){//为了避免虚假唤醒问题,应该总是使用在循环中 System.out.println("产品已满!"); try { this.wait(); } catch (InterruptedException e) { } } System.out.println(Thread.currentThread().getName() + " : " + ++product); this.notifyAll(); } //卖货 public synchronized void sale(){//product = 0; 循环次数:0 while(product <= 0){ System.out.println("缺货!"); try { this.wait(); } catch (InterruptedException e) { } } System.out.println(Thread.currentThread().getName() + " : " + --product); this.notifyAll(); } } //生产者 class Productor implements Runnable{ private Clerk clerk; public Productor(Clerk clerk) { this.clerk = clerk; } @Override public void run() { for (int i = 0; i < 20; i++) { try { Thread.sleep(200); } catch (InterruptedException e) { } clerk.get(); } } } //消费者 class Consumers implements Runnable{ private Clerk clerk; public Consumers(Clerk clerk) { this.clerk = clerk; } @Override public void run() { for (int i = 0; i < 20; i++) { clerk.sale(); } } }await()、signalAll()package com.yanxizhu; import java.util.concurrent.locks.Condition; import java.util.concurrent.locks.Lock; import java.util.concurrent.locks.ReentrantLock; /* * 生产者消费者案例: */ public class TestProductorAndConsumerForLock { public static void main(String[] args) { Clerk clerk = new Clerk(); Productor pro = new Productor(clerk); Consumer con = new Consumer(clerk); new Thread(pro, "生产者 A").start(); new Thread(con, "消费者 B").start(); // new Thread(pro, "生产者 C").start(); // new Thread(con, "消费者 D").start(); } } class Clerk { private int product = 0; private Lock lock = new ReentrantLock(); private Condition condition = lock.newCondition(); // 进货 public void get() { lock.lock(); try { if (product >= 1) { // 为了避免虚假唤醒,应该总是使用在循环中。 System.out.println("产品已满!"); try { condition.await(); } catch (InterruptedException e) { } } System.out.println(Thread.currentThread().getName() + " : " + ++product); condition.signalAll(); } finally { lock.unlock(); } } // 卖货 public void sale() { lock.lock(); try { if (product <= 0) { System.out.println("缺货!"); try { condition.await(); } catch (InterruptedException e) { } } System.out.println(Thread.currentThread().getName() + " : " + --product); condition.signalAll(); } finally { lock.unlock(); } } } // 生产者 class Productor implements Runnable { private Clerk clerk; public Productor(Clerk clerk) { this.clerk = clerk; } @Override public void run() { for (int i = 0; i < 20; i++) { try { Thread.sleep(200); } catch (InterruptedException e) { e.printStackTrace(); } clerk.get(); } } } // 消费者 class Consumer implements Runnable { private Clerk clerk; public Consumer(Clerk clerk) { this.clerk = clerk; } @Override public void run() { for (int i = 0; i < 20; i++) { clerk.sale(); } } }