K8S集群部署
一、VirtualBox虚拟机搭建
通过Oracle VM VirtualBox,Vagrant搭建三台虚拟机。
准备工作
1、准备软件
CentOS虚拟系统:CentOS-7-x86_64-Vagrant-2004_01.VirtualBox.box
虚拟软件(VirtualBox):VirtualBox-6.1.34-150636-Win.exe
Vagrant安装虚拟机软件:vagrant_2.2.19_i686.msi。
2、软件安装
先安装VirtualBox、然后安装Vagrant。
3、修改配置
虚拟机、配置存放位置如下:
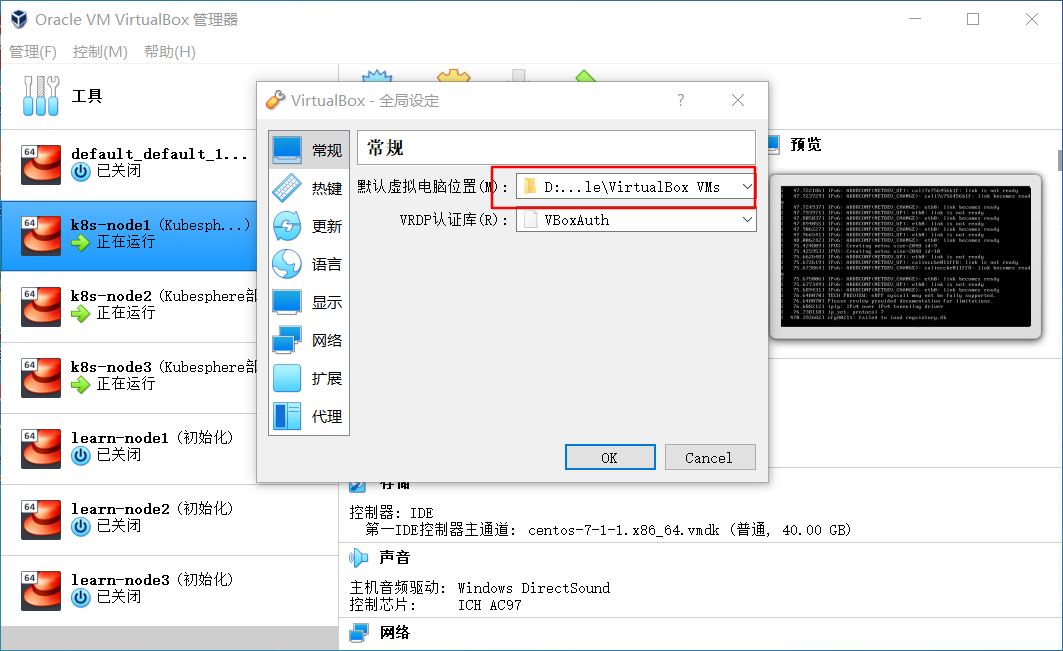

虚拟系统安装
1、创建配置文件
新建Vagrantfile文件,批量创建3台虚拟机,内容如下:该文件是放在个人用户名文件夹下的。
Vagrant.configure("2") do |config|

   (1..3).each do |i|
        config.vm.define "k8s-node#{i}" do |node|
            # 设置虚拟机的Box
            node.vm.box = "centos/7"
            config.vm.box_url = "https://mirrors.ustc.edu.cn/centos-cloud/centos/7/vagrant/x86_64/images/CentOS-7.box"

            # 设置虚拟机的主机名
            node.vm.hostname="k8s-node#{i}"

            # 设置虚拟机的IP
            node.vm.network "private_network", ip: "192.168.56.#{99+i}", netmask: "255.255.255.0"

            # 设置主机与虚拟机的共享目录
            # node.vm.synced_folder "~/Documents/vagrant/share", "/home/vagrant/share"

            # VirtaulBox相关配置
            node.vm.provider "virtualbox" do |v|
                # 设置虚拟机的名称
                v.name = "k8s-node#{i}"
                # 设置虚拟机的内存大小
                v.memory = 4096
                # 设置虚拟机的CPU个数
                v.cpus = 4
            end
        end
   end
end
注意一个细节,如果不修改配置文件和存放路径,可能一直卡在文件复制过程中,检查是否复制了全部个人目录下数据。如果是请修改Vagrantfile文件:
C:\Users\自己用户名\.vagrant.d\boxes\centos-VAGRANTSLASH-7\0\virtualbox\VagrantfileVagrant.configure("2") do |config|
config.vm.base_mac = "5254004d77d3"
config.vm.synced_folder "./.vagrant", "/vagrant", type: "rsync"
end.vagrant:为自己用户名下的.vagrant文件夹

2、创建虚拟系统
进入配置好的Vagrantfile目录,cmd命令快速批量生成3台虚拟机:
vagrant up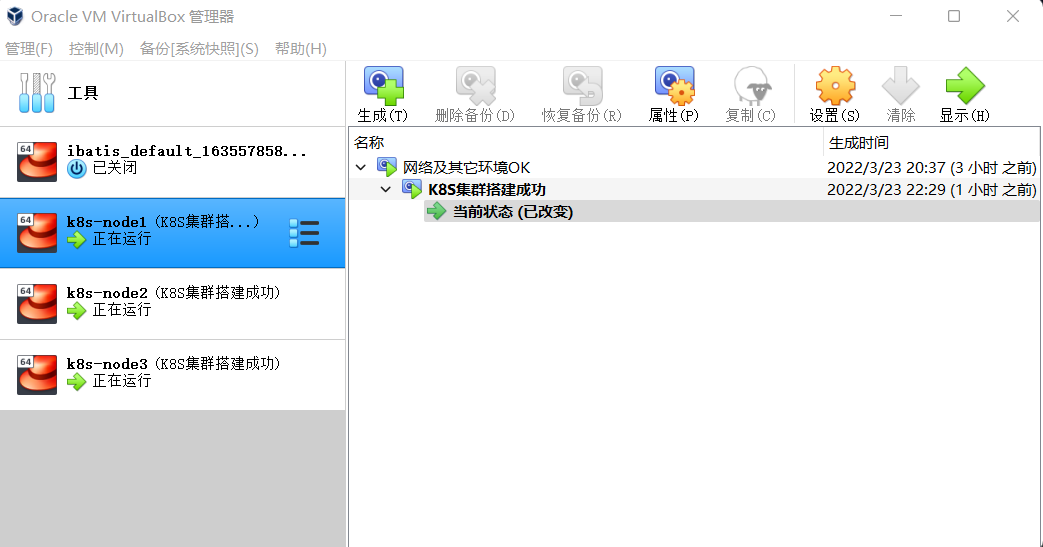
SSH配置
1、cmd进入虚拟机
vagrant ssh k8s-node12、切换root账号,默认密码vagrant
su root3、修改ssh配置,开启 root 的密码访问权限
vi /etc/ssh/sshd_config修改配置文件:PasswordAuthentication为yes
PasswordAuthentication yes4、重启sshd
service sshd restart5、三台虚拟机相同配置。
二、网络配置
1、全局添加网卡
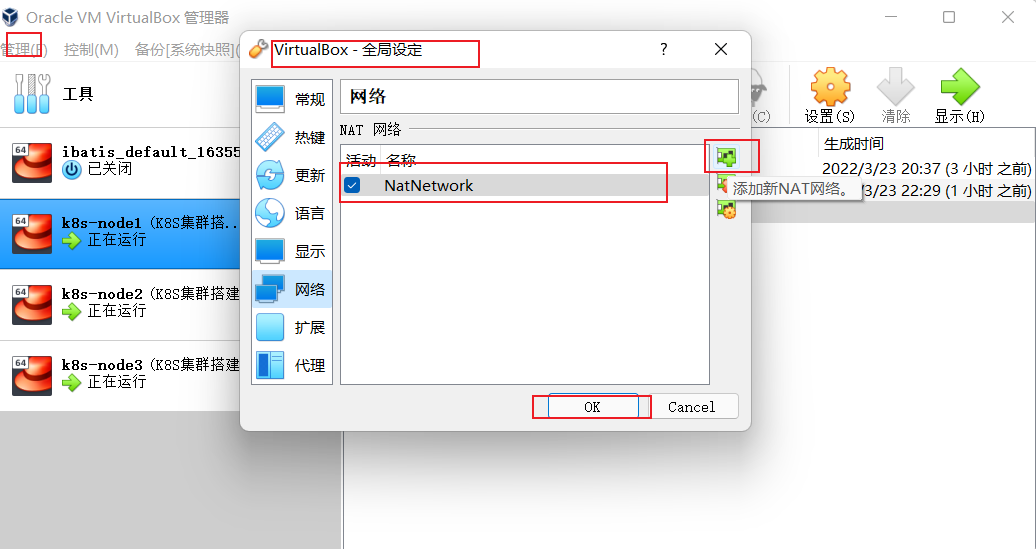
2、网卡配置
为每台虚拟配置网卡一NET网络,并重新生成mac地址。
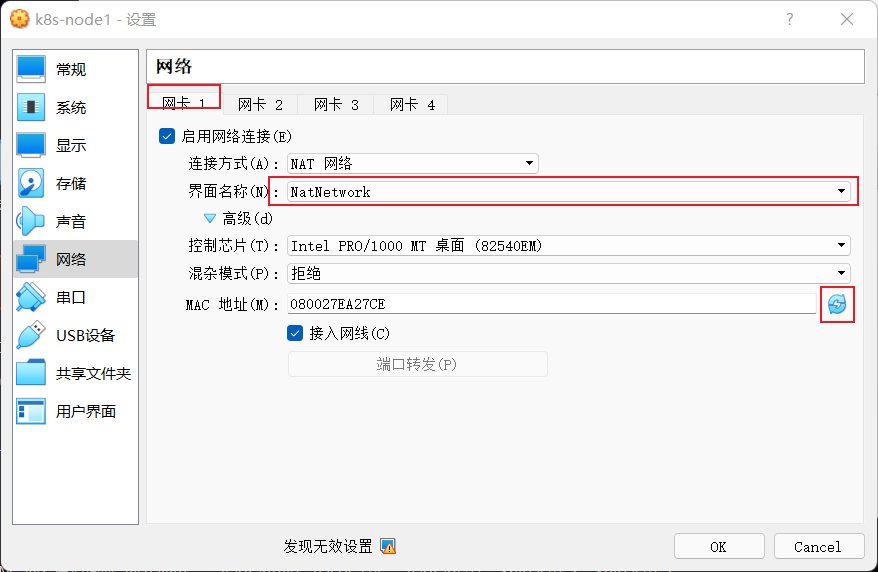
说明:网卡1是实际用的地址,网卡2是用于本地ssh链接到虚拟机的网络。
注意:三台虚拟机进行同样操作,记得重新生成mac地址。
3、linux 环境配置
通过上面配置后,启动3太虚拟机,通过SSH软件连接到3台虚拟机,都进行下面操作:
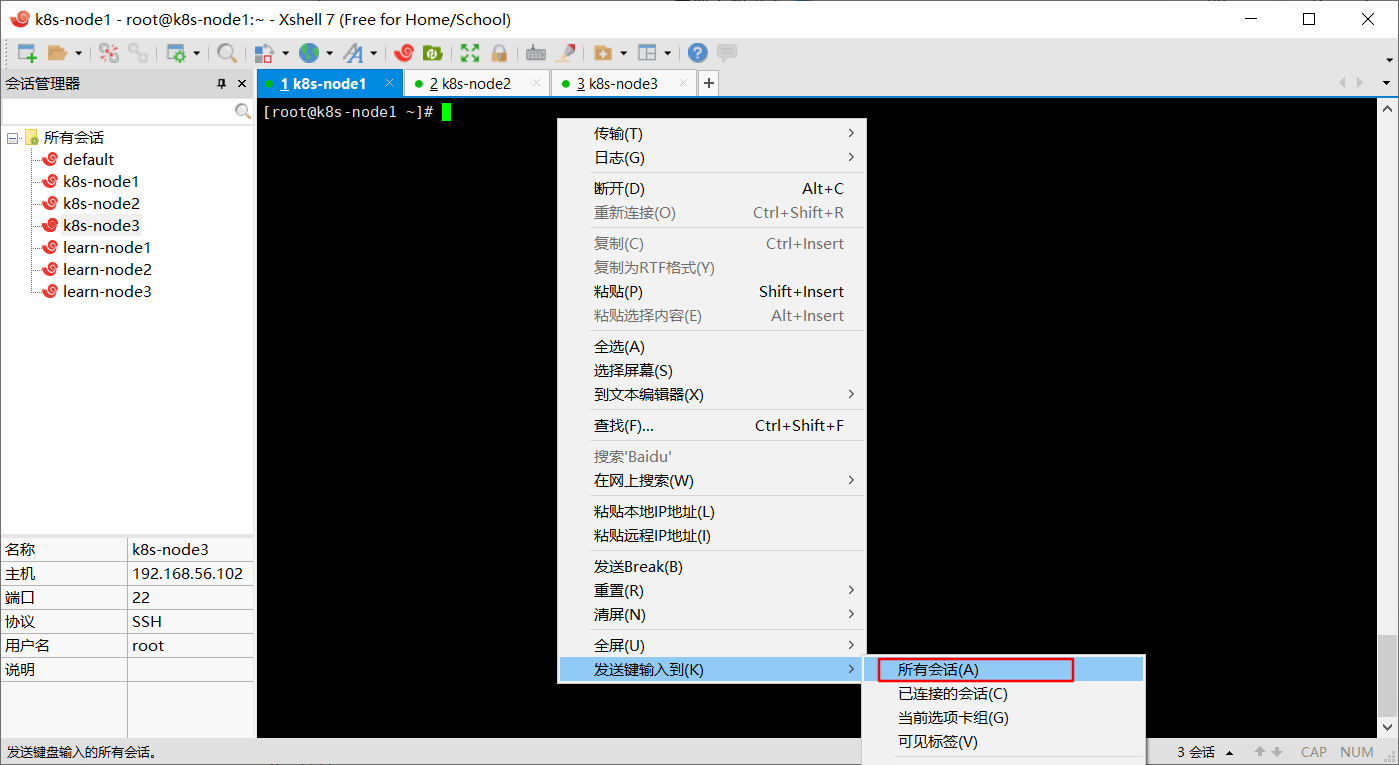
注意:三个节点都执行
关闭防火墙
systemctl stop firewalld
systemctl disable firewalld
关闭 selinux
sed -i 's/enforcing/disabled/' /etc/selinux/config
setenforce 0
关闭 swap
临时关闭
swapoff -a 永久
sed -ri 's/.*swap.*/#&/' /etc/fstab验证,swap 必须为 0;
free -g 添加主机名与 IP 对应关系
vi /etc/hosts添加自己主机net网络ip与虚拟机名字映射:(注意,重点,ip不要搞错了,是eth0的ip)
10.0.2.15 k8s-node1
10.0.2.6 k8s-node2
10.0.2.7 k8s-node3
将桥接的 IPv4 流量传递到 iptables 的链:
cat > /etc/sysctl.d/k8s.conf << EOF
net.bridge.bridge-nf-call-ip6tables = 1
net.bridge.bridge-nf-call-iptables = 1
EOF
重启
sysctl --syste疑难问题,遇见提示是只读的文件系统,运行如下命令
mount -o remount rw三、安装K8S环境
所有节点安装 Docker、kubeadm、kubelet、kubectl
docker安装
1、卸载系统之前的 docker
sudo yum remove docker \
docker-client \
docker-client-latest \
docker-common \
docker-latest \
docker-latest-logrotate \
docker-logrotate \
docker-engine
2、安装 Docker-CE
sudo yum install -y yum-utils \
device-mapper-persistent-data \
lvm2
3、设置 docker repo 的 yum 位置
sudo yum-config-manager --add-repo https://mirrors.aliyun.com/docker-ce/linux/centos/docker-ce.repo4、安装 docker,以及 docker-cli
sudo yum install -y docker-ce docker-ce-cli containerd.iosudo sed -i 's+download.docker.com+mirrors.aliyun.com/docker-ce+' /etc/yum.repos.d/docker-ce.repo5、更新并安装Docker-CE
sudo yum makecache fastsudo yum install -y docker-ce docker-ce-cli containerd.io6、配置docker加速
sudo mkdir -p /etc/docker
sudo tee /etc/docker/daemon.json <<-'EOF'
{
"registry-mirrors": ["https://82m9ar63.mirror.aliyuncs.com"]
}
EOF
sudo systemctl daemon-reload
sudo systemctl restart docker
注意看看daemon.json最后文件是否创建成功,对不对。
7、启动 docker & 设置 docker 开机自启
systemctl enable docker8、添加阿里云 yum 源
cat > /etc/yum.repos.d/kubernetes.repo << EOF
[kubernetes]
name=Kubernetes
baseurl=https://mirrors.aliyun.com/kubernetes/yum/repos/kubernetes-el7-x86_64
enabled=1
gpgcheck=0
repo_gpgcheck=0
gpgkey=https://mirrors.aliyun.com/kubernetes/yum/doc/yum-key.gpg
https://mirrors.aliyun.com/kubernetes/yum/doc/rpm-package-key.gpg
EOF
安装 kubeadm,kubelet 、 kubectl
yum install -y kubelet-1.17.3 kubeadm-1.17.3 kubectl-1.17.31、设置开机启动
systemctl enable kubelet
systemctl start kubelet
2、通过命令查看现在是起不来得,还没配置好。
systemctl status kubelet四、部署 k8s-master
master 节点初始化
1、初始化
注意修改为自己master主机地址,我的master虚拟机IP:10.0.2.15
kubeadm init \
--apiserver-advertise-address=10.0.2.15 \
--image-repository registry.cn-hangzhou.aliyuncs.com/google_containers \
--kubernetes-version v1.17.3 \
--service-cidr=10.96.0.0/16 \
--pod-network-cidr=10.244.0.0/16
2、/root/新建文件夹k8s,然后cd k8s目录,新建master_images.sh文件:注意版本。
#!/bin/bash

images=(
    kube-apiserver:v1.17.3
    kube-proxy:v1.17.3
    kube-controller-manager:v1.17.3
    kube-scheduler:v1.17.3
    coredns:1.6.5
    etcd:3.4.3-0
    pause:3.1
)

for imageName in ${images[@]} ; do
    docker pull registry.cn-hangzhou.aliyuncs.com/google_containers/$imageName
#   docker tag registry.cn-hangzhou.aliyuncs.com/google_containers/$imageName  k8s.gcr.io/$imageName
done
3、修改脚本权限:
chmod 700 master_images.sh4、执行脚本:
./master_images.sh执行结果:
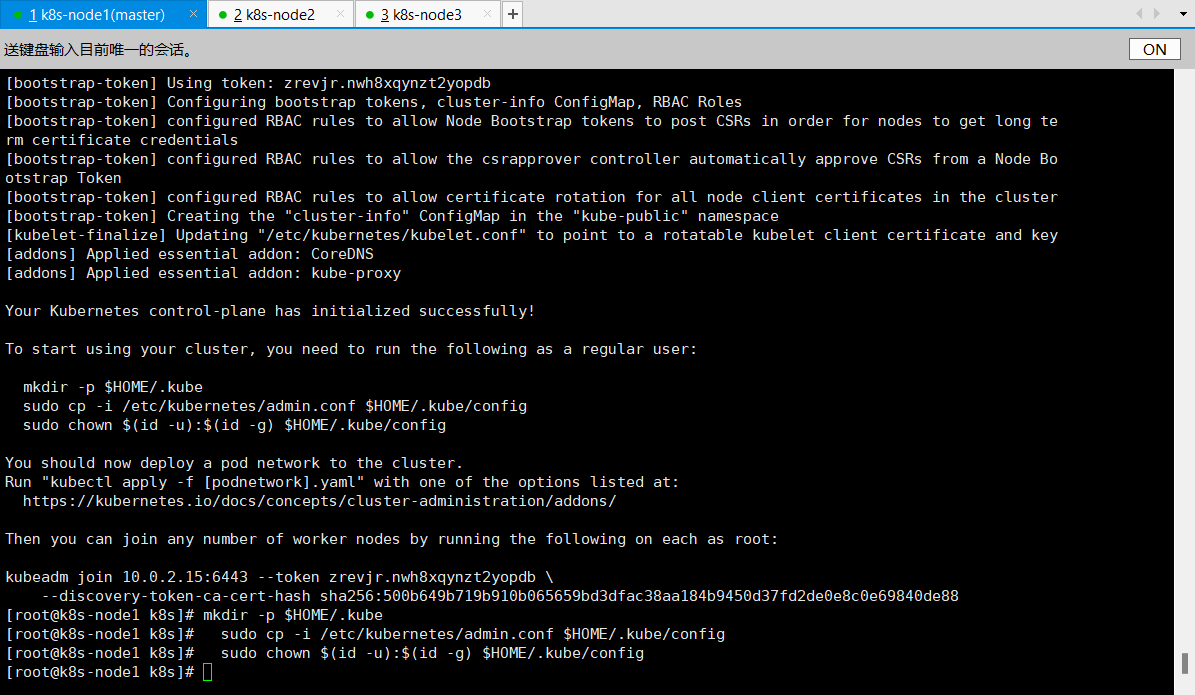
[bootstrap-token] Using token: zrevjr.nwh8xqynzt2yopdb
[bootstrap-token] Configuring bootstrap tokens, cluster-info ConfigMap, RBAC Roles
[bootstrap-token] configured RBAC rules to allow Node Bootstrap tokens to post CSRs in order for nodes to get long term certificate credentials
[bootstrap-token] configured RBAC rules to allow the csrapprover controller automatically approve CSRs from a Node Bootstrap Token
[bootstrap-token] configured RBAC rules to allow certificate rotation for all node client certificates in the cluster
[bootstrap-token] Creating the "cluster-info" ConfigMap in the "kube-public" namespace
[kubelet-finalize] Updating "/etc/kubernetes/kubelet.conf" to point to a rotatable kubelet client certificate and key
[addons] Applied essential addon: CoreDNS
[addons] Applied essential addon: kube-proxy

Your Kubernetes control-plane has initialized successfully!

To start using your cluster, you need to run the following as a regular user:

  mkdir -p $HOME/.kube
  sudo cp -i /etc/kubernetes/admin.conf $HOME/.kube/config
  sudo chown $(id -u):$(id -g) $HOME/.kube/config

You should now deploy a pod network to the cluster.
Run "kubectl apply -f [podnetwork].yaml" with one of the options listed at:
  https://kubernetes.io/docs/concepts/cluster-administration/addons/

Then you can join any number of worker nodes by running the following on each as root:

kubeadm join 10.0.2.15:6443 --token zrevjr.nwh8xqynzt2yopdb \
    --discovery-token-ca-cert-hash sha256:500b649b719b910b065659bd3dfac38aa184b9450d37fd2de0e8c0e69840de88
5、master根据提示执行命令:
mkdir -p $HOME/.kube
sudo cp -i /etc/kubernetes/admin.conf $HOME/.kube/config
sudo chown $(id -u):$(id -g) $HOME/.kube/config
注意:记录下自己上面的打印信息,后面会用到生成的信息。
kubeadm join 10.0.2.15:6443 --token zrevjr.nwh8xqynzt2yopdb \
    --discovery-token-ca-cert-hash sha256:500b649b719b910b065659bd3dfac38aa184b9450d37fd2de0e8c0e69840de88
安装网络插件
1、安装kube-flannel.yml
文件地址https://raw.githubusercontent.com/coreos/flannel/master/Documentation/kube-flannel.yml
kubectl apply -f kube-flannel.yml由于是海外站点可能访问不到,kube-flannel.yml配置文件内容如下:
---
apiVersion: policy/v1beta1
kind: PodSecurityPolicy
metadata:
  name: psp.flannel.unprivileged
  annotations:
    seccomp.security.alpha.kubernetes.io/allowedProfileNames: docker/default
    seccomp.security.alpha.kubernetes.io/defaultProfileName: docker/default
    apparmor.security.beta.kubernetes.io/allowedProfileNames: runtime/default
    apparmor.security.beta.kubernetes.io/defaultProfileName: runtime/default
spec:
  privileged: false
  volumes:
    - configMap
    - secret
    - emptyDir
    - hostPath
  allowedHostPaths:
    - pathPrefix: "/etc/cni/net.d"
    - pathPrefix: "/etc/kube-flannel"
    - pathPrefix: "/run/flannel"
  readOnlyRootFilesystem: false
  # Users and groups
  runAsUser:
    rule: RunAsAny
  supplementalGroups:
    rule: RunAsAny
  fsGroup:
    rule: RunAsAny
  # Privilege Escalation
  allowPrivilegeEscalation: false
  defaultAllowPrivilegeEscalation: false
  # Capabilities
  allowedCapabilities: ['NET_ADMIN']
  defaultAddCapabilities: []
  requiredDropCapabilities: []
  # Host namespaces
  hostPID: false
  hostIPC: false
  hostNetwork: true
  hostPorts:
  - min: 0
    max: 65535
  # SELinux
  seLinux:
    # SELinux is unused in CaaSP
    rule: 'RunAsAny'
---
kind: ClusterRole
apiVersion: rbac.authorization.k8s.io/v1beta1
metadata:
  name: flannel
rules:
  - apiGroups: ['extensions']
    resources: ['podsecuritypolicies']
    verbs: ['use']
    resourceNames: ['psp.flannel.unprivileged']
  - apiGroups:
      - ""
    resources:
      - pods
    verbs:
      - get
  - apiGroups:
      - ""
    resources:
      - nodes
    verbs:
      - list
      - watch
  - apiGroups:
      - ""
    resources:
      - nodes/status
    verbs:
      - patch
---
kind: ClusterRoleBinding
apiVersion: rbac.authorization.k8s.io/v1beta1
metadata:
  name: flannel
roleRef:
  apiGroup: rbac.authorization.k8s.io
  kind: ClusterRole
  name: flannel
subjects:
- kind: ServiceAccount
  name: flannel
  namespace: kube-system
---
apiVersion: v1
kind: ServiceAccount
metadata:
  name: flannel
  namespace: kube-system
---
kind: ConfigMap
apiVersion: v1
metadata:
  name: kube-flannel-cfg
  namespace: kube-system
  labels:
    tier: node
    app: flannel
data:
  cni-conf.json: |
    {
      "name": "cbr0",
      "cniVersion": "0.3.1",
      "plugins": [
        {
          "type": "flannel",
          "delegate": {
            "hairpinMode": true,
            "isDefaultGateway": true
          }
        },
        {
          "type": "portmap",
          "capabilities": {
            "portMappings": true
          }
        }
      ]
    }
  net-conf.json: |
    {
      "Network": "10.244.0.0/16",
      "Backend": {
        "Type": "vxlan"
      }
    }
---
apiVersion: apps/v1
kind: DaemonSet
metadata:
  name: kube-flannel-ds-amd64
  namespace: kube-system
  labels:
    tier: node
    app: flannel
spec:
  selector:
    matchLabels:
      app: flannel
  template:
    metadata:
      labels:
        tier: node
        app: flannel
    spec:
      affinity:
        nodeAffinity:
          requiredDuringSchedulingIgnoredDuringExecution:
            nodeSelectorTerms:
              - matchExpressions:
                  - key: beta.kubernetes.io/os
                    operator: In
                    values:
                      - linux
                  - key: beta.kubernetes.io/arch
                    operator: In
                    values:
                      - amd64
      hostNetwork: true
      tolerations:
      - operator: Exists
        effect: NoSchedule
      serviceAccountName: flannel
      initContainers:
      - name: install-cni
        image: quay.io/coreos/flannel:v0.11.0-amd64
        command:
        - cp
        args:
        - -f
        - /etc/kube-flannel/cni-conf.json
        - /etc/cni/net.d/10-flannel.conflist
        volumeMounts:
        - name: cni
          mountPath: /etc/cni/net.d
        - name: flannel-cfg
          mountPath: /etc/kube-flannel/
      containers:
      - name: kube-flannel
        image: quay.io/coreos/flannel:v0.11.0-amd64
        command:
        - /opt/bin/flanneld
        args:
        - --ip-masq
        - --kube-subnet-mgr
        resources:
          requests:
            cpu: "100m"
            memory: "50Mi"
          limits:
            cpu: "100m"
            memory: "50Mi"
        securityContext:
          privileged: false
          capabilities:
            add: ["NET_ADMIN"]
        env:
        - name: POD_NAME
          valueFrom:
            fieldRef:
              fieldPath: metadata.name
        - name: POD_NAMESPACE
          valueFrom:
            fieldRef:
              fieldPath: metadata.namespace
        volumeMounts:
        - name: run
          mountPath: /run/flannel
        - name: flannel-cfg
          mountPath: /etc/kube-flannel/
      volumes:
        - name: run
          hostPath:
            path: /run/flannel
        - name: cni
          hostPath:
            path: /etc/cni/net.d
        - name: flannel-cfg
          configMap:
            name: kube-flannel-cfg
---
apiVersion: apps/v1
kind: DaemonSet
metadata:
  name: kube-flannel-ds-arm64
  namespace: kube-system
  labels:
    tier: node
    app: flannel
spec:
  selector:
    matchLabels:
      app: flannel
  template:
    metadata:
      labels:
        tier: node
        app: flannel
    spec:
      affinity:
        nodeAffinity:
          requiredDuringSchedulingIgnoredDuringExecution:
            nodeSelectorTerms:
              - matchExpressions:
                  - key: beta.kubernetes.io/os
                    operator: In
                    values:
                      - linux
                  - key: beta.kubernetes.io/arch
                    operator: In
                    values:
                      - arm64
      hostNetwork: true
      tolerations:
      - operator: Exists
        effect: NoSchedule
      serviceAccountName: flannel
      initContainers:
      - name: install-cni
        image: quay.io/coreos/flannel:v0.11.0-arm64
        command:
        - cp
        args:
        - -f
        - /etc/kube-flannel/cni-conf.json
        - /etc/cni/net.d/10-flannel.conflist
        volumeMounts:
        - name: cni
          mountPath: /etc/cni/net.d
        - name: flannel-cfg
          mountPath: /etc/kube-flannel/
      containers:
      - name: kube-flannel
        image: quay.io/coreos/flannel:v0.11.0-arm64
        command:
        - /opt/bin/flanneld
        args:
        - --ip-masq
        - --kube-subnet-mgr
        resources:
          requests:
            cpu: "100m"
            memory: "50Mi"
          limits:
            cpu: "100m"
            memory: "50Mi"
        securityContext:
          privileged: false
          capabilities:
             add: ["NET_ADMIN"]
        env:
        - name: POD_NAME
          valueFrom:
            fieldRef:
              fieldPath: metadata.name
        - name: POD_NAMESPACE
          valueFrom:
            fieldRef:
              fieldPath: metadata.namespace
        volumeMounts:
        - name: run
          mountPath: /run/flannel
        - name: flannel-cfg
          mountPath: /etc/kube-flannel/
      volumes:
        - name: run
          hostPath:
            path: /run/flannel
        - name: cni
          hostPath:
            path: /etc/cni/net.d
        - name: flannel-cfg
          configMap:
            name: kube-flannel-cfg
---
apiVersion: apps/v1
kind: DaemonSet
metadata:
  name: kube-flannel-ds-arm
  namespace: kube-system
  labels:
    tier: node
    app: flannel
spec:
  selector:
    matchLabels:
      app: flannel
  template:
    metadata:
      labels:
        tier: node
        app: flannel
    spec:
      affinity:
        nodeAffinity:
          requiredDuringSchedulingIgnoredDuringExecution:
            nodeSelectorTerms:
              - matchExpressions:
                  - key: beta.kubernetes.io/os
                    operator: In
                    values:
                      - linux
                  - key: beta.kubernetes.io/arch
                    operator: In
                    values:
                      - arm
      hostNetwork: true
      tolerations:
      - operator: Exists
        effect: NoSchedule
      serviceAccountName: flannel
      initContainers:
      - name: install-cni
        image: quay.io/coreos/flannel:v0.11.0-arm
        command:
        - cp
        args:
        - -f
        - /etc/kube-flannel/cni-conf.json
        - /etc/cni/net.d/10-flannel.conflist
        volumeMounts:
        - name: cni
          mountPath: /etc/cni/net.d
        - name: flannel-cfg
          mountPath: /etc/kube-flannel/
      containers:
      - name: kube-flannel
        image: quay.io/coreos/flannel:v0.11.0-arm
        command:
        - /opt/bin/flanneld
        args:
        - --ip-masq
        - --kube-subnet-mgr
        resources:
          requests:
            cpu: "100m"
            memory: "50Mi"
          limits:
            cpu: "100m"
            memory: "50Mi"
        securityContext:
          privileged: false
          capabilities:
             add: ["NET_ADMIN"]
        env:
        - name: POD_NAME
          valueFrom:
            fieldRef:
              fieldPath: metadata.name
        - name: POD_NAMESPACE
          valueFrom:
            fieldRef:
              fieldPath: metadata.namespace
        volumeMounts:
        - name: run
          mountPath: /run/flannel
        - name: flannel-cfg
          mountPath: /etc/kube-flannel/
      volumes:
        - name: run
          hostPath:
            path: /run/flannel
        - name: cni
          hostPath:
            path: /etc/cni/net.d
        - name: flannel-cfg
          configMap:
            name: kube-flannel-cfg
---
apiVersion: apps/v1
kind: DaemonSet
metadata:
  name: kube-flannel-ds-ppc64le
  namespace: kube-system
  labels:
    tier: node
    app: flannel
spec:
  selector:
    matchLabels:
      app: flannel
  template:
    metadata:
      labels:
        tier: node
        app: flannel
    spec:
      affinity:
        nodeAffinity:
          requiredDuringSchedulingIgnoredDuringExecution:
            nodeSelectorTerms:
              - matchExpressions:
                  - key: beta.kubernetes.io/os
                    operator: In
                    values:
                      - linux
                  - key: beta.kubernetes.io/arch
                    operator: In
                    values:
                      - ppc64le
      hostNetwork: true
      tolerations:
      - operator: Exists
        effect: NoSchedule
      serviceAccountName: flannel
      initContainers:
      - name: install-cni
        image: quay.io/coreos/flannel:v0.11.0-ppc64le
        command:
        - cp
        args:
        - -f
        - /etc/kube-flannel/cni-conf.json
        - /etc/cni/net.d/10-flannel.conflist
        volumeMounts:
        - name: cni
          mountPath: /etc/cni/net.d
        - name: flannel-cfg
          mountPath: /etc/kube-flannel/
      containers:
      - name: kube-flannel
        image: quay.io/coreos/flannel:v0.11.0-ppc64le
        command:
        - /opt/bin/flanneld
        args:
        - --ip-masq
        - --kube-subnet-mgr
        resources:
          requests:
            cpu: "100m"
            memory: "50Mi"
          limits:
            cpu: "100m"
            memory: "50Mi"
        securityContext:
          privileged: false
          capabilities:
             add: ["NET_ADMIN"]
        env:
        - name: POD_NAME
          valueFrom:
            fieldRef:
              fieldPath: metadata.name
        - name: POD_NAMESPACE
          valueFrom:
            fieldRef:
              fieldPath: metadata.namespace
        volumeMounts:
        - name: run
          mountPath: /run/flannel
        - name: flannel-cfg
          mountPath: /etc/kube-flannel/
      volumes:
        - name: run
          hostPath:
            path: /run/flannel
        - name: cni
          hostPath:
            path: /etc/cni/net.d
        - name: flannel-cfg
          configMap:
            name: kube-flannel-cfg
---
apiVersion: apps/v1
kind: DaemonSet
metadata:
  name: kube-flannel-ds-s390x
  namespace: kube-system
  labels:
    tier: node
    app: flannel
spec:
  selector:
    matchLabels:
      app: flannel
  template:
    metadata:
      labels:
        tier: node
        app: flannel
    spec:
      affinity:
        nodeAffinity:
          requiredDuringSchedulingIgnoredDuringExecution:
            nodeSelectorTerms:
              - matchExpressions:
                  - key: beta.kubernetes.io/os
                    operator: In
                    values:
                      - linux
                  - key: beta.kubernetes.io/arch
                    operator: In
                    values:
                      - s390x
      hostNetwork: true
      tolerations:
      - operator: Exists
        effect: NoSchedule
      serviceAccountName: flannel
      initContainers:
      - name: install-cni
        image: quay.io/coreos/flannel:v0.11.0-s390x
        command:
        - cp
        args:
        - -f
        - /etc/kube-flannel/cni-conf.json
        - /etc/cni/net.d/10-flannel.conflist
        volumeMounts:
        - name: cni
          mountPath: /etc/cni/net.d
        - name: flannel-cfg
          mountPath: /etc/kube-flannel/
      containers:
      - name: kube-flannel
        image: quay.io/coreos/flannel:v0.11.0-s390x
        command:
        - /opt/bin/flanneld
        args:
        - --ip-masq
        - --kube-subnet-mgr
        resources:
          requests:
            cpu: "100m"
            memory: "50Mi"
          limits:
            cpu: "100m"
            memory: "50Mi"
        securityContext:
          privileged: false
          capabilities:
             add: ["NET_ADMIN"]
        env:
        - name: POD_NAME
          valueFrom:
            fieldRef:
              fieldPath: metadata.name
        - name: POD_NAMESPACE
          valueFrom:
            fieldRef:
              fieldPath: metadata.namespace
        volumeMounts:
        - name: run
          mountPath: /run/flannel
        - name: flannel-cfg
          mountPath: /etc/kube-flannel/
      volumes:
        - name: run
          hostPath:
            path: /run/flannel
        - name: cni
          hostPath:
            path: /etc/cni/net.d
        - name: flannel-cfg
          configMap:
            name: kube-flannel-cfg
2、查看所有名称空间的 pods
注意注意:多等一会,如果一直Pending状态,缺少网络插件,需要重新部署flannel网络插件。

处理方案:执行脚本
kubectl apply -f https://docs.projectcalico.org/v3.14/manifests/calico.yaml重新查看:如果都是Running表示安装成功。
kubectl get pods --all-namespaces
查看节点信息:
kubectl get nodes
加入节点
1、在 Node2、node3 节点执行,上面初始化master时生成的,加入:
kubeadm join 10.0.2.15:6443 --token zrevjr.nwh8xqynzt2yopdb \
--discovery-token-ca-cert-hash sha256:500b649b719b910b065659bd3dfac38aa184b9450d37fd2de0e8c0e69840de88 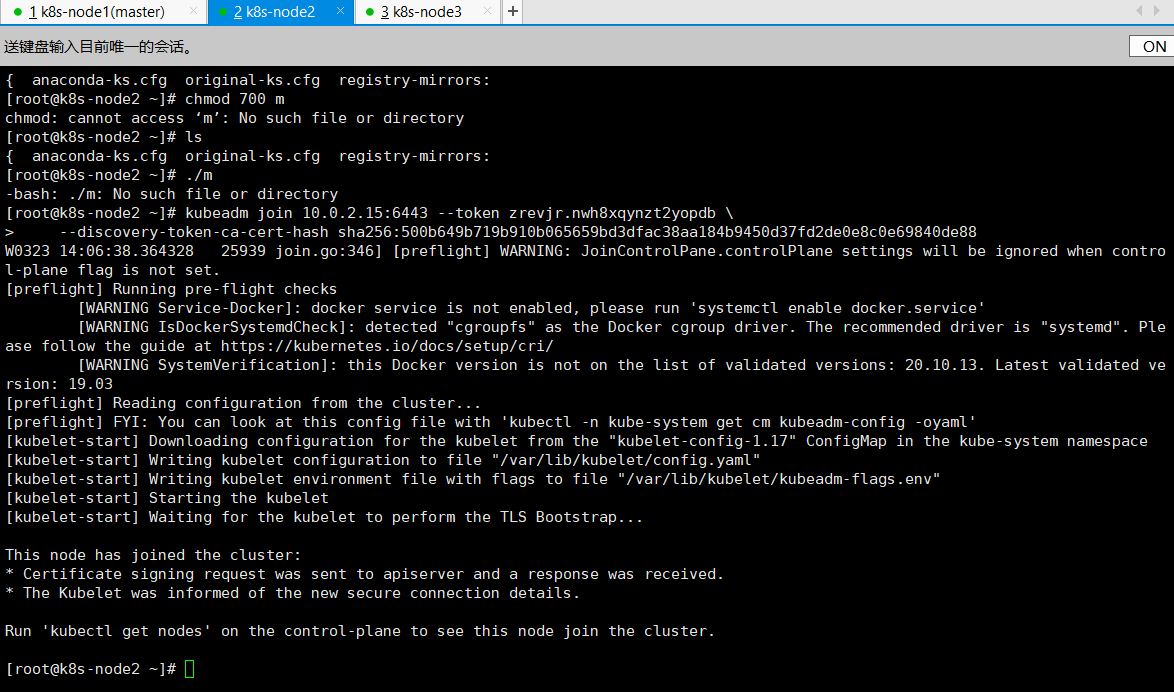
2、查看节点信息:多等一会等全部Ready时表示成功。
kubectl get nodes
可监控 pod进度:
watch kubectl get pod -n kube-system -o wide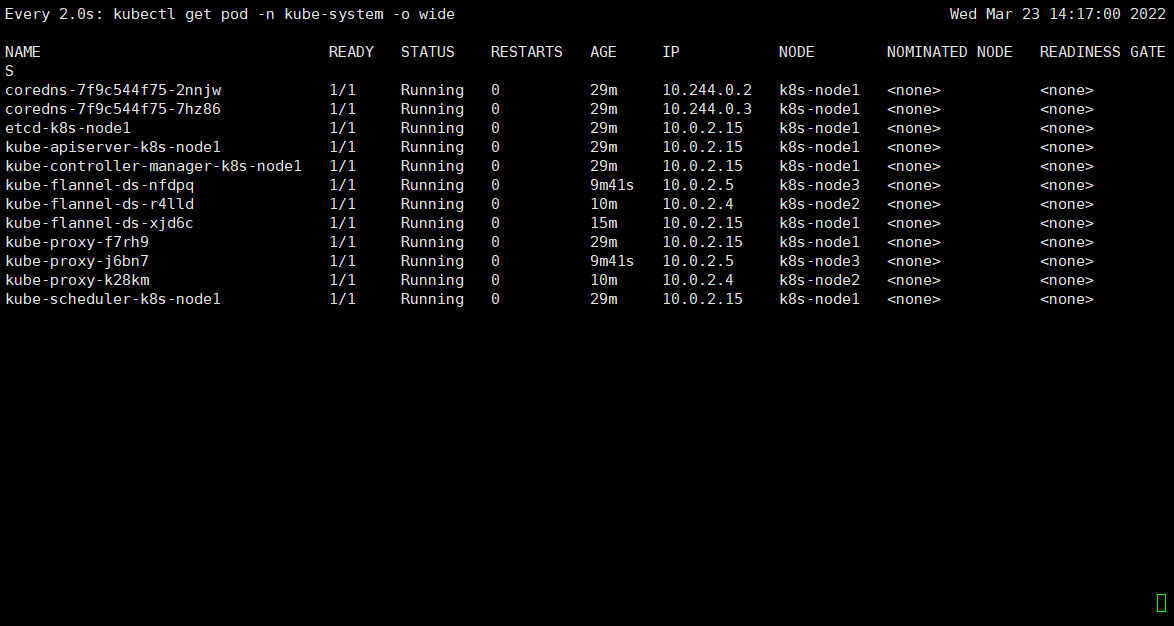
再次查看节点信息:
kubectl get nodes
此时都是Ready状态,整个集群就搭建成功了。一个manster+2个node节点。
五、K8S测试
1、master自动选择哪个节点,部署一个 tomcat。
kubectl create deployment tomcat6 --image=tomcat:6.0.53-jre8说明:
tomcat6:部署应用名称
image:镜像
获取到 tomcat 信息

查看资源:
kubectl get all查看更详细信息:
kubectl get all -o wide
可以看到tomcat部署在了node3节点。
在node3执行docker命令可以看到tomcat已经执行:
docker imagesdocker ps
查看默认命名空间信息:
kubectl get pods查看全部命名空间信息:
kubectl get pods --all-namespaces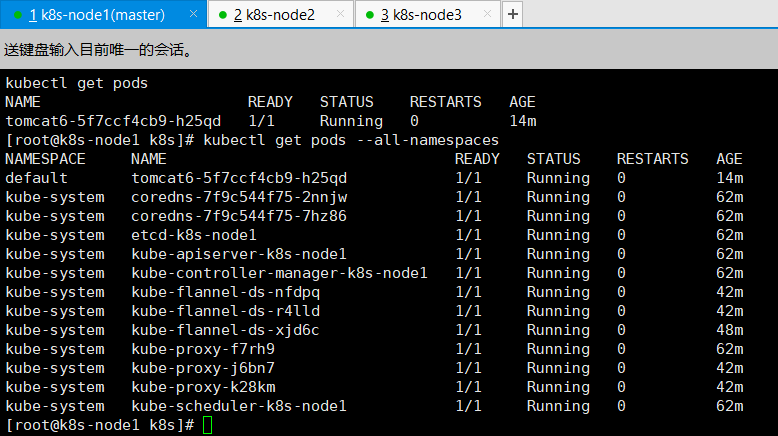
2、容灾恢复
node3节点模拟宕机,停掉tomcat应用:
docker stop 9f2fad305252会自动再部署一个tomcat容器。
node3节点直接关机测试模拟宕机。
查看节点信息node3已经是noready
kubectl get nodes
查看详细信息:
kubectl get pods -o wide此时node2节点已经在拉去创建tomcat镜像创建tomcat了

node2节点查看docker信息,已经有tomcat了:
docker imagesdocker ps
这就是所谓的容灾恢复。
3、暴露 nginx 访问
kubectl expose deployment tomcat6 --port=80 --target-port=8080 --type=NodePort说明:
Pod 的 80 映射容器的 8080;
service 会代理 Pod 的 80端口。

查看服务信息:svc(service的简写)
kubectl get svc -o wide
然后就可以通过http://192.168.56.101:32476/访问了

查看信息:
kubectl get all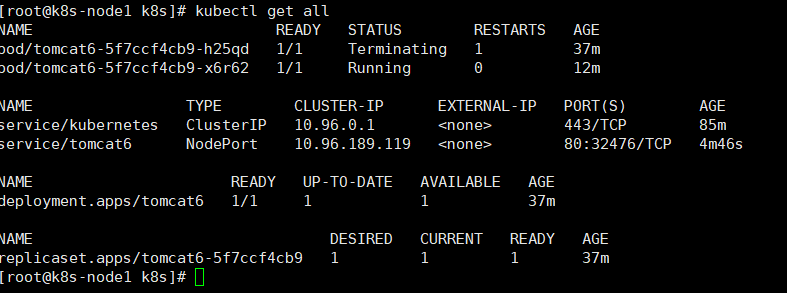
4、动态扩容测试
kubectl scale --replicas=3 deployment tomcat6扩容了多份,所有无论访问哪个 node 的指定端口,都可以访问到 tomcat6。上面扩容了3个tomcat6.
查看扩容后情况:
kubectl get pods -o wide查看服务端口信息:
kubectl get svc -o wide
此时通过任何节点32476端口都可以访问tomcat了。
缩容同样可以实现:
kubectl scale --replicas=1 deployment tomcat65、删除部署
查看资源信息
kubectl get all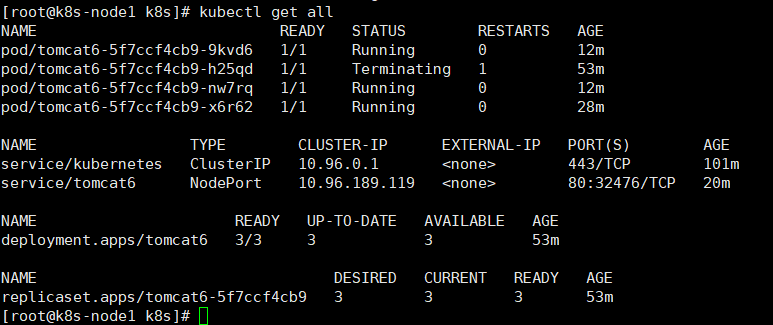
删除整个部署信息
kubectl delete deployment.apps/tomcat6此时再查看
kubectl get allkubectl get pods已经没有tomcat部署信息了
流程:创建 deployment 会管理 replicas,replicas 控制 pod 数量,有 pod 故障会自动拉起 新的 pod。
六、kubesphere最小化安装
安装helm
Helm 是Kubernetes 的包管理器。包管理器类似于我们在Ubuntu 中使用的apt、Centos中使用的yum 或者Python 中的pip 一样,能快速查找、下载和安装软件包。Helm 由客户端组件helm 和服务端组件Tiller 组成, 能够将一组K8S 资源打包统一管理, 是查找、共享和使用为Kubernetes 构建的软件的最佳方式。有3种安装方案,推荐第三种方案。
1、helm安装
方案一:直接下载安装
curl -L https://git.io/get_helm.sh | bash方案二:使用通过给定的get_helm.sh脚本安装。
chmod 700 get_helm.sh然后执行安装
./get_helm.sh可能有文件格式兼容性问题,用vi 打开该sh 文件,输入:
:set ff
回车,显示fileformat=dos,重新设置下文件格式:
:set ff=unix
保存退出:
:wq
方案三:上面2种方案都需要可以访问外网。因此有了这种离线安装方案。
离线下载安装,推荐使用这种国内。注意:指定版本才行,其他版本官网不支持。
1、下载离线安装包
https://get.helm.sh/helm-v2.16.3-linux-amd64.tar.gz2、解压
tar -zxvf helm-v2.16.3-linux-amd64.tar.gz3、安装
cp linux-amd64/helm /usr/local/bin
cp linux-amd64/tiller /usr/local/bin
4、修改权限
chmod 777 /usr/local/bin/helm
chmod 777 /usr/local/bin/tiller
5、验证:
helm version
2、授权文件配置
创建权限(只需要master 执行),创建授权文件helm-rbac.yaml,内容如下:
apiVersion: v1
kind: ServiceAccount
metadata:
  name: tiller
  namespace: kube-system
---
apiVersion: rbac.authorization.k8s.io/v1
kind: ClusterRoleBinding
metadata:
  name: tiller
roleRef:
  apiGroup: rbac.authorization.k8s.io
  kind: ClusterRole
  name: cluster-admin
subjects:
  - kind: ServiceAccount
    name: tiller
    namespace: kube-system
应用配置文件:
kubectl apply -f helm-rbac.yaml3、安装Tiller
(master 执行)
初始化:
helm init --service-account tiller --upgrade \
-i registry.cn-hangzhou.aliyuncs.com/google_containers/tiller:v2.16.3 \
--stable-repo-url https://kubernetes.oss-cn-hangzhou.aliyuncs.com/charts
查看:
kubectl get pods --all-namespaces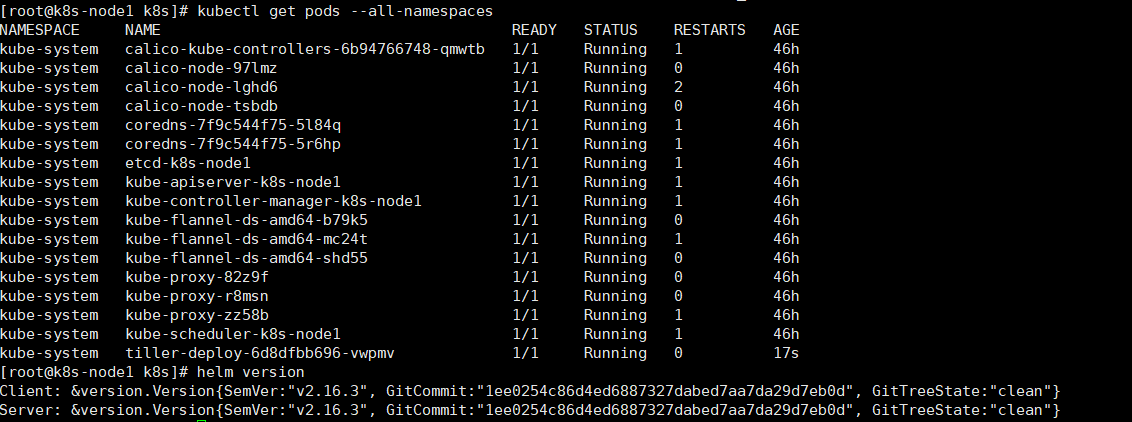
3、去掉 master 节点的 Taint
等所有组件Running后,确认 master 节点是否有 Taint,如下表示master 节点有 Taint。
kubectl describe node k8s-node1 | grep Taint
去掉污点,否则污点会影响OpenEBS安装:
kubectl taint nodes k8s-node1 node-role.kubernetes.io/master:NoSchedule-安装 OpenEBS
创建 OpenEBS 的 namespace,OpenEBS 相关资源将创建在这个 namespace 下:
kubectl create ns openebs安装 OpenEBS
如果直接安装可能会报错:"Error: failed to download "stable/openebs" (hint: running
helm repo updatemay help"解决方法:换镜像
helm repo remove stable
helm repo add stable http://mirror.azure.cn/kubernetes/charts
执行安装
helm install --namespace openebs --name openebs stable/openebs --version 1.5.0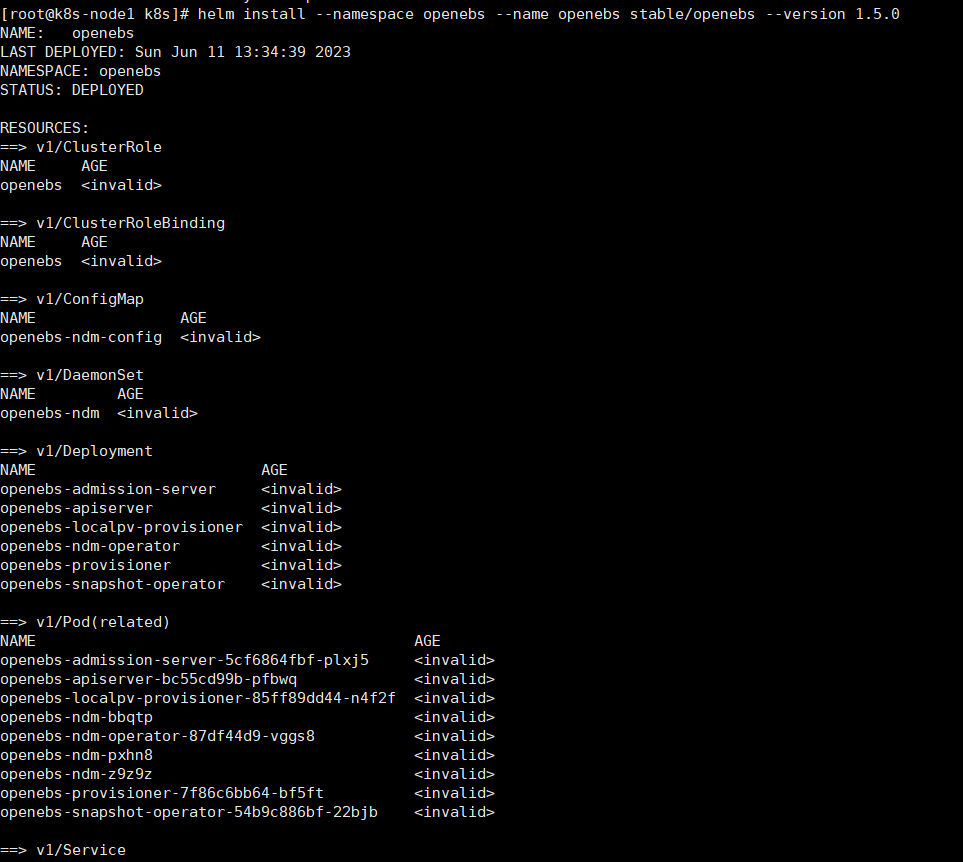
3、安装 OpenEBS 后将自动创建 4 个 StorageClass,查看创建的 StorageClass:
kubectl get sc
4、将 openebs-hostpath设置为 默认的 StorageClass:
kubectl patch storageclass openebs-hostpath -p '{"metadata": {"annotations":{"storageclass.kubernetes.io/is-default-class":"true"}}}'最小化安装kubesphere
下载最小化安装配置文件kubesphere-mini.yaml内容如下:
---
apiVersion: v1
kind: Namespace
metadata:
  name: kubesphere-system

---
apiVersion: v1
data:
  ks-config.yaml: |
    ---
    persistence:
      storageClass: ""
    etcd:
      monitoring: False
      endpointIps: 192.168.0.7,192.168.0.8,192.168.0.9
      port: 2379
      tlsEnable: True
    common:
      mysqlVolumeSize: 20Gi
      minioVolumeSize: 20Gi
      etcdVolumeSize: 20Gi
      openldapVolumeSize: 2Gi
      redisVolumSize: 2Gi
    metrics_server:
      enabled: False
    console:
      enableMultiLogin: False  # enable/disable multi login
      port: 30880
    monitoring:
      prometheusReplicas: 1
      prometheusMemoryRequest: 400Mi
      prometheusVolumeSize: 20Gi
      grafana:
        enabled: False
    logging:
      enabled: False
      elasticsearchMasterReplicas: 1
      elasticsearchDataReplicas: 1
      logsidecarReplicas: 2
      elasticsearchMasterVolumeSize: 4Gi
      elasticsearchDataVolumeSize: 20Gi
      logMaxAge: 7
      elkPrefix: logstash
      containersLogMountedPath: ""
      kibana:
        enabled: False
    openpitrix:
      enabled: False
    devops:
      enabled: False
      jenkinsMemoryLim: 2Gi
      jenkinsMemoryReq: 1500Mi
      jenkinsVolumeSize: 8Gi
      jenkinsJavaOpts_Xms: 512m
      jenkinsJavaOpts_Xmx: 512m
      jenkinsJavaOpts_MaxRAM: 2g
      sonarqube:
        enabled: False
        postgresqlVolumeSize: 8Gi
    servicemesh:
      enabled: False
    notification:
      enabled: False
    alerting:
      enabled: False
kind: ConfigMap
metadata:
  name: ks-installer
  namespace: kubesphere-system

---
apiVersion: v1
kind: ServiceAccount
metadata:
  name: ks-installer
  namespace: kubesphere-system

---
apiVersion: rbac.authorization.k8s.io/v1
kind: ClusterRole
metadata:
  creationTimestamp: null
  name: ks-installer
rules:
- apiGroups:
  - ""
  resources:
  - '*'
  verbs:
  - '*'
- apiGroups:
  - apps
  resources:
  - '*'
  verbs:
  - '*'
- apiGroups:
  - extensions
  resources:
  - '*'
  verbs:
  - '*'
- apiGroups:
  - batch
  resources:
  - '*'
  verbs:
  - '*'
- apiGroups:
  - rbac.authorization.k8s.io
  resources:
  - '*'
  verbs:
  - '*'
- apiGroups:
  - apiregistration.k8s.io
  resources:
  - '*'
  verbs:
  - '*'
- apiGroups:
  - apiextensions.k8s.io
  resources:
  - '*'
  verbs:
  - '*'
- apiGroups:
  - tenant.kubesphere.io
  resources:
  - '*'
  verbs:
  - '*'
- apiGroups:
  - certificates.k8s.io
  resources:
  - '*'
  verbs:
  - '*'
- apiGroups:
  - devops.kubesphere.io
  resources:
  - '*'
  verbs:
  - '*'
- apiGroups:
  - monitoring.coreos.com
  resources:
  - '*'
  verbs:
  - '*'
- apiGroups:
  - logging.kubesphere.io
  resources:
  - '*'
  verbs:
  - '*'
- apiGroups:
  - jaegertracing.io
  resources:
  - '*'
  verbs:
  - '*'
- apiGroups:
  - storage.k8s.io
  resources:
  - '*'
  verbs:
  - '*'
- apiGroups:
  - admissionregistration.k8s.io
  resources:
  - '*'
  verbs:
  - '*'

---
kind: ClusterRoleBinding
apiVersion: rbac.authorization.k8s.io/v1
metadata:
  name: ks-installer
subjects:
- kind: ServiceAccount
  name: ks-installer
  namespace: kubesphere-system
roleRef:
  kind: ClusterRole
  name: ks-installer
  apiGroup: rbac.authorization.k8s.io

---
apiVersion: apps/v1
kind: Deployment
metadata:
  name: ks-installer
  namespace: kubesphere-system
  labels:
    app: ks-install
spec:
  replicas: 1
  selector:
    matchLabels:
      app: ks-install
  template:
    metadata:
      labels:
        app: ks-install
    spec:
      serviceAccountName: ks-installer
      containers:
      - name: installer
        image: kubesphere/ks-installer:v2.1.1
        imagePullPolicy: "Always"
1、执行安装
kubectl apply -f kubesphere-mini.yaml
2、等所有pod启动好后,执行日志查看。
查看所有pod状态
kubectl get pods --all-namespaces
查看所有节点:
kubectl get nodes
3、查看日志:
kubectl logs -n kubesphere-system $(kubectl get pod -n kubesphere-system -l app=ks-install -o jsonpath='{.items[0].metadata.name}') -f最后控制台显示:

4、最后,由于在文档开头手动去掉了 master 节点的 Taint,我们可以在安装完 OpenEBS 和 KubeSphere 后,可以将 master 节点 Taint 加上,避免业务相关的工作负载调度到 master 节点抢占 master 资源:
kubectl describe node k8s-node1 | grep Taint添加Taint:
kubectl taint nodes k8s-node1 node-role.kubernetes.io/master=:NoSchedule5、访问测试
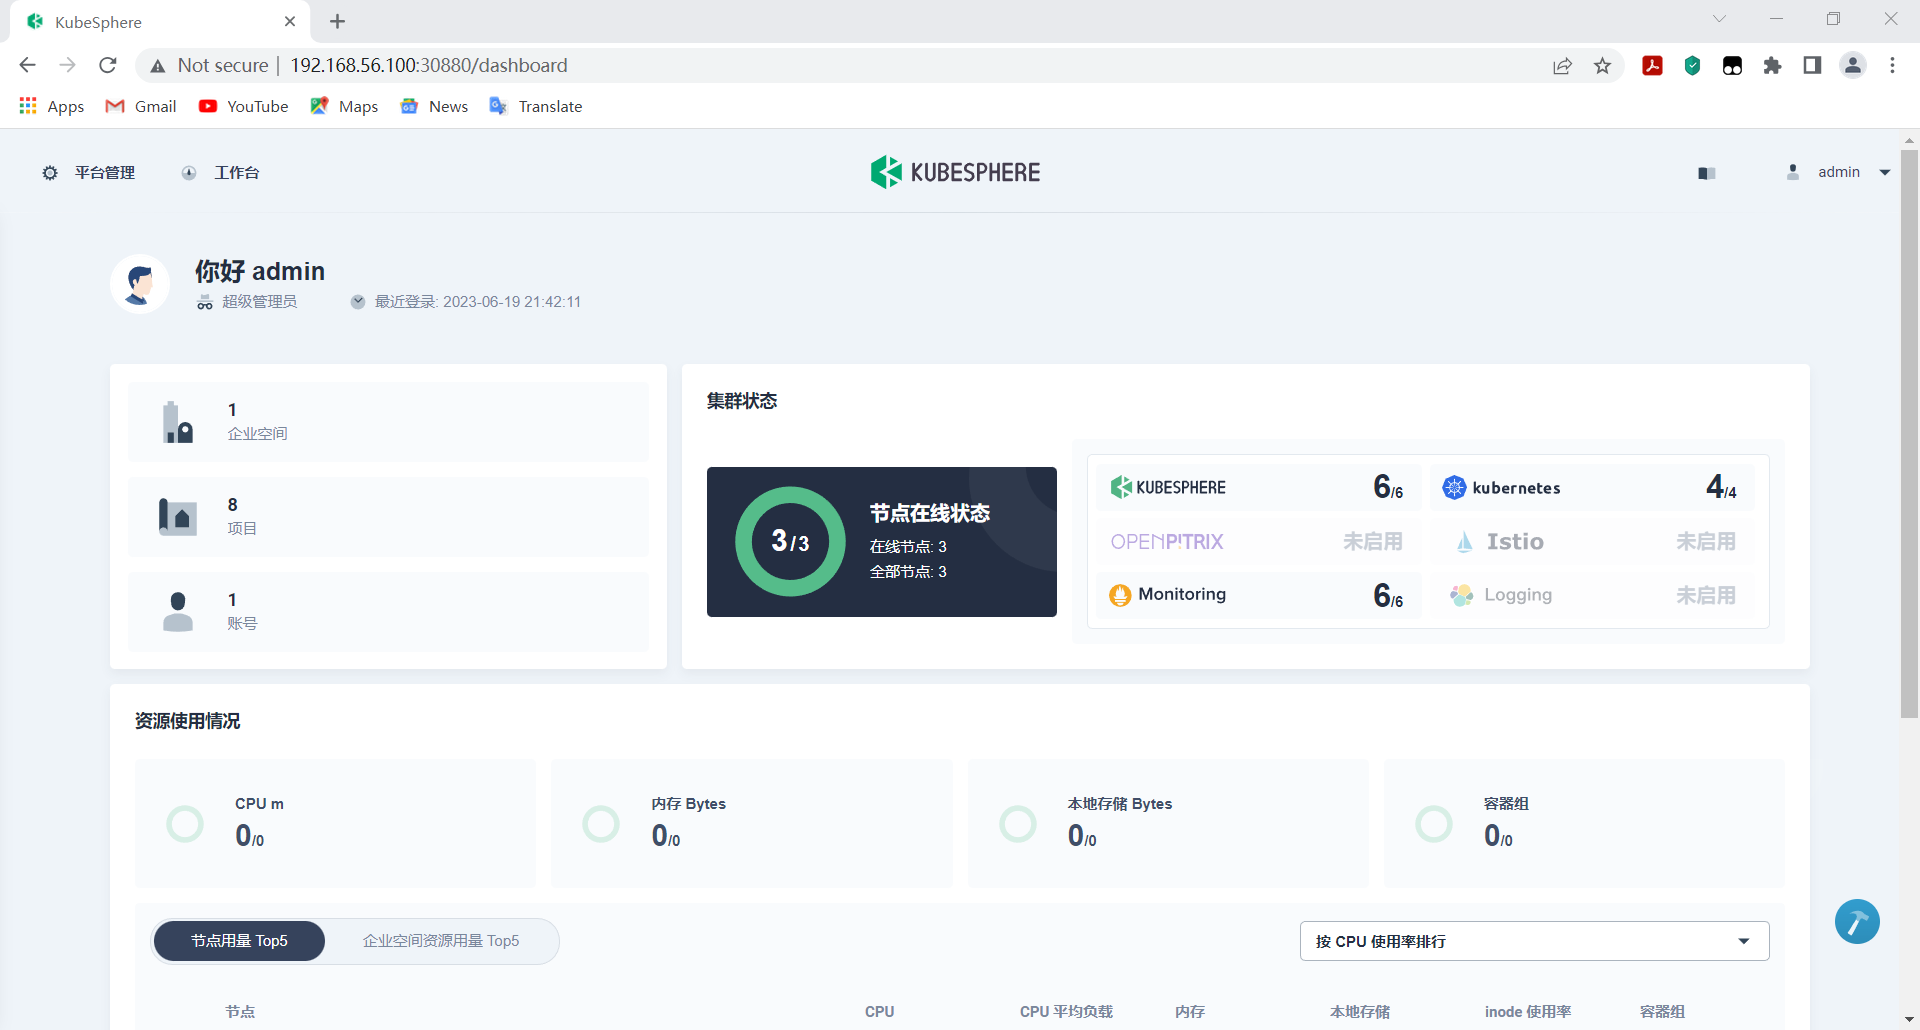
注意:日志如果显示的是内网地址,也可以直接通过Net网络IP地址地址访问。
http://192.168.56.100:30880/dashboard
默认账号:admin 密码:P@88w0rd
七、定制化安装
master节点执行下面命令,修改需要开启的功能为True保存后会自动安装新开启的组件。
kubectl edit cm -n kubesphere-system ks-installer同样可以通过命令监听安装情况:
kubectl logs -n kubesphere-system $(kubectl get pod -n kubesphere-system -l app=ks-install -o jsonpath='{.items[0].metadata.name}') -f



评论 (0)